How To...Create A Template
Welcome to this "how to create a template" guide. Disclaimer, I'm a humble hobbyist Wiki editor, with zero formal training in coding. The information I provide in the guide has been learned from trial and error, internet research and from the many discussions I've had with other members of the Horizon Wiki community. I plan to continue adding to the guide as I learn more, so please check back from time to time if there is nothing of use to you right now. I appreciate advice and anyone who is willing to proof-read this guide; feel free to reach out to me on the Wiki discord @pendulum/spiffly with any feedback.
The Basics
There are many uses for templates but in their simplest form, they are simply a page that an editor has created that can then be called upon on other pages. The name for this process is "Transclusion".
You could create a template to:
- Show an image
- Add text
- Provide a pre-made table
- Categorise a page
- Be used in conjunction with other Wiki features eg. dpl tables.
- There are simply too many use cases to list them all.
If I create a template called "Template:Animals" and add the text "Welcome to this page, all about" to the page, I can then call this template (and text) on any page I choose, eg. "Dog", "Cat" etc. To call the template, I would simply write the following:
{{Animals}}
I can then add the name of each animal after the template call. So on the dog page, I can write:
{{Animals}} Dogs!
Which will then appear on the page as:
Welcome to this page, all about Dogs!
Parameters
Parameters can be used to allow an editor to eaisly add information to a page, which will then be displayed in a pre-determined way. The name "Infobox" is commonly used to describe this and it's more easily described with examples.
First of all the template needs some code so it knows how to display the information an editor will provide. I will use a simple table in my example. On the left is my table code and on the right is the simple table it produces.
The code
{| width="50% border="1px #aaa solid";
! style="border:1px #aaa solid" colspan="2"| Animals
|-
! style="border:1px #aaa solid" width="50%" | Type
| style="border:1px #aaa solid" width="50%" |
|}
The table it creates
| Animals | |
|---|---|
| Type | |
Pre-Defined
Now that I have my table, it's time to add a parameter. Looking at the table, we need to add the "type" parameter, which will fill the empty table cell, adjacent to type. To create a parameter, we simply surround text with 3 curly brackets, like so:
{{{type}}}
Whatever text we surround is the parameter name and is our pre-defined parameter. Essentially this means that we have named it and thus must use that name if we wish to use it. However first of all, we need to add this parameter to our table.
|-
! style="border:1px #aaa solid" width="50%" | Type
| style="border:1px #aaa solid" width="50%" | {{{type}}}
We can now use the template and the pre-defined parameter. In the example below is how to use the template and it's filled parameter, followed by what it outputs.
How to use the template
{{Animals
| type = Rabbit
}}
What it returns
| Animals | |
|---|---|
| Type | Rabbit |
Undefined Parameter
An undefined parameter is one that we haven't named. On our template page we simply surround the number 1 with 3 curly brackets, to create it. If we wish to have a second, we would then surround the number 2 with th brackets. So on and so forth for as many parameters as is necessary.
In our example below: we have our code, how we would call the template finally how it will appear. We will be sticking with the template name of "Animals".
The code
<h2> Animals </h2>
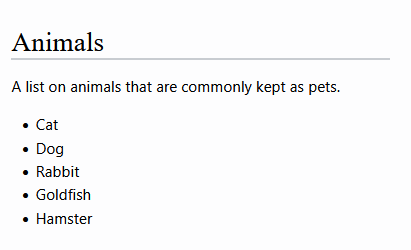
A list on animals that are commonly kept as pets.
* {{{1}}}
* {{{2}}}
* {{{3}}}
* {{{4}}}
* {{{5}}}
Calling the template
{{Animals
|Cat
|Dog
|Rabbit
|Goldfish
|Hamster
}}
I have created a list for this example. I can use the template to format the list however I wish and that formatting will apply every time the template is used.
Documentation
Need to write about this.
Examples
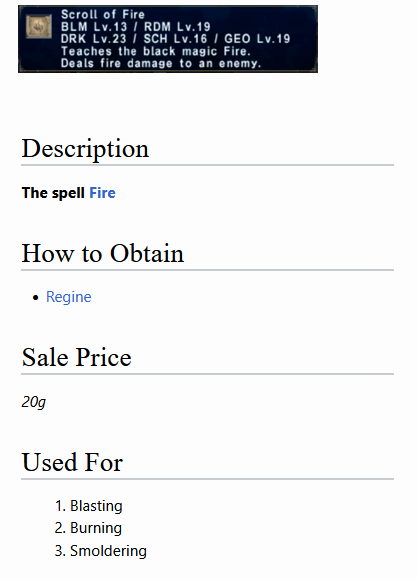
This template will be called {{Items}} and will demonstrate how to create a page template that editors add information to with ease. I'm using the example to show various ways to apply formatting, such as: adding images and setting a standard picture format, appling bold and italic, how the editor can still add their own internal wiki and two forms of lists (bullet points and numbered).
The code
[[File:{{{image}}}.png|300px|left]]

{| width="100%"|
| align="left"|
<h2>Description</h2>
'''{{{description}}}'''

<h2> How to Obtain </h2>
* {{{obtain}}}

<h2> Sale Price </h2>
''{{{sale price}}}g''

<h2> Used For </h2>
# {{{1}}}
# {{{2}}}
# {{{3}}}
|}

__notoc__

[[Category:Items]]
Calling the Template
{{Test
|image=Scroll_of_Fire
|description=The spell [[fire]]
|obtain=[[Regine]]
|sale price=20
|Blasting
|Burning
|Smoldering
}}
As a word of warning, take care when combining defined and non-defined parameters, as it would be quite easy to confuse an editor as which parameters need to be defined and which do not. Sometimes it may be better to define all parameters and name them eg. "item1", "item2", "item3" etc.
No Include, Include Only & Only Include
These wiki markups are used to give transclusion instructions to the code on a page. They are useful when creating template because you need to make sure that your template code can appear on other pages, but also to make sure that other information on your template page, such as documentation, stays on the page. This is where < noinclude >, < includeonly > and < onlyinclude > come into play (spaces have been added purposefully as we don't want them affecting the code on this page!). This page provides a really useful explanation of each one:
- < noinclude > Any text between the tags is visible exclusively on the source page and cannot be transcluded onto another page. This is useful for template documentation and categories.
- < includeonly > Any text between the tags will be hidden on the source page and visible only when transcluded onto a different page. This can be useful, for example, for adding categories to pages transcluding a template, without adding the template itself to these categories.
- < onlyinclude > Any text between the tags will be visible on the source page and visible when transcluded onto a different page. This is the most subtle of the partial transclusion tags because it often overrules the others. If there is at least one pair of "onlyinclude" tags on a page, then whenever this page is transcluded, it is only the material within the "onlyinclude" tags that is transcluded. There can be several such "onlyinclude" sections on a page. This can be useful, for example, to repeat a small part of one page on a second one: just surround the small part by onlyinclude tags, and transclude it onto the second page.
Confusing right? A litte rule of thumb is to use < noinclude > for keeping documentation on template pages. Use a mixture of the other two when trying to transclude your templates code. Sadly there's no one size fits all method here, trial and error will be necessary.
Conditionals (if-functions)
MediaWiki offers a couple of options when it comes to conditionals. These have unique behavior which might surprise you if you have a background in other programming languages
Parameter Pipe
The pipe-character "|" used in parameters is a fundamental MediaWiki syntax with widespread use. It acts as a conditional that checks if the parameter has been given or not.
The syntax is
{{{<parameter name>|<output if parameter is empty>}}}
Example:
Assume the following template called "Animals":
Welcome to this page, all about {{{animal}}}s! Sound: {{{sound|none}}}
If you use this template with the parameter "sound" like this:
{{Animals
|animal=dog
|sound=bark
}}
You get:
Welcome to this page, all about dogs! Sound: bark
If you omit the parameter sound, the alternative output after the pipe will be returned, so
{{Animals
|animal=dog
|sound=bark
}}
you get:
Welcome to this page, all about dogs! Sound: none
Notes:
- The confusing part about this syntax is that while the part before the pipe is the parameter name, the part after the pipe is the literal output.
- This can be used to chain parameters in a template like {{{parameter 1|{{{parameter 2|{{{parameter 3|}}}}}}}}}, which will output parameter 2 if parameter 1 is not given, parameter 3 if parameter 2 is not given either, and nothing if neither parameter 1, 2 or 3 are given.
Important: If the parameter is given in the use of the template but it is empty, it will return the empty value, not trigger the return of the alternative output. To catch empty inputs, you need to use real conditional functions, see the next section.
So with the input:
{{Animals
|animal=dog
|sound=
}}
You get:
Welcome to this page, all about dogs! Sound:
Since the parameter is given (as empty), the alternative behind the pipe is not used but the parameter is returned as given.
if
{{#if: <condition> | <do this if true> | <do this if false>}}
This basically reads "If <condition> is true, then return <do this if true>, else return <do this if false>"
The if-function evaluates the condition it is given and then decides whether to return its first or its second argument. To properly use this, it is important to know what MediaWiki considers als "true" (to return the first argument) and what as "false" (to return the second argument):
- The only condition that evaluates as false is an empty parameter
That means, whatever you put in as <condition>, the if-function will always return its first argument, unless you input nothing as condition.
The most common use case for this is to check in a template whether or not a parameter has been used or not. For example:
Assume you have the following template called "Animals":
Welcome to this page, all about {{{animal}}}s! {{#if: {{{sound|}}} | They {{{sound}}}. | }}
Note the pipe-character "|" in the condition, this will make sure that if the {{{sound}}} is not given, it will return empty. If the pipe is not used and the parameter is not given, MediaWiki will literally return {{{sound}}} in the condition, which is not empty and therefore the condition evaluates as true.
If you use it like
{{Animals
| animal = dog
| sound = bark
}}
You get:
Welcome to this page, all about dogs! They bark.
If you were to omit the parameter sound
like
{{Animals
| animal = dog
}}
|
or
{{Animals
| animal = dog
| sound =
}}
|
the if-function would see that the parameter is empty (because of the use of the pipe-character in the parameter in the condition) and return:
Welcome to this page, all about dogs!
ifeq (If equal)
switch
ifexist
Further Information
To Add
- if, ifeq, switch, ifexist functions
- Removing a table row if no parameter set.
- Add a line break if lists aren't working correctly.
- Categorisation
- note for future self. template:job trait for examples on switching content on/off depending on defined parameters. check "tier 1 " parameter in the "tiers" section.


