New Editor Guide: Difference between revisions
mNo edit summary |
m (proof reading and changes complete up to and including "Numbered Bullet Points".) |
||
| Line 63: | Line 63: | ||
== Text Formatting == | == Text Formatting == | ||
The | The editing bar in any editing window provides a handy list of ways to apply formatting to wikitext. '''I recommend ALL editors turn on the "Preview" option at the far right-hand side of this bar.''' This allows editors to see changes in real-time. | ||
[[File:editing_header.png]] | |||
When using this bar, editors will start to encounter '''html markups'''. Described simply, these are instructions used to tell mediawiki how to display content. These can be identified by their appearance, with all markups consist of an opening, an ending and the text they surround that they're applying their instructions to. | |||
<pre><example>affected text</example></pre> | <pre><example>affected text</example></pre> | ||
<br> | <br> | ||
Examples of the most commonly used | Examples of the most commonly used formattings are: | ||
* ''Itallic'':- Simply <nowiki>''surround text | * ''Itallic'':- Simply <nowiki>''surround text'' with</nowiki> '''two''' apostrophes. | ||
* '''Bold''':- Simply <nowiki>'''surround text | * '''Bold''':- Simply <nowiki>'''surround text''' with</nowiki> '''three''' apostrophes. | ||
* '''''Bold & Itallic''''':- Simply <nowiki>'''''surround text | * '''''Bold & Itallic''''':- Simply <nowiki>'''''surround text''''' with</nowiki> '''five''' apostrophes. | ||
* <big>Big text</big>:- <nowiki><big>Surround text with the "big" html markup</big></nowiki>. | * <big>Big text</big>:- <nowiki><big>Surround text with the "big" html markup</big></nowiki>. | ||
*<small>Small text</small>:- <nowiki><big>Surround text with the "small" html markup</big></nowiki>. | *<small>Small text</small>:- <nowiki><big>Surround text with the "small" html markup</big></nowiki>. | ||
| Line 76: | Line 80: | ||
=== Line Breaks === | === Line Breaks === | ||
These can be added in a couple of | These can be added in a couple of ways. Simply leaving a line between paragraphs will provide a line break. A second way is to use the html markup '''<nowiki><br></nowiki>'''. The benefit to using the <nowiki><br></nowiki> is that the editor can choose where a line break happens. Multiple <nowiki><br></nowiki>'s can be added in succession for multiple line breaks. Finally this method is always worth remember for the times when Mediawiki misbehaves and won't apply a break. | ||
=== Bullet Points === | === Bullet Points === | ||
Bullet points are widely used on wiki pages and are generally used to create lists of items or information. Mediawiki makes them really simple to use. | Bullet points are widely used on wiki pages and are generally used to create lists of items or information. Mediawiki makes them really simple to use. | ||
* Use a single '''asterix (*)''' at the start of a line for a single bullet point. | * Use a single '''asterix (*)''' at the start of a line for a single bullet point. | ||
** Using two asterix's (**) | ** Using two asterix's (**) on the line below a single asterix bullet point creates this different style, with indentation. | ||
*** Three asterix's (***) creates this bullet point with further indentation. | *** Three asterix's (***) creates this bullet point with further indentation. | ||
Beyond three asterix's results in the same style of bullet point but further indentation for each extra one used. '''An asterix can also be combined a full colon''' to apply indentation to the initial bullet point. | Beyond three asterix's results in the same style of bullet point but further indentation for each extra one used. '''An asterix can also be combined a full colon''' to apply indentation to the initial bullet point. | ||
:* The full colon should come before the asterix (:*). | :* The full colon should come before the asterix (:*). | ||
:::::* Adding multiple full colons adds multiple levels of indentation. | :::::* Adding multiple full colons adds multiple levels of indentation. | ||
Here is an example of a list: | Here is an example of how to write a list and how it will appear on the page: | ||
<br> | <br> | ||
<div class="flex-container"> | |||
<div class="flex-container-item-2"> | |||
<pre>Shopping List | |||
* Drink | |||
** Water | |||
** Tea | |||
** Coffee | |||
*** Must be decaffinated! | |||
** Orange Juice | |||
* Food | |||
** Bread | |||
** Fruit | |||
*** Apples | |||
*** Bananas | |||
** Pasta | |||
** Rice</pre> | |||
</div> | |||
<div class="flex-container-item-2"> | |||
Shopping List | Shopping List | ||
* Drink | * Drink | ||
| Line 103: | Line 126: | ||
** Pasta | ** Pasta | ||
** Rice | ** Rice | ||
</div></div> | |||
=== Numbered Bullet Points === | === Numbered Bullet Points === | ||
Numbered bullet points work in exactly the same way as regular ones but the '''asterix is replaced with a hash (#)'''. | Numbered bullet points work in exactly the same way as regular ones but the '''asterix is replaced with a hash (#)'''. | ||
# A single hash. | # A single hash. | ||
## Two hashes | ## Two hashes begin the numbering again but with an indentation. | ||
## Maintaining the two hashes at the start of a line keeps up the indented list. | ## Maintaining the two hashes at the start of a line keeps up the indented list. | ||
# Returning to a single hash at the start of a line returns the numbering to the initial numbered list. | # Returning to a single hash at the start of a line returns the numbering to the initial numbered list. | ||
Finally a full colon can also be used here to provide indentation to the numbered bullet points. Editors should however proceed with caution as | Finally a full colon can also be used here to provide indentation to the numbered bullet points. Editors should however proceed with caution as combining indented numbered lists with non indented ones can create some odd numbering behaviours. | ||
== Coming Soon... == | == Coming Soon... == | ||
Revision as of 23:35, 31 October 2023
This guide is aimed at anyone who would like to to start Wiki editing but has no previous experience. As long as you know your way around the keyboard, this guide will explain how to do the all the basics and more. I originally wrote this guide for the FFXI private server HorizonXI but feel free to adapt it anywhere it may help other fledgling editors.
Starting out editing can be a daunting time for new editors. I remember all too well starting out with zero knowledge of coding and fumbling my way through my editing. It took a long time and a lot of trial and error but eventually, with years of learning and experience behind me, I feel confident in sharing my knowledge with others. I consider this guide a working progress and I'm very welcome to constructive criticism. The best place to give feedback would be on the Wiki discord.
Creating a Page
Starting from the beginning, lets create a new page. There are several ways of doing this.
Keyboard Shortcut
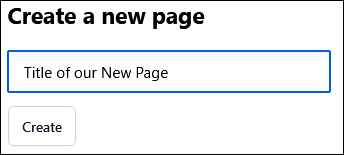
On Horizon Wiki, simply hitting the "N" key will bring up the "Create a New Page" popup box. Type a page title and click the "Create" button.
Red Links
On any Wiki, red links can be found. A red link is simply a link to a page that doesn't exist. Clicking on these will take an editor to the "Creating Name of Missing Page" page.
Search Bar
If an editor tries to search for a page that doesnt exist, the search results page will provide the editor with a red link to create the page.
Now it's time to add something to the blank page. A Wiki page can be as simple as adding some text and hitting the save page button at the bottom, but that's going to make for a boring page. There are many things that editors can do to make things look interesting...
Headings
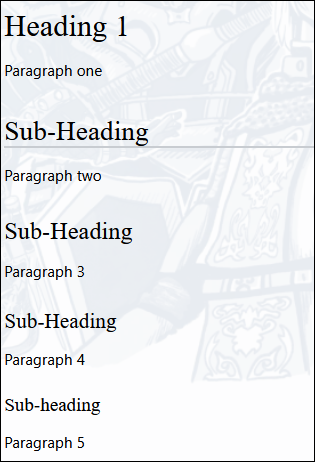
Headings are used to seperate different sections of a page. Each heading can be broken down into four further sub-headings. To create a heading or sub-heading, surround the heading title with a single equals symbol (=). Using two equal symbols on either side of the title creates a sub-heading. This can be taken as far as five equals symbols, as can be seen below.
= Heading 1 =
Paragraph one

== Sub-Heading ==
Paragraph two

=== Sub-Heading ===
Paragraph 3

==== Sub-Heading ====
Paragraph 4

===== Sub-heading =====
Paragraph 5
Table of Contents
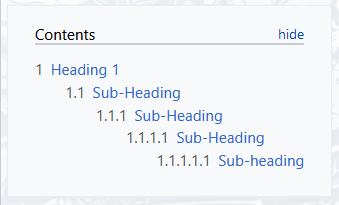
Headings lead nicely to adding a table of contents to a page. This is primarily used as a way for Wiki users to navigate to a particular section of a page. A table of contents will be automatically added to a page when four headings or more are present and it will appear at the very top left of the page.
An editor can remove a table of contents from a page by adding the following code anywhere on a page:
__notoc__
Yes, they are double underscores. An editor can also add a table of contents to a page, even when fewer than four headings are present. Again, this can be added anywhere on a page:
__toc__
Unfortunately Mediawiki is quite limited in how these table of contents appear. Fortunately there is a template available which will allow editors to place a table anywhere on a page and to the right (as opposed to left) of a page, allowing for better page formatting. Templates will be covered in more depth much later on in this guide but to add this alternative table of contents, include this on a page:
{{tocright}}
Adding this to the very first line of a page ensures that the table of contents will appear at the top of the page. Adding this to the bottom of a page, after all other content will make the table appear at the bottom. Add it to the middle to appear in the middle and so on. It gives the editor the ability to choose where it should appear. Finally remember to include __notoc__ to a page using this template to prevent two tables being present.
Text Formatting
The editing bar in any editing window provides a handy list of ways to apply formatting to wikitext. I recommend ALL editors turn on the "Preview" option at the far right-hand side of this bar. This allows editors to see changes in real-time.
When using this bar, editors will start to encounter html markups. Described simply, these are instructions used to tell mediawiki how to display content. These can be identified by their appearance, with all markups consist of an opening, an ending and the text they surround that they're applying their instructions to.
<example>affected text</example>
Examples of the most commonly used formattings are:
- Itallic:- Simply ''surround text'' with two apostrophes.
- Bold:- Simply '''surround text''' with three apostrophes.
- Bold & Itallic:- Simply '''''surround text''''' with five apostrophes.
- Big text:- <big>Surround text with the "big" html markup</big>.
- Small text:- <big>Surround text with the "small" html markup</big>.
- Indent:- Start a line with a full colon ":". Multiple full colons can be used to increase the amount of indentation.
* Starting a line with a space creates this box. This is generally used to highlight the text within the box.
Line Breaks
These can be added in a couple of ways. Simply leaving a line between paragraphs will provide a line break. A second way is to use the html markup <br>. The benefit to using the <br> is that the editor can choose where a line break happens. Multiple <br>'s can be added in succession for multiple line breaks. Finally this method is always worth remember for the times when Mediawiki misbehaves and won't apply a break.
Bullet Points
Bullet points are widely used on wiki pages and are generally used to create lists of items or information. Mediawiki makes them really simple to use.
- Use a single asterix (*) at the start of a line for a single bullet point.
- Using two asterix's (**) on the line below a single asterix bullet point creates this different style, with indentation.
- Three asterix's (***) creates this bullet point with further indentation.
- Using two asterix's (**) on the line below a single asterix bullet point creates this different style, with indentation.
Beyond three asterix's results in the same style of bullet point but further indentation for each extra one used. An asterix can also be combined a full colon to apply indentation to the initial bullet point.
- The full colon should come before the asterix (:*).
- Adding multiple full colons adds multiple levels of indentation.
Here is an example of how to write a list and how it will appear on the page:
Shopping List

* Drink
** Water
** Tea
** Coffee
*** Must be decaffinated!
** Orange Juice
* Food
** Bread
** Fruit
*** Apples
*** Bananas
** Pasta
** Rice
Shopping List
- Drink
- Water
- Tea
- Coffee
- Must be decaffinated!
- Orange Juice
- Food
- Bread
- Fruit
- Apples
- Bananas
- Pasta
- Rice
Numbered Bullet Points
Numbered bullet points work in exactly the same way as regular ones but the asterix is replaced with a hash (#).
- A single hash.
- Two hashes begin the numbering again but with an indentation.
- Maintaining the two hashes at the start of a line keeps up the indented list.
- Returning to a single hash at the start of a line returns the numbering to the initial numbered list.
Finally a full colon can also be used here to provide indentation to the numbered bullet points. Editors should however proceed with caution as combining indented numbered lists with non indented ones can create some odd numbering behaviours.
Coming Soon...
- Categorisation
- Images
- Saving a page
- Add a note about using page preview.
- Deleting a page
- Changing a page name
- Other useful things eg "what links here"
Later on in the guide
- Page searching
- Find and replace
- Tables
- Templates
- CSS
- redirecting


