New Editor Guide: Difference between revisions
No edit summary |
No edit summary |
||
| (3 intermediate revisions by the same user not shown) | |||
| Line 137: | Line 137: | ||
Finally a full colon can also be used here to provide indentation to the numbered bullet points. Editors should however proceed with caution as combining indented numbered lists with non indented ones can create some odd numbering behaviours. | Finally a full colon can also be used here to provide indentation to the numbered bullet points. Editors should however proceed with caution as combining indented numbered lists with non indented ones can create some odd numbering behaviours. | ||
=== Links === | == Links == | ||
=== Internal Links === | |||
We can add links to our page to direct Wiki users to other pages, whether that be internally (staying on the Wiki) or externally (other websites). Internal links are a great way to '''supplement a page''' as they provide an easy way for a Wiki user to find out '''further information'''. As you will see from the image, each of the spells in the list are '''blue'''. Any text colored blue can be clicked on and will take the user to wherever the editor is directing them. For example: | |||
[[File:adding_links_1.png]] | |||
=== Categorisation | To add a link, simply surround text with two square brackets on either side, like so: | ||
* <nowiki>[[Cure]]</nowiki> | |||
* <nowiki>[[Protect]]</nowiki> | |||
* <nowiki>[[Regen]]</nowiki> | |||
As long as there is a Wiki page of the same name as the text within the square brackets, your link will work. If you there '''isn't''' a page with this name, your page will create a '''red link''', which as we learnt earlier can be used to create that page. It's always worth bearing in mind that while links shouldn't be case sensitive, mediawiki doesn't always work correctly. For example, '''<nowiki>[[White Magic]]</nowiki>''' will work correctly whereas '''<nowiki>[[white magic]]</nowiki>''' will not. | |||
As a rule of thumb I would always suggest writing a link out with capitals, which while being frustrating, is unfortunately necessary. Thankfully there is a little trick to get around the issue! | |||
* <nowiki>[[White Magic|text to be displayed]]</nowiki> | |||
As you can see we have added a '''pipe symbol''' (a vertical line) '''after''' the name of our link. Any text that comes after this is the text that will be displayed. So in our example, the text displayed on our page would be '''"text to be displayed"'''. It will appear blue, remain clickable and take the user to the page named '''"White Magic"'''. This can be really useful because if we wish, we can turn whole sections of text into a link or shorten a really long page name. | |||
There is one small final aspect of internal links that needs covering. If we want to link to a '''category page''', we have to write our link ever so slightly different. | |||
* <nowiki>[[:Category:White Magic]]</nowiki> | |||
If you look closely, you can see that we have added a '''full-colon''' before the page name. Without this, we would be adding the page to that category, not what we're trying to achieve! You may also wish to add a pipe symbol when linking to category pages to hide the ":Category:" part of the link. [[#Categorisation|Categorisation]] itself is covered a little further on in the guide. | |||
=== Sub-heading Links === | |||
These are links which take you to one of the sub-headings of either the current page or any other page of the editors choosing. These links will once again appear as '''blue links'''. If I wanted to create a link to the '''images''' sub-heading of this page, I would simply add: | |||
* <nowiki>[[#Images]]</nowiki> | |||
We can change the name of this link in exactly the same way as described in the [[#Internal Links|internal links]] section. | |||
* <nowiki>[[#Images|the text I want to appear]]</nowiki> | |||
Finally, if an editor wishes to link to a certain section of a different page on the wiki: | |||
* <nowiki>[[White Mage#Spell List|text I want to appear]]</nowiki> | |||
I would highly recommend adding "text I want to appear" as the link are quite unatractive on the eye, for example: [[New Editor Guide#Links]]. | |||
=== External Links === | |||
As the name suggests, these links take you to other websites. There is a couple of differences to internal links: only '''a single square bracket either side''' is necessary and we cannot link to particular sections of the sites we are linking to. We change the '''text I want to appear''' differently too. Rather than using the pipe symbol, this time we simply '''leave a space''' between the link and the text. Here's an example of how to do it, what it looks like without adding "text I want to appear" and another with the text: | |||
* <nowiki>[https://horizonxi.com/]</nowiki> - [https://horizonxi.com/] | |||
* <nowiki>[https://horizonxi.com/ https://horizonxi.com/]</nowiki> - [https://horizonxi.com/ text I want to appear] | |||
Whilst there is no rule against it, I usually consider it good practice to set the "text I want to appear" as the website you are linking to, so that wiki users can clearly see your link is an external one. | |||
== Categorisation == | |||
We're coming towards the end editing our basic page. Before we finish and hit that '''save page''' button, we should ask ourselves "does this page belong to a category?" If we were making a page called "Bananas", it would make sense to add it to the category called "Fruit". In the world of HorizonXI, the job ability [[provoke]] would belong in the [[:Category:Job Abilities]]. It's really important to categorise Wiki pages as it not only makes it simple to find all the associated pages on the category page, it also unlocks some pretty advanced Wiki features later down the line. | We're coming towards the end editing our basic page. Before we finish and hit that '''save page''' button, we should ask ourselves "does this page belong to a category?" If we were making a page called "Bananas", it would make sense to add it to the category called "Fruit". In the world of HorizonXI, the job ability [[provoke]] would belong in the [[:Category:Job Abilities]]. It's really important to categorise Wiki pages as it not only makes it simple to find all the associated pages on the category page, it also unlocks some pretty advanced Wiki features later down the line. | ||
| Line 150: | Line 193: | ||
[[File:Categorisation_example.png]] | [[File:Categorisation_example.png]] | ||
== | == Images == | ||
This will be our last action on our page before hitting that all important save button! Images aren't required on any page but they certainly help to '''break up a page''', make it '''more interesting''' and can provide a '''visual example''' of what you're trying to explain in the text. There's a couple of steps involved with adding an image to a page; first of all we need to add the code for an image to the page. Make sure you add this where you would like it to appear ie. if at the top of a page, in the very top line of your page code, below your paragraph about animals then below that paragraph etc. | This will be our last action on our page before hitting that all important save button! Images aren't required on any page but they certainly help to '''break up a page''', make it '''more interesting''' and can provide a '''visual example''' of what you're trying to explain in the text. There's a couple of steps involved with adding an image to a page; first of all we need to add the code for an image to the page. Make sure you add this where you would like it to appear ie. if at the top of a page, in the very top line of your page code, below your paragraph about animals then below that paragraph etc. | ||
| Line 171: | Line 214: | ||
This page is fairly self-explanatory but we will cover it regardless. First of all select '''"Browse'''" under '''"Source File"'''. Here you can find your image and select it. Next, under '''File Description'''" the parameter "'''Destination Filename:'''" as it is (this is prefilled when we clicked the red link). Add a '''"Summary'''" if you wish. If this is your own image then feel free to add a description or leave it blank. Here on the HorizonXI Wiki we ask that if the image has been taken from in-game that you leave the summary "hxi image", so other editors are aware that this is a new image and not one from 20 years ago! Last of all hit the "'''Upload File'''" at the bottom. | This page is fairly self-explanatory but we will cover it regardless. First of all select '''"Browse'''" under '''"Source File"'''. Here you can find your image and select it. Next, under '''File Description'''" the parameter "'''Destination Filename:'''" as it is (this is prefilled when we clicked the red link). Add a '''"Summary'''" if you wish. If this is your own image then feel free to add a description or leave it blank. Here on the HorizonXI Wiki we ask that if the image has been taken from in-game that you leave the summary "hxi image", so other editors are aware that this is a new image and not one from 20 years ago! Last of all hit the "'''Upload File'''" at the bottom. | ||
--- | === Formatting an Image === | ||
Wiki gives us quite a few ways in which we can format our image to suit our page. Each different way of formatting the image '''MUST''' be separated by a pipe symbol. | |||
* <nowiki>[[File:imagename.png|left]]</nowiki> - this ensures our image will appear on the '''left''' of our page. You can also set this to "'''middle or right'''". | |||
* <nowiki><nowiki>[[File:imagename.png|100x100px]]</nowiki> - this allows us to set the '''size of the image'''. By default Wiki will scale the image '''up or down''' to the '''smallest''' value set. For example, If the image itself is 400x400px and I set it to 100x1000px on my page, Wiki will display the image at 100x100px. | |||
* <nowiki>[[File:imagename.png|text that I want to appear whena user hovers over the image]]</nowiki> - As suggested, this text will appear when the user hovers over the image with their mouse. | |||
* <nowiki>[[File:imagename.png|thumb]]</nowiki> - puts the image inside a thumbnail. | |||
* <nowiki>[[File:imagename.png|thumb|text to be displayed]]</nowiki> - this will then display the "text to be displayed" below the image, inside the thumbnail. | |||
* <nowiki>[[File:imagename.png|link=pagename]]</nowiki> - turns the image into a clickable link. Replace "'''pagename'''" with the name of a page found on the wiki eg "White Magic". You can also add a full hyperlink here eg "link=https://horizonxi.com/" | |||
== Coming Soon... == | == Coming Soon... == | ||
* Images | * Images | ||
* Saving a page | * Saving a page | ||
* Deleting a page | * Deleting a page | ||
* Changing a page name | * Changing a page name | ||
| Line 189: | Line 237: | ||
* CSS | * CSS | ||
* redirecting | * redirecting | ||
* Transclusions | |||
<!-- Templates | |||
1. How to categorise a page. | |||
2. How to add a "switch" that lets the user input certain pre-determined options into a parameter and the outcome is a certain result. | |||
--> | |||
Latest revision as of 15:12, 1 December 2023
This guide is aimed at anyone who would like to to start Wiki editing but has no previous experience. As long as you know your way around the keyboard, this guide will explain how to do the all the basics and more. I originally wrote this guide for the FFXI private server HorizonXI but feel free to adapt it anywhere it may help other fledgling editors.
Starting out editing can be a daunting time for new editors. I remember all too well starting out with zero knowledge of coding and fumbling my way through my editing. It took a long time and a lot of trial and error but eventually, with years of learning and experience behind me, I feel confident in sharing my knowledge with others. I consider this guide a working progress and I'm very welcome to constructive criticism. The best place to give feedback would be on the Wiki discord.
Creating a Page
Starting from the beginning, lets create a new page. There are several ways of doing this.
Keyboard Shortcut
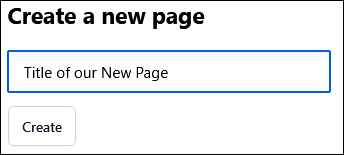
On Horizon Wiki, simply hitting the "N" key will bring up the "Create a New Page" popup box. Type a page title and click the "Create" button.
Red Links
On any Wiki, red links can be found. A red link is simply a link to a page that doesn't exist. Clicking on these will take an editor to the "Creating Name of Missing Page" page.
Search Bar
If an editor tries to search for a page that doesnt exist, the search results page will provide the editor with a red link to create the page.
Now it's time to add something to the blank page. A Wiki page can be as simple as adding some text and hitting the save page button at the bottom, but that's going to make for a boring page. There are many things that editors can do to make things look interesting...
Headings
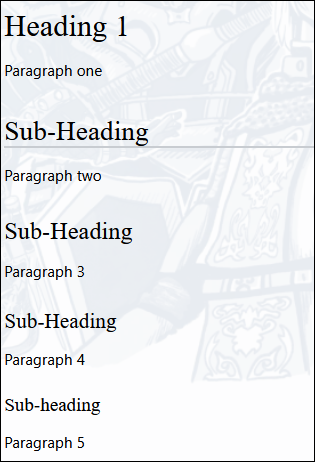
Headings are used to seperate different sections of a page. Each heading can be broken down into four further sub-headings. To create a heading or sub-heading, surround the heading title with a single equals symbol (=). Using two equal symbols on either side of the title creates a sub-heading. This can be taken as far as five equals symbols, as can be seen below.
= Heading 1 =
Paragraph one

== Sub-Heading ==
Paragraph two

=== Sub-Heading ===
Paragraph 3

==== Sub-Heading ====
Paragraph 4

===== Sub-heading =====
Paragraph 5
Table of Contents
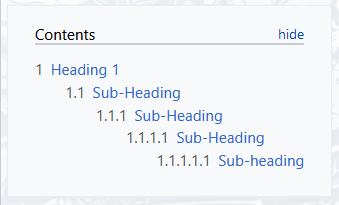
Headings lead nicely to adding a table of contents to a page. This is primarily used as a way for Wiki users to navigate to a particular section of a page. A table of contents will be automatically added to a page when four headings or more are present and it will appear at the very top left of the page.
An editor can remove a table of contents from a page by adding the following code anywhere on a page:
__notoc__
Yes, they are double underscores. An editor can also add a table of contents to a page, even when fewer than four headings are present. Again, this can be added anywhere on a page:
__toc__
Unfortunately Mediawiki is quite limited in how these table of contents appear. Fortunately there is a template available which will allow editors to place a table anywhere on a page and to the right (as opposed to left) of a page, allowing for better page formatting. Templates will be covered in more depth much later on in this guide but to add this alternative table of contents, include this on a page:
{{tocright}}
Adding this to the very first line of a page ensures that the table of contents will appear at the top of the page. Adding this to the bottom of a page, after all other content will make the table appear at the bottom. Add it to the middle to appear in the middle and so on. It gives the editor the ability to choose where it should appear. Finally remember to include __notoc__ to a page using this template to prevent two tables being present.
Text Formatting
The editing bar in any editing window provides a handy list of ways to apply formatting to wikitext. I recommend ALL editors turn on the "Preview" option at the far right-hand side of this bar. This allows editors to see changes in real-time.
When using this bar, editors will start to encounter html markups. Described simply, these are instructions used to tell mediawiki how to display content. These can be identified by their appearance, with all markups consist of an opening, an ending and the text they surround that they're applying their instructions to.
<example>affected text</example>
Examples of the most commonly used formattings are:
- Itallic:- Simply ''surround text'' with two apostrophes.
- Bold:- Simply '''surround text''' with three apostrophes.
- Bold & Itallic:- Simply '''''surround text''''' with five apostrophes.
- Big text:- <big>Surround text with the "big" html markup</big>.
- Small text:- <big>Surround text with the "small" html markup</big>.
- Indent:- Start a line with a full colon ":". Multiple full colons can be used to increase the amount of indentation.
* Starting a line with a space creates this box. This is generally used to highlight the text within the box.
Line Breaks
These can be added in a couple of ways. Simply leaving a line between paragraphs will provide a line break. A second way is to use the html markup <br>. The benefit to using the <br> is that the editor can choose where a line break happens. Multiple <br>'s can be added in succession for multiple line breaks. Finally this method is always worth remember for the times when Mediawiki misbehaves and won't apply a break.
Bullet Points
Bullet points are widely used on wiki pages and are generally used to create lists of items or information. Mediawiki makes them really simple to use.
- Use a single asterix (*) at the start of a line for a single bullet point.
- Using two asterix's (**) on the line below a single asterix bullet point creates this different style, with indentation.
- Three asterix's (***) creates this bullet point with further indentation.
- Using two asterix's (**) on the line below a single asterix bullet point creates this different style, with indentation.
Beyond three asterix's results in the same style of bullet point but further indentation for each extra one used. An asterix can also be combined a full colon to apply indentation to the initial bullet point.
- The full colon should come before the asterix (:*).
- Adding multiple full colons adds multiple levels of indentation.
Here is an example of how a list will appear on a page and how to write it:
Shopping List
- Drink
- Water
- Tea
- Coffee
- Must be decaffinated!
- Orange Juice
- Food
- Bread
- Fruit
- Apples
- Bananas
- Pasta
- Rice
Shopping List

* Drink
** Water
** Tea
** Coffee
*** Must be decaffinated!
** Orange Juice
* Food
** Bread
** Fruit
*** Apples
*** Bananas
** Pasta
** Rice
Numbered Bullet Points
Numbered bullet points work in exactly the same way as regular ones but the asterix is replaced with a hash (#).
- A single hash.
- Two hashes begin the numbering again but with an indentation.
- Maintaining the two hashes at the start of a line keeps up the indented list.
- Returning to a single hash at the start of a line returns the numbering to the initial numbered list.
Finally a full colon can also be used here to provide indentation to the numbered bullet points. Editors should however proceed with caution as combining indented numbered lists with non indented ones can create some odd numbering behaviours.
Links
Internal Links
We can add links to our page to direct Wiki users to other pages, whether that be internally (staying on the Wiki) or externally (other websites). Internal links are a great way to supplement a page as they provide an easy way for a Wiki user to find out further information. As you will see from the image, each of the spells in the list are blue. Any text colored blue can be clicked on and will take the user to wherever the editor is directing them. For example:
To add a link, simply surround text with two square brackets on either side, like so:
- [[Cure]]
- [[Protect]]
- [[Regen]]
As long as there is a Wiki page of the same name as the text within the square brackets, your link will work. If you there isn't a page with this name, your page will create a red link, which as we learnt earlier can be used to create that page. It's always worth bearing in mind that while links shouldn't be case sensitive, mediawiki doesn't always work correctly. For example, [[White Magic]] will work correctly whereas [[white magic]] will not.
As a rule of thumb I would always suggest writing a link out with capitals, which while being frustrating, is unfortunately necessary. Thankfully there is a little trick to get around the issue!
- [[White Magic|text to be displayed]]
As you can see we have added a pipe symbol (a vertical line) after the name of our link. Any text that comes after this is the text that will be displayed. So in our example, the text displayed on our page would be "text to be displayed". It will appear blue, remain clickable and take the user to the page named "White Magic". This can be really useful because if we wish, we can turn whole sections of text into a link or shorten a really long page name.
There is one small final aspect of internal links that needs covering. If we want to link to a category page, we have to write our link ever so slightly different.
- [[:Category:White Magic]]
If you look closely, you can see that we have added a full-colon before the page name. Without this, we would be adding the page to that category, not what we're trying to achieve! You may also wish to add a pipe symbol when linking to category pages to hide the ":Category:" part of the link. Categorisation itself is covered a little further on in the guide.
Sub-heading Links
These are links which take you to one of the sub-headings of either the current page or any other page of the editors choosing. These links will once again appear as blue links. If I wanted to create a link to the images sub-heading of this page, I would simply add:
- [[#Images]]
We can change the name of this link in exactly the same way as described in the internal links section.
- [[#Images|the text I want to appear]]
Finally, if an editor wishes to link to a certain section of a different page on the wiki:
- [[White Mage#Spell List|text I want to appear]]
I would highly recommend adding "text I want to appear" as the link are quite unatractive on the eye, for example: New Editor Guide#Links.
External Links
As the name suggests, these links take you to other websites. There is a couple of differences to internal links: only a single square bracket either side is necessary and we cannot link to particular sections of the sites we are linking to. We change the text I want to appear differently too. Rather than using the pipe symbol, this time we simply leave a space between the link and the text. Here's an example of how to do it, what it looks like without adding "text I want to appear" and another with the text:
- [https://horizonxi.com/] - [1]
- [https://horizonxi.com/ https://horizonxi.com/] - text I want to appear
Whilst there is no rule against it, I usually consider it good practice to set the "text I want to appear" as the website you are linking to, so that wiki users can clearly see your link is an external one.
Categorisation
We're coming towards the end editing our basic page. Before we finish and hit that save page button, we should ask ourselves "does this page belong to a category?" If we were making a page called "Bananas", it would make sense to add it to the category called "Fruit". In the world of HorizonXI, the job ability provoke would belong in the Category:Job Abilities. It's really important to categorise Wiki pages as it not only makes it simple to find all the associated pages on the category page, it also unlocks some pretty advanced Wiki features later down the line.
Adding a page to a category is really easy. Simply add:
[[Category:Name of Category]]
With this code on a page, it will automatically be added to the "Name of Category" category when saved. You can add as many categories as you feel is necessary but do try to stick to relevant ones. If you forget to add a category don't worry, simply re-edit the page and add the category in. Finally to find a category page and your page on it, simply search for "Category:Name" and Wiki will take you to its page. Scroll to the bottom of the page to find the list of pages contained within that category.
Images
This will be our last action on our page before hitting that all important save button! Images aren't required on any page but they certainly help to break up a page, make it more interesting and can provide a visual example of what you're trying to explain in the text. There's a couple of steps involved with adding an image to a page; first of all we need to add the code for an image to the page. Make sure you add this where you would like it to appear ie. if at the top of a page, in the very top line of your page code, below your paragraph about animals then below that paragraph etc.
[[File:name of file.png]]
If this image name already exists on the Wiki then you have successfully added it to your page. If not, there's a couple of things to take note of here:
- ALL image code must be surrounded by TWO square brackets "[[ ]]. As described earlier, these are used for adding links to text and once we have uploaded the image, we're telling the Wiki to look for the images' wiki page.
- ALL images must start with the prefix " File: "
- After "File:" we can choose a name for our image. Select a name that appropriately describes your image because yourself or other editors may wish to find it at a later date. It's going to be difficult finding that picture of a car if you called the image name a train. Special characters can sometimes cause issues for the Wiki so it's best to avoid them. Underscores in place of spaces do however work fine.
- Last of all is our image type. Make sure to use the type that matches your own image eg. ".png, .jpg etc." We generally ask our editors here to upload in .png but there's no rules against using other types.
With our image code in place we can now hit that all important "Save Changes" button. This can be found at the bottom of our editing window (you may need to scroll down).
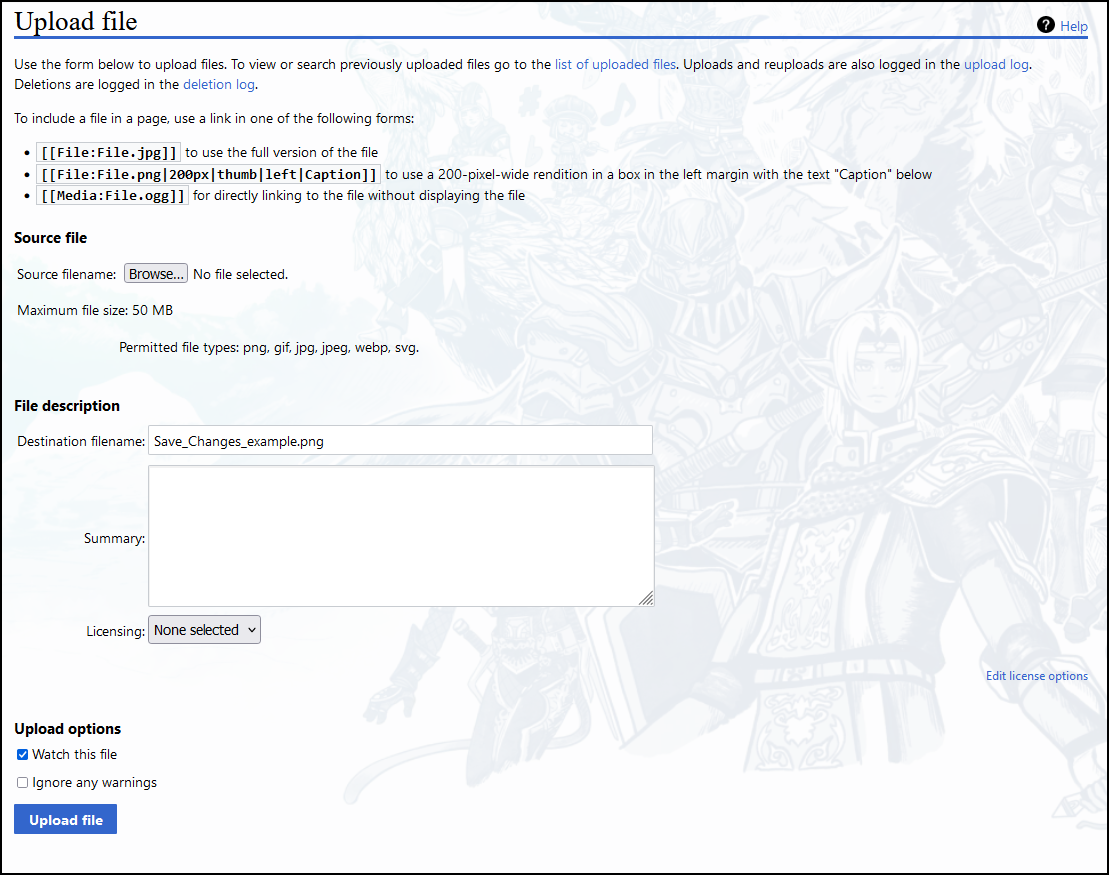
Congratulations, you've just created your first Wiki page! Take some time to look at it. Is it how you imagined? Are there any typos? Take some time to checkout your work and once you have, find where you added your image code to your page. Unless you added a pre-existing Wiki image, you will notice that it's displaying as a red link. Remember those from earlier? We follow the same process as last time but when we hit that red link, are taken to the "Upload File" instead.
This page is fairly self-explanatory but we will cover it regardless. First of all select "Browse" under "Source File". Here you can find your image and select it. Next, under File Description" the parameter "Destination Filename:" as it is (this is prefilled when we clicked the red link). Add a "Summary" if you wish. If this is your own image then feel free to add a description or leave it blank. Here on the HorizonXI Wiki we ask that if the image has been taken from in-game that you leave the summary "hxi image", so other editors are aware that this is a new image and not one from 20 years ago! Last of all hit the "Upload File" at the bottom.
Formatting an Image
Wiki gives us quite a few ways in which we can format our image to suit our page. Each different way of formatting the image MUST be separated by a pipe symbol.
- [[File:imagename.png|left]] - this ensures our image will appear on the left of our page. You can also set this to "middle or right".
- <nowiki>[[File:imagename.png|100x100px]] - this allows us to set the size of the image. By default Wiki will scale the image up or down to the smallest value set. For example, If the image itself is 400x400px and I set it to 100x1000px on my page, Wiki will display the image at 100x100px.
- [[File:imagename.png|text that I want to appear whena user hovers over the image]] - As suggested, this text will appear when the user hovers over the image with their mouse.
- [[File:imagename.png|thumb]] - puts the image inside a thumbnail.
- [[File:imagename.png|thumb|text to be displayed]] - this will then display the "text to be displayed" below the image, inside the thumbnail.
- [[File:imagename.png|link=pagename]] - turns the image into a clickable link. Replace "pagename" with the name of a page found on the wiki eg "White Magic". You can also add a full hyperlink here eg "link=https://horizonxi.com/"
Coming Soon...
- Images
- Saving a page
- Deleting a page
- Changing a page name
- Other useful things eg "what links here"
Later on in the guide
- Page searching
- Find and replace
- Tables
- Templates
- CSS
- redirecting
- Transclusions
