San d'Oria Mission 9-1: Difference between revisions
From HorizonXI Wiki
mNo edit summary |
Potatoking90 (talk | contribs) No edit summary |
||
| Line 14: | Line 14: | ||
==Walkthrough== | ==Walkthrough== | ||
* | *Trade [[:Category:Crystals|crystals]] to a Conquest NPC to unlock this mission, then speak to a [[San d'Oria Gate Guard]] to start it. | ||
*''' | *'''Optional:''' : Interact with the two doors to the Princes' quarters for short cutscenes. | ||
**Speak with [[Curilla]] and [[Rahal]] for small talk about the previous mission. They will also have different dialogue after the KIs are obtained but before the mission is completed. | **Speak with [[Curilla]] and [[Rahal]] for small talk about the previous mission. They will also have different dialogue after the KIs are obtained but before the mission is completed. | ||
*Go to the Chateau and check the Great Hall for a cutscene. | *Go to the Chateau and check the Great Hall for a cutscene. | ||
*You must now travel to three '''???'''s and obtain 3 [[Key Item]]s. They {{color|red|must}} be done in order. | *You must now travel to three '''???'''s and obtain 3 [[Key Item]]s. They {{color|red|must}} be done in order. | ||
===Valley of Sorrows=== | |||
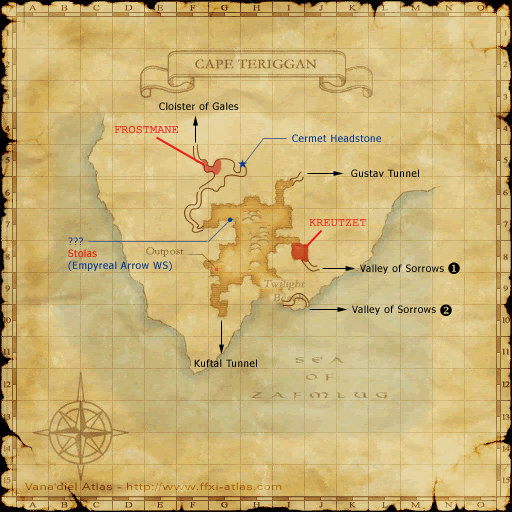
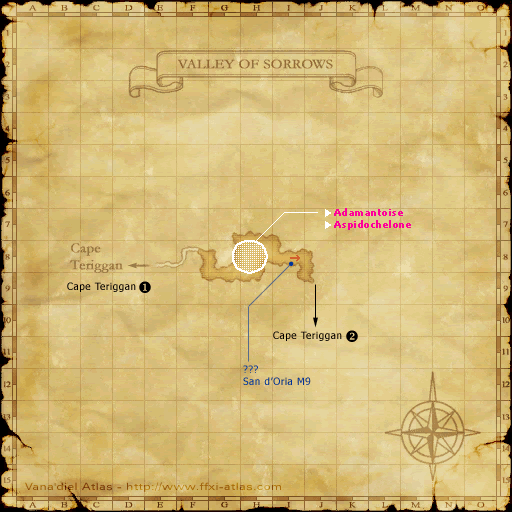
*Go to [[Cape Teriggan]] and head to the ({{Location Tooltip|area=Cape Teriggan|pos=J-8}}) entrance to [[Valley of Sorrows]]. This is the same entrance used for [[Adamantoise]]/[[Aspidochelone]]. [[Sneak]] and [[Invisible (Status)]] across to ({{Location Tooltip|area=Valley of Sorrows|pos=I-8}}) and check the '''???''' to receive the [[Figure of Titan]]. | |||
===Xarcabard=== | |||
*Head for [[Xarcabard]] and go to ({{Location Tooltip|area=Xarcabard|pos=H-7}}) upper level. The '''???''' is in a group of 3 clustered trees with their leaves to the west of the ramp (still in H-7). Select the '''???''' to obtain the [[Figure of Garuda]]. | |||
===Batallia Downs=== | |||
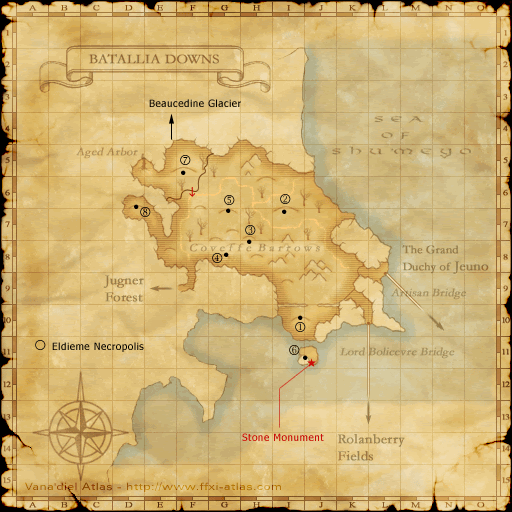
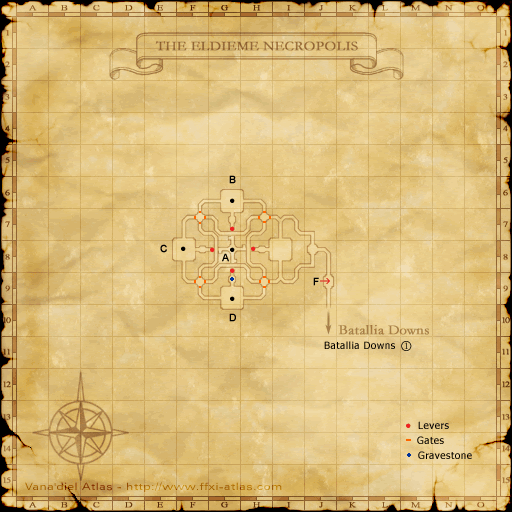
*Head for the southern [[Eldieme Necropolis]] entrance at ({{Location Tooltip|area=Batallia Downs|pos=I-10}}). Make your way to the southern room, and then to the '''center''' hole at ({{Location Tooltip|area=The Eldieme Necropolis|pos=G-9}}). You will likely need [[Sneak]] in the basement, do so before dropping down. Go east and then south, and take a right at the intersection, and start heading up a hill. You will eventually zone back out to [[Batallia Downs]]. | |||
*If [[Ahtu]] is up, kill it first, it should not pose a problem to anyone in the party. | |||
*Check the '''???''' near the cliff to spawn two [[:Category:Greater Bird|Greater Bird]] NMs: [[Suparna]] ([[WAR]]) and [[Suparna Fledgling]] ([[WHM]]). | |||
** Note: There are multiple '''???''' on this island. Check the one near the [[Stone Monument]] at the rear of this island. | |||
*They can both use [[Horde Lullaby]] and [[Massacre Elegy]] as well as their own respective abilities, such as [[Mighty Strikes]] and [[Benediction]], and typical Greater Bird TP attacks. | |||
*You can pull just one, but it is difficult. Recommended that you kite one NM and kill the other, then finish the kited one off. | |||
*Defeat both NMs and check the ''???'' again to receive a cutscene and the [[Figure of Leviathan]]. | |||
*Head back to the Chateau and check the Great Hall for a final cutscene that completes the mission. | *Head back to the Chateau and check the Great Hall for a final cutscene that completes the mission. | ||
[[Category:Missions]] | [[Category:Missions]] | ||
[[Category:San d'Oria Missions]] | [[Category:San d'Oria Missions]] | ||
Revision as of 17:54, 3 December 2023
| Breaking Barriers | |
|---|---|
| Series | San d'Oria Missions |
| Starting NPC | Any San d'Oria Gate Guard |
| Title | None |
| Repeatable | No |
| Description | Darkness looms over San d'Oria. Report to the Audience Chamber in Chateau d'Oraguille for further details. |
| Rewards | |
| Rank Points | |
| ← Previous Mission | Next Mission → |
|---|---|
| Lightbringer | The Heir to the Light |
Walkthrough
- Trade crystals to a Conquest NPC to unlock this mission, then speak to a San d'Oria Gate Guard to start it.
- Optional: : Interact with the two doors to the Princes' quarters for short cutscenes.
- Go to the Chateau and check the Great Hall for a cutscene.
- You must now travel to three ???s and obtain 3 Key Items. They must be done in order.
Valley of Sorrows
- Go to Cape Teriggan and head to the (J-8) entrance to Valley of Sorrows. This is the same entrance used for Adamantoise/Aspidochelone. Sneak and Invisible (Status) across to (I-8) and check the ??? to receive the Figure of Titan.
Xarcabard
- Head for Xarcabard and go to (H-7) upper level. The ??? is in a group of 3 clustered trees with their leaves to the west of the ramp (still in H-7). Select the ??? to obtain the Figure of Garuda.
Batallia Downs
- Head for the southern Eldieme Necropolis entrance at (I-10). Make your way to the southern room, and then to the center hole at (G-9). You will likely need Sneak in the basement, do so before dropping down. Go east and then south, and take a right at the intersection, and start heading up a hill. You will eventually zone back out to Batallia Downs.
- If Ahtu is up, kill it first, it should not pose a problem to anyone in the party.
- Check the ??? near the cliff to spawn two Greater Bird NMs: Suparna (WAR) and Suparna Fledgling (WHM).
- Note: There are multiple ??? on this island. Check the one near the Stone Monument at the rear of this island.
- They can both use Horde Lullaby and Massacre Elegy as well as their own respective abilities, such as Mighty Strikes and Benediction, and typical Greater Bird TP attacks.
- You can pull just one, but it is difficult. Recommended that you kite one NM and kill the other, then finish the kited one off.
- Defeat both NMs and check the ??? again to receive a cutscene and the Figure of Leviathan.
- Head back to the Chateau and check the Great Hall for a final cutscene that completes the mission.


