A Reputation in Ruins: Difference between revisions
From HorizonXI Wiki
walkthrough rework (in progress) |
m added clarifying note about when which KI is obtained from the starting NPC |
||
| (One intermediate revision by the same user not shown) | |||
| Line 14: | Line 14: | ||
== Walkthrough == | == Walkthrough == | ||
<div class="float-container"> | <div class="float-container"> | ||
*Talk to [[Migliorozz]] to start the quest. He gives you the {{KeyItem}}[[Phoenix Pearl]] or {{KeyItem}}[[Phoenix Armlet]], to take to [[Pso'Xja]]'s southwestern tower. | *Talk to [[Migliorozz]] to start the quest. He gives you the {{KeyItem}}[[Phoenix Pearl]] (if [[Promathia Mission 3-5|Promathia Mission 3-5: Darkness Named]] has been completed) or {{KeyItem}}[[Phoenix Armlet]], to take to [[Pso'Xja]]'s southwestern tower. | ||
*Head to {{Location|Beaucedine Glacier|G-9}} and enter the tower; this is the tower closest to the [[Ranguemont Pass]] zone, and has no level cap. | *Head to {{Location|Beaucedine Glacier|G-9}} and enter the tower; this is the tower closest to the [[Ranguemont Pass]] zone, and has no level cap. | ||
''Note: Monsters in this area are between levels 50-60. Some form of [[Sneak (Status Effect)|Sneak]] and [[Invisible (Status Effect)|Invisible]] is advised. | ''Note: Monsters in this area are between levels 50-60. Some form of [[Sneak (Status Effect)|Sneak]] and [[Invisible (Status Effect)|Invisible]] is advised. | ||
''Note: There are many mimic chests (55-60) in this area. Getting too close to them can cause them to aggro.{{Verification}}'' | |||
<div class="float-container-item-right" style="border: 4px lightgrey dashed; padding: 8px; text-align: center;"> | <div class="float-container-item-right" style="border: 4px lightgrey dashed; padding: 8px; text-align: center;"> | ||
;[[Pso'Xja]]<br>Tower 2 maps | ;[[Pso'Xja]]<br>Tower 2 maps | ||
| Line 40: | Line 40: | ||
</div> | </div> | ||
*Head up the stairs at ({{Location Tooltip|area=Pso'Xja|map=Map 6|pos=I-8}}) to the small room at ({{Location Tooltip|area=Pso'Xja|map=Map 5|pos=I-8}}), which contains a [[???]]. | ;Obtaining the {{KeyItem}}[[Blue Bracelet]] | ||
*Head up the stairs at ({{Location Tooltip|area=Pso'Xja|map=Map 6|pos=I-8}}) to the second floor and enter the small room at ({{Location Tooltip|area=Pso'Xja|map=Map 5|pos=I-8}}), which contains a [[???]]. | |||
**Make sure everyone in the group is inside the room, as the door to the room will close when you select the [[???]]. | **Make sure everyone in the group is inside the room, as the door to the room will close when you select the [[???]]. | ||
*When ready, select the ??? to spawn two [[:Category:Dolls|Doll]] NMs, [[Gargoyle-Iota]] and [[Gargoyle-Kappa]]. | *When ready, select the ??? to spawn two [[:Category:Dolls|Doll]] NMs, [[Gargoyle-Iota]] and [[Gargoyle-Kappa]]. | ||
**The Dolls alternate between physical immunity and very high magical resistance, each doll changing weaknesses simultaneously. This is marked by a blue- or yellow-colored sheen on each mob, so be prepared to switch targets if relying on melee damage. | **The Dolls alternate between physical immunity and very high magical resistance, each doll changing weaknesses simultaneously. This is marked by a blue- or yellow-colored sheen on each mob, so be prepared to switch targets if relying on melee damage. | ||
**The dolls only need to be defeated once for an entire party. | **The dolls only need to be defeated once for an entire party. | ||
*Go back down the stairs | *When both mobs are defeated, examine the [[???]] once more to obtain the {{KeyItem}}[[Blue Bracelet]]. | ||
*Drop down a hole and head to ({{Location Tooltip|area=Pso'Xja|map=Map 7|pos=H-7}}) to find another room, another [[???]] and another set of dolls. | |||
* | |||
*Once through the green door, go to (G-8) | ;Obtaining the {{KeyItem}}[[Green Bracelet]] | ||
*Go back down the stairs, around to ({{Location Tooltip|area=Pso'Xja|map=Map 6|pos=H-9}}) and examine the door with a blue gemstone set into it. The {{KeyItem}}[[Blue Bracelet]] will allow you to pass through. | |||
* | *Drop down a hole to land in the basement at ({{Location Tooltip|area=Pso'Xja|map=Map 7|pos=H-9}}), and head to ({{Location Tooltip|area=Pso'Xja|map=Map 7|pos=H-7}}) to find another room, another [[???]] and another set of dolls. | ||
*Return to [[Migliorozz]] in [[Upper Jeuno]] for your reward of 3500 gil. | *When ready, select the ??? to spawn to spawn [[Gargoyle-Mu]] and [[Gargoyle-Lambda]]. | ||
**They work exactly like the first set of [[:Category:Dolls|Dolls]]. Kill them with the same strategy. | |||
*Once both mobs are defeated, examine the [[???]] again to obtain the {{KeyItem}}[[Green Bracelet]]. | |||
;Reaching the ''Avatar Gate'' | |||
*Pass through the circular room with the elevator and head up the stairs at ({{Location Tooltip|area=Pso'Xja|map=Map 7|pos=G-7}}) to arrive back on the first floor at ({{Location Tooltip|area=Pso'Xja|map=Map 6|pos=H-7}}). | |||
*Make your way to ({{Location Tooltip|area=Pso'Xja|map=Map 6|pos=I-8}}) and go upstairs to the second floor. | |||
*Go to ({{Location Tooltip|area=Pso'Xja|map=Map 5|pos=I-9}}) and examine the door with a green gemstone set into it. The {{KeyItem}}[[Green Bracelet]] will allow you to pass through. | |||
*Once through the green door, go to the ''Crystal Receptor'' machine at ({{Location Tooltip|area=Pso'Xja|map=Map 5|pos=G-8}}). | |||
**It will spawn two tiles on the floor below which allow access to the elevator. The way there takes about 1 minute, the tiles stay active for about 2 minutes. | |||
*Activate the ''Crystal Receptor'' and ''quickly'' backtrack to a hole ('Drop B') at ({{Location Tooltip|area=Pso'Xja|map=Map 5|pos=H-9}}) to drop back to the first floor at ({{Location Tooltip|area=Pso'Xja|map=Map 6|pos=H-9}}). | |||
*Run west then north to pass over the tiles and up the stairs at ({{Location Tooltip|area=Pso'Xja|map=Map 6|pos=G-7}}) back to the second floor where you find the entrance to the elevator at ({{Location Tooltip|area=Pso'Xja|map=Map 5|pos=H-8}}). | |||
''Note: At the base of the elevator, four [[Diremite Assaulter]]s (64-68) wait. Cast Sneak to prevent aggro.'' | |||
*Take the elevator down to find the ''Avatar Gate'' and select it for a cutscene. | |||
*After the cutscene you can return to [[Upper Jeuno]]. To get out of the tower, follow the other path behind the elevator and turn left to find a teleporter, which takes you back outside to [[Beaucedine Glacier]]. | |||
*Return to [[Migliorozz]] in [[Upper Jeuno]] for your reward of 3500 gil. You get to keep the {{KeyItem}}[[Blue Bracelet]] and the {{KeyItem}}[[Green Bracelet]] which allow you access through the blue and greem gemstone doors at any time. | |||
</div> | </div> | ||
{{Testimonials}} | |||
Latest revision as of 21:39, 1 December 2025
| A Reputation in Ruins | |
|---|---|
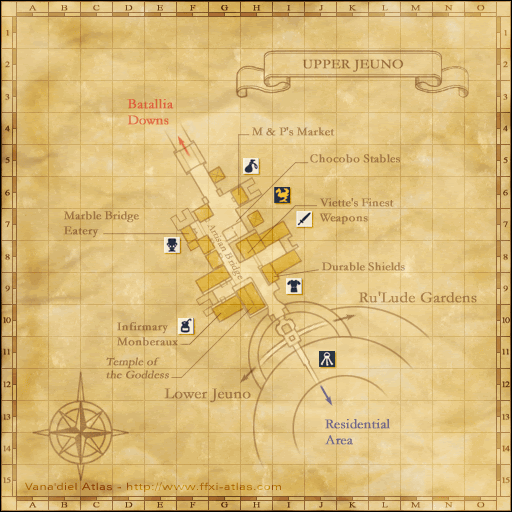
| Starting NPC | Migliorozz, Upper Jeuno (H-9)
|
| Required Fame | None |
| Title | None |
| Repeatable | No |
| Description | The Tenshodo has opened the ruins of Pso'Xja to adventurers. Migliorozz has asked that you perform a task involving the gate that lies in the deepest part of the southwest tower of the ruins. |
| Rewards | |
| 3500g | |
| ← Previous Quest | Next Quest → |
|---|---|
| Promathia Mission 3-3: The Road Forks | None |
Walkthrough
- Talk to Migliorozz to start the quest. He gives you the
 Phoenix Pearl (if Promathia Mission 3-5: Darkness Named has been completed) or
  Phoenix Armlet, to take to Pso'Xja's southwestern tower.
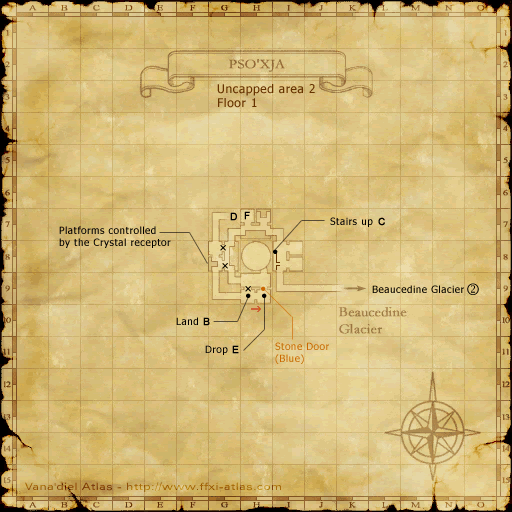
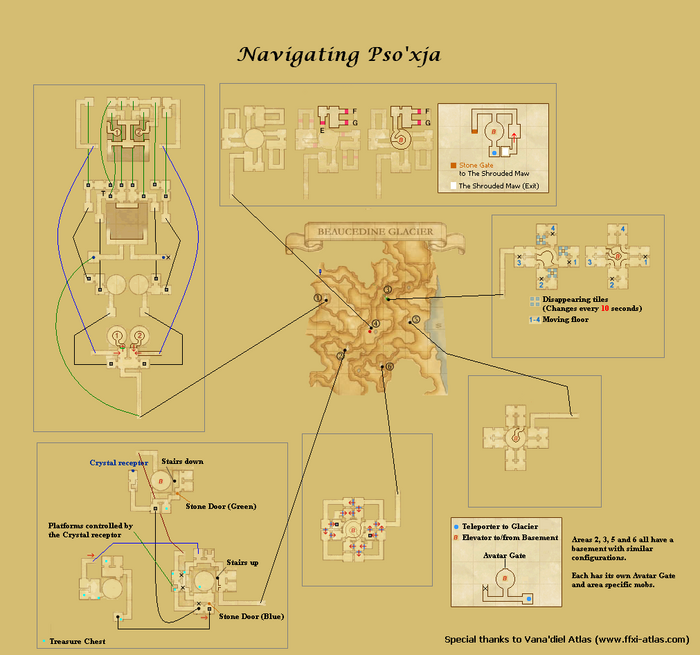
 - Head to Beaucedine Glacier (G-9) and enter the tower; this is the tower closest to the Ranguemont Pass zone, and has no level cap.
Note: Monsters in this area are between levels 50-60. Some form of Sneak and Invisible is advised.
Note: There are many mimic chests (55-60) in this area. Getting too close to them can cause them to aggro.![]()
- Obtaining the
 Blue Bracelet
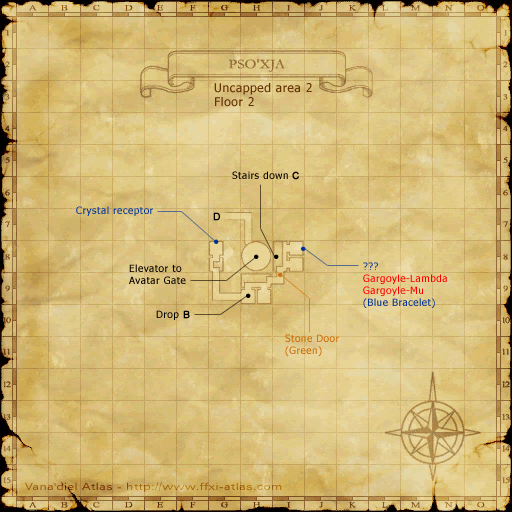
- Head up the stairs at (I-8) to the second floor and enter the small room at (I-8), which contains a ???.
- Make sure everyone in the group is inside the room, as the door to the room will close when you select the ???.
- When ready, select the ??? to spawn two Doll NMs, Gargoyle-Iota and Gargoyle-Kappa.
- The Dolls alternate between physical immunity and very high magical resistance, each doll changing weaknesses simultaneously. This is marked by a blue- or yellow-colored sheen on each mob, so be prepared to switch targets if relying on melee damage.
- The dolls only need to be defeated once for an entire party.
- When both mobs are defeated, examine the ??? once more to obtain the
 Blue Bracelet.
- Obtaining the
 Green Bracelet
- Go back down the stairs, around to (H-9) and examine the door with a blue gemstone set into it. The
 Blue Bracelet will allow you to pass through.
 - Drop down a hole to land in the basement at (H-9), and head to (H-7) to find another room, another ??? and another set of dolls.
- When ready, select the ??? to spawn to spawn Gargoyle-Mu and Gargoyle-Lambda.
- They work exactly like the first set of Dolls. Kill them with the same strategy.
- Once both mobs are defeated, examine the ??? again to obtain the
 Green Bracelet.
- Reaching the Avatar Gate
- Pass through the circular room with the elevator and head up the stairs at (G-7) to arrive back on the first floor at (H-7).
- Make your way to (I-8) and go upstairs to the second floor.
- Go to (I-9) and examine the door with a green gemstone set into it. The
 Green Bracelet will allow you to pass through.
 - Once through the green door, go to the Crystal Receptor machine at (G-8).
- It will spawn two tiles on the floor below which allow access to the elevator. The way there takes about 1 minute, the tiles stay active for about 2 minutes.
- Activate the Crystal Receptor and quickly backtrack to a hole ('Drop B') at (H-9) to drop back to the first floor at (H-9).
- Run west then north to pass over the tiles and up the stairs at (G-7) back to the second floor where you find the entrance to the elevator at (H-8).
Note: At the base of the elevator, four Diremite Assaulters (64-68) wait. Cast Sneak to prevent aggro.
- Take the elevator down to find the Avatar Gate and select it for a cutscene.
- After the cutscene you can return to Upper Jeuno. To get out of the tower, follow the other path behind the elevator and turn left to find a teleporter, which takes you back outside to Beaucedine Glacier.
- Return to Migliorozz in Upper Jeuno for your reward of 3500 gil. You get to keep the
 Blue Bracelet and the
  Green Bracelet which allow you access through the blue and greem gemstone doors at any time.
(see testimonials)
