|
|
| (6 intermediate revisions by one other user not shown) |
| Line 1: |
Line 1: |
| __TOC__ | | __TOC__ |
| == The Basics == | | == The Basics == |
| This new map provides easy access to all available map images for available HorizonXI content. Currently the map has a small amount of interactive features that both help the user navigate between desired maps and increase convenience. All map images are a compilation from multiple sources. Map images from the Remapster project were prioritized, followed by those from SquareEnix. All maps within Rise of the Zilart, Chains of Promathia, and Treasures of Aht Urhgan. Some interactive map features within Treasures of Aht Urhgan are still under construction, but the maps themselves are available. | | This new map provides easy access to all available map images for available HorizonXI content. Currently the map has interactive features that both help the user navigate between desired maps and increase convenience. All map images are a compilation from multiple sources. Map images from the Remapster project were prioritized, followed by those from SquareEnix. All maps within Rise of the Zilart, Chains of Promathia, and Treasures of Aht Urhgan. Some interactive map features within Treasures of Aht Urhgan are still under construction, but the maps themselves are available. |
|
| |
|
| == Features == | | == Features == |
| Line 18: |
Line 18: |
| |} | | |} |
|
| |
|
| == New Features Under Construction == | | == Showing NPCs & Map Details == |
| <div class="float-container"> | | <div class="float-container"> |
| <div class="float-container-item-left"> | | <div class="float-container-item-left"> |
| Line 24: |
Line 24: |
| </div> | | </div> |
| === NPCs displayed on Map === | | === NPCs displayed on Map === |
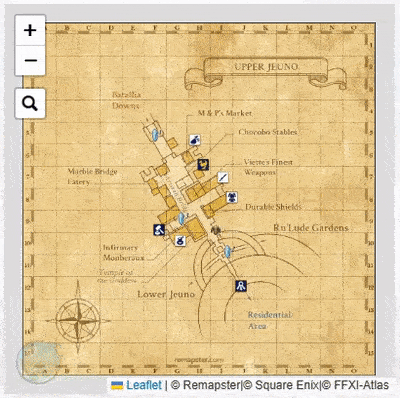
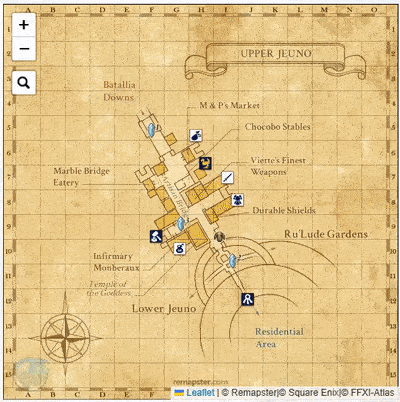
| The example image here shows NPCs in Upper Jeuno. This is made possible by wiki editors adding certain required code to an NPC wiki page. When the map detects this code it adds the NPC to the map as an icon, that lightly pulses. These icons are organized in categories and available to see on the map by clicking the layers button on the top right. '''Upper Jeuno''' is the only zone with NPCs at the moment. We chose to slow down the addition of more NPCs due to some small bugs found here and there.<br><br> | | The example image here shows NPCs, as icons, in Upper Jeuno. This is made possible by adding known points available from the AirSkyBoat project and from HorizonXI players throughout Vana'diel. These icons are organized in categories and available to see on the map by clicking the layers button on the top right. <br><br> |
| Additionally, when you move the mouse over an NPC on the map (or if you're on mobile just tap the NPC icon once) a tooltip opens and shows you the current HorizonXI image for that NPC, along with the name and current in-game coordinates. Clicking the NPC icon again (or on mobile just tap again) will open that NPCs wiki page in another browser window. | | Additionally, when you move the mouse over an NPC on the map (or if you're on mobile just tap the NPC icon once) a tooltip opens and shows you the current HorizonXI image for that NPC, along with the name and current in-game coordinates. Clicking the NPC icon again (or on mobile just tap again) will open that NPCs wiki page in another browser window. <br> |
| | <br> |
| | This feature is about 50% complete, with new wiki editors and users helping contribute daily. If you are interested, just reach out anywhere on our Discord and we will assist with more specifics ! |
| </div> | | </div> |
|
| |
|
| == How can I contribute? == | | == How can I contribute? == |
| Great question ! First, I would highly encourage anyone excited about editing any portion of the HorizonXI Wiki to check out [[Editing_the_HorizonXI_Wiki]] and [[Editor_Hub]]. These pages house most of the basic knowledge regarding editing/styling Wiki pages. If you're still interested in contributing to the map I would check out [[Template:FFXIMap]] and [[Template:FFXIMap Markers]]. | | Great question ! First, I would highly encourage anyone excited about editing any portion of the HorizonXI Wiki to check out [[Editing Guidelines]] and [[Editor_Hub]]. These pages house most of the basic knowledge regarding editing/styling Wiki pages. If you're still interested in contributing to the map I would check out [[Template:FFXIMap]] and [[Template:FFXIMap Markers]]. |
| <div class="float-container"> | | <div class="float-container"> |
| <div class="float-container-item-left"> | | <div class="float-container-item-left"> |
| Line 42: |
Line 44: |
| This is the current template that demonstrates how to add NPCs to the map. This is the only template we are using at the moment to add things to the map, so follow this if you are interested in adding NPCs that aren't currently displayed. | | This is the current template that demonstrates how to add NPCs to the map. This is the only template we are using at the moment to add things to the map, so follow this if you are interested in adding NPCs that aren't currently displayed. |
| </div> | | </div> |
| === In-Game coordinates needed ===
| |
| Below is a table of the status of the in-game coordinates we have/need
| |
| {| class="wikitable"
| |
|
| |
| |+
| |
| !Map ID
| |
| !Map Name
| |
| !Map Coord. Status
| |
| |-
| |
| |0
| |
| |World Map
| |
| |N/A
| |
| |-
| |
| |1
| |
| |Bastok Market
| |
| |-
| |
| |2
| |
| |Bastok Mines
| |
| |-
| |
| |3
| |
| |Battalia Downs
| |
| |-
| |
| |4
| |
| |Beaucedine Glacier
| |
| |-
| |
| |5
| |
| |Chateau d'Oraguille
| |
| |-
| |
| |6
| |
| |Konschtat Highlands
| |
| |-
| |
| |7
| |
| |La Theine Plateau
| |
| |-
| |
| |8
| |
| |Lower Delkfutt's Tower: Map 1
| |
| |-
| |
| |9
| |
| |Lower Delkfutt's Tower: Map 2
| |
| |-
| |
| |10
| |
| |Lower Delkfutt's Tower: Map 3
| |
| |-
| |
| |11
| |
| |Lower Delkfutt's Tower: Map 4
| |
| |-
| |
| |12
| |
| |Lower Jeuno
| |
| |-
| |
| |13
| |
| |Metalworks
| |
| |-
| |
| |14
| |
| |Mhaura
| |
| |-
| |
| |15
| |
| |Middle Delkfutt's Tower: Map 1
| |
| |-
| |
| |16
| |
| |Middle Delkfutt's Tower: Map 2
| |
| |-
| |
| |17
| |
| |Middle Delkfutt's Tower: Map 3
| |
| |-
| |
| |18
| |
| |Middle Delkfutt's Tower: Map 4
| |
| |-
| |
| |19
| |
| |Middle Delkfutt's Tower: Map 5
| |
| |-
| |
| |20
| |
| |Middle Delkfutt's Tower: Map 6
| |
| |-
| |
| |21
| |
| |Norg
| |
| |-
| |
| |22
| |
| |Northern San d'Oria
| |
| |-
| |
| |23
| |
| |Port Bastok
| |
| |-
| |
| |24
| |
| |Port Jeuno
| |
| |-
| |
| |25
| |
| |Port San d'Oria
| |
| |-
| |
| |26
| |
| |Port Windurst
| |
| |-
| |
| |27
| |
| |Pso'Xja: Map 1
| |
| |-
| |
| |28
| |
| |Pso'Xja: Map 2
| |
| |-
| |
| |29
| |
| |Pso'Xja: Map 3
| |
| |-
| |
| |30
| |
| |Pso'Xja: Map 4
| |
| |-
| |
| |31
| |
| |Pso'Xja: Map 5
| |
| |-
| |
| |32
| |
| |Pso'Xja: Map 6
| |
| |-
| |
| |33
| |
| |Pso'Xja: Map 7
| |
| |-
| |
| |34
| |
| |Pso'Xja: Map 8
| |
| |-
| |
| |35
| |
| |Pso'Xja: Map 9
| |
| |-
| |
| |36
| |
| |Pso'Xja: Map 10
| |
| |-
| |
| |37
| |
| |Pso'Xja: Map 11
| |
| |-
| |
| |38
| |
| |Pso'Xja: Map 12
| |
| |-
| |
| |39
| |
| |Pso'Xja: Map 13
| |
| |-
| |
| |40
| |
| |Pso'Xja: Map 14
| |
| |-
| |
| |41
| |
| |Pso'Xja: Map 15
| |
| |-
| |
| |42
| |
| |Pso'Xja: Map 16
| |
| |-
| |
| |43
| |
| |Pso'Xja: Map 17
| |
| |-
| |
| |44
| |
| |Pso'Xja: Map 18
| |
| |-
| |
| |45
| |
| |Pso'Xja: Map 19
| |
| |-
| |
| |46
| |
| |Pso'Xja: Map 20
| |
| |-
| |
| |47
| |
| |Qufim Island
| |
| |-
| |
| |48
| |
| |Rolanberry Fields
| |
| |-
| |
| |49
| |
| |Ru'Lude Gardens
| |
| |-
| |
| |50
| |
| |Sauromugue Champaign
| |
| |-
| |
| |51
| |
| |Southern San d'Oria
| |
| |-
| |
| |52
| |
| |Tahrongi Canyon
| |
| |-
| |
| |53
| |
| |Tavnazian Safehold: Map 1
| |
| |-
| |
| |54
| |
| |Tavnazian Safehold: Map 2
| |
| |-
| |
| |55
| |
| |Tavnazian Safehold: Map 3
| |
| |-
| |
| |56
| |
| |Upper Delkfutt's Tower: Map 1
| |
| |-
| |
| |57
| |
| |Upper Delkfutt's Tower: Map 2
| |
| |-
| |
| |58
| |
| |Upper Delkfutt's Tower: Map 3
| |
| |-
| |
| |59
| |
| |Upper Delkfutt's Tower: Map 4
| |
| |-
| |
| |60
| |
| |Upper Delkfutt's Tower: Map 5
| |
| |-
| |
| |61
| |
| |Upper Delkfutt's Tower: Map 6
| |
| |-
| |
| |62
| |
| |Upper Jeuno
| |
| |-
| |
| |63
| |
| |Valkurm Dunes
| |
| |-
| |
| |64
| |
| |Windurst Walls
| |
| |-
| |
| |65
| |
| |Windurst Waters: North
| |
| |-
| |
| |66
| |
| |Windurst Waters: South
| |
| |-
| |
| |67
| |
| |Windurst Woods
| |
| |-
| |
| |68
| |
| |Al'Taieu
| |
| |-
| |
| |69
| |
| |Altar Room
| |
| |-
| |
| |70
| |
| |Apollyon: Map 1
| |
| |-
| |
| |71
| |
| |Apollyon: Map 2
| |
| |-
| |
| |72
| |
| |Apollyon: Map 3
| |
| |-
| |
| |73
| |
| |Apollyon: Map 4
| |
| |-
| |
| |74
| |
| |Apollyon: Map 5
| |
| |-
| |
| |75
| |
| |Apollyon: Map 6
| |
| |-
| |
| |76
| |
| |Apollyon: Map 7
| |
| |-
| |
| |77
| |
| |Apollyon: Map 8
| |
| |-
| |
| |78
| |
| |Attohwa Chasm
| |
| |-
| |
| |79
| |
| |Beadeaux: Map 1
| |
| |-
| |
| |80
| |
| |Beadeaux: Map 2
| |
| |-
| |
| |81
| |
| |Behemoth's Dominion
| |
| |-
| |
| |82
| |
| |Bibiki Bay: Map 1
| |
| |-
| |
| |83
| |
| |Bibiki Bay: Map 2
| |
| |-
| |
| |84
| |
| |Bostaunieux Oubliette: Map 1
| |
| |-
| |
| |85
| |
| |Bostaunieux Oubliette: Map 2
| |
| |-
| |
| |86
| |
| |Bostaunieux Oubliette: Map 3
| |
| |-
| |
| |87
| |
| |Buburimu Peninsula
| |
| |-
| |
| |88
| |
| |Castle Oztroja: Map 1
| |
| |-
| |
| |89
| |
| |Castle Oztroja: Map 2
| |
| |-
| |
| |90
| |
| |Castle Oztroja: Map 3
| |
| |-
| |
| |91
| |
| |Castle Oztroja: Map 4
| |
| |-
| |
| |92
| |
| |Castle Oztroja: Map 5
| |
| |-
| |
| |93
| |
| |Castle Oztroja: Map 6
| |
| |-
| |
| |94
| |
| |Castle Oztroja: Map 7
| |
| |-
| |
| |95
| |
| |Castle Zvahl Baileys: Map 1
| |
| |-
| |
| |96
| |
| |Castle Zvahl Baileys: Map 2
| |
| |-
| |
| |97
| |
| |Castle Zvahl Baileys: Map 3
| |
| |-
| |
| |98
| |
| |Castle Zvahl Baileys: Map 4
| |
| |-
| |
| |99
| |
| |Castle Zvahl Keep: Map 1
| |
| |-
| |
| |100
| |
| |Castle Zvahl Keep: Map 2
| |
| |-
| |
| |101
| |
| |Castle Zvahl Keep: Map 3
| |
| |-
| |
| |102
| |
| |Castle Zvahl Keep: Map 4
| |
| |-
| |
| |103
| |
| |Crawler's Nest: Map 1
| |
| |-
| |
| |104
| |
| |Crawler's Nest: Map 2
| |
| |-
| |
| |105
| |
| |Crawler's Nest: Map 3
| |
| |-
| |
| |106
| |
| |Dangruf Wadi
| |
| |-
| |
| |107
| |
| |Davoi
| |
| |-
| |
| |108
| |
| |East Ronfaure
| |
| |-
| |
| |109
| |
| |East Sarutabaruta
| |
| |-
| |
| |110
| |
| |Fort Ghelsba
| |
| |-
| |
| |111
| |
| |Garlaige Citadel: Map 1
| |
| |-
| |
| |112
| |
| |Garlaige Citadel: Map 2
| |
| |-
| |
| |113
| |
| |Garlaige Citadel: Map 3
| |
| |-
| |
| |114
| |
| |Garlaige Citadel: Map 4
| |
| |-
| |
| |115
| |
| |Ghelsba Outpost: Map 1
| |
| |-
| |
| |116
| |
| |Ghelsba Outpost: Map 2
| |
| |-
| |
| |117
| |
| |Giddeus: Map 1
| |
| |-
| |
| |118
| |
| |Giddeus: Map 2
| |
| |-
| |
| |119
| |
| |Gusgen Mines: Map 1
| |
| |-
| |
| |120
| |
| |Gusgen Mines: Map 2
| |
| |-
| |
| |121
| |
| |Gusgen Mines: Map 3
| |
| |-
| |
| |122
| |
| |Gusgen Mines: Map 4
| |
| |-
| |
| |123
| |
| |Gustav Tunnel: Map 1
| |
| |-
| |
| |124
| |
| |Gustav Tunnel: Map 2
| |
| |-
| |
| |125
| |
| |Inner Horutoto Ruins: Map 1
| |
| |-
| |
| |126
| |
| |Inner Horutoto Ruins: Map 2
| |
| |-
| |
| |127
| |
| |Inner Horutoto Ruins: Map 3
| |
| |-
| |
| |128
| |
| |Inner Horutoto Ruins: Map 4
| |
| |-
| |
| |129
| |
| |Jugner Forest
| |
| |-
| |
| |130
| |
| |Korroloka Tunnel: Map 1
| |
| |-
| |
| |131
| |
| |Korroloka Tunnel: Map 2
| |
| |-
| |
| |132
| |
| |Korroloka Tunnel: Map 3
| |
| |-
| |
| |133
| |
| |Korroloka Tunnel: Map 4
| |
| |-
| |
| |134
| |
| |Korroloka Tunnel: Map 5
| |
| |-
| |
| |135
| |
| |Kuftal Tunnel: Map 1
| |
| |-
| |
| |136
| |
| |Kuftal Tunnel: Map 2
| |
| |-
| |
| |137
| |
| |Kuftal Tunnel: Map 3
| |
| |-
| |
| |138
| |
| |Kuftal Tunnel: Map 4
| |
| |-
| |
| |139
| |
| |Lufaise Meadows
| |
| |-
| |
| |140
| |
| |Meriphataud Mountains
| |
| |-
| |
| |141
| |
| |Misareaux Coast
| |
| |-
| |
| |142
| |
| |Monastic Cavern
| |
| |-
| |
| |143
| |
| |North Gustaberg
| |
| |-
| |
| |144
| |
| |Palborough Mines: Map 1
| |
| |-
| |
| |145
| |
| |Palborough Mines: Map 2
| |
| |-
| |
| |146
| |
| |Palborough Mines: Map 3
| |
| |-
| |
| |147
| |
| |Pashhow Marshlands
| |
| |-
| |
| |148
| |
| |Promyvion Dem
| |
| |-
| |
| |149
| |
| |Promyvion Holla
| |
| |-
| |
| |150
| |
| |Promyvion Mea
| |
| |-
| |
| |151
| |
| |Promyvion Vahzl
| |
| |-
| |
| |152
| |
| |Qulun Dome
| |
| |-
| |
| |153
| |
| |Riverne Site #A01
| |
| |-
| |
| |154
| |
| |Riverne Site #B01
| |
| |-
| |
| |155
| |
| |Ru'Aun Gardens
| |
| |-
| |
| |156
| |
| |Sea Serpent Grotto: Map 1
| |
| |-
| |
| |157
| |
| |Sea Serpent Grotto: Map 2
| |
| |-
| |
| |158
| |
| |Sea Serpent Grotto: Map 3
| |
| |-
| |
| |159
| |
| |Sea Serpent Grotto: Map 4
| |
| |-
| |
| |160
| |
| |Sea Serpent Grotto: Map 5
| |
| |-
| |
| |161
| |
| |Selbina
| |
| |-
| |
| |162
| |
| |South Gustaberg
| |
| |-
| |
| |163
| |
| |Temenos North: Map 1
| |
| |-
| |
| |164
| |
| |Temenos North: Map 2
| |
| |-
| |
| |165
| |
| |Temenos North: Map 3
| |
| |-
| |
| |166
| |
| |Temenos North: Map 4
| |
| |-
| |
| |167
| |
| |Temenos North: Map 5
| |
| |-
| |
| |168
| |
| |Temenos North: Map 6
| |
| |-
| |
| |169
| |
| |Temenos North: Map 7
| |
| |-
| |
| |170
| |
| |Temenos East: Map 1
| |
| |-
| |
| |171
| |
| |Temenos East: Map 2
| |
| |-
| |
| |172
| |
| |Temenos East: Map 3
| |
| |-
| |
| |173
| |
| |Temenos East: Map 4
| |
| |-
| |
| |174
| |
| |Temenos East: Map 5
| |
| |-
| |
| |175
| |
| |Temenos East: Map 6
| |
| |-
| |
| |176
| |
| |Temenos East: Map 7
| |
| |-
| |
| |177
| |
| |Temenos West: Map 1
| |
| |-
| |
| |178
| |
| |Temenos West: Map 2
| |
| |-
| |
| |179
| |
| |Temenos West: Map 3
| |
| |-
| |
| |180
| |
| |Temenos West: Map 4
| |
| |-
| |
| |181
| |
| |Temenos West: Map 5
| |
| |-
| |
| |182
| |
| |Temenos West: Map 6
| |
| |-
| |
| |183
| |
| |Temenos West: Map 7
| |
| |-
| |
| |184
| |
| |Temenos Center: Map 1
| |
| |-
| |
| |185
| |
| |Temenos Center: Map 2
| |
| |-
| |
| |186
| |
| |Temenos Center: Map 3
| |
| |-
| |
| |187
| |
| |Temenos Center: Map 4
| |
| |-
| |
| |188
| |
| |Temenos Center: Basement
| |
| |-
| |
| |189
| |
| |Temenos Entrance
| |
| |-
| |
| |190
| |
| |Temple of Uggalepih: Map 1
| |
| |-
| |
| |191
| |
| |Temple of Uggalepih: Map 2
| |
| |-
| |
| |192
| |
| |Temple of Uggalepih: Map 3
| |
| |-
| |
| |193
| |
| |Temple of Uggalepih: Map 4
| |
| |-
| |
| |194
| |
| |The Boyahda Tree: Map 1
| |
| |-
| |
| |195
| |
| |The Boyahda Tree: Map 2
| |
| |-
| |
| |196
| |
| |The Boyahda Tree: Map 3
| |
| |-
| |
| |197
| |
| |The Boyahda Tree: Map 4
| |
| |-
| |
| |198
| |
| |The Eldieme Necropolis: Map 1
| |
| |-
| |
| |199
| |
| |The Eldieme Necropolis: Map 2
| |
| |-
| |
| |200
| |
| |The Eldieme Necropolis: Map 3
| |
| |-
| |
| |201
| |
| |The Santuary of Zi'Tah
| |
| |-
| |
| |202
| |
| |Uleguerand Range: Map 1
| |
| |-
| |
| |203
| |
| |Uleguerand Range: Map 2
| |
| |-
| |
| |204
| |
| |West Ronfaure
| |
| |-
| |
| |205
| |
| |West Sarutabaruta
| |
| |-
| |
| |206
| |
| |Windurst Walls
| |
| |-
| |
| |207
| |
| |Xarcabard
| |
| |-
| |
| |208
| |
| |Yhoator Jungle
| |
| |-
| |
| |209
| |
| |Yughott Grotto: Map 1
| |
| |-
| |
| |210
| |
| |Yughott Grotto: Map 2
| |
| |-
| |
| |211
| |
| |Yuhtunga Jungle
| |
| |-
| |
| |212
| |
| |Zeruhn Mines
| |
| |-
| |
| |213
| |
| |Eastern Altepa Desert
| |
| |-
| |
| |214
| |
| |Western Altepa Desert
| |
| |-
| |
| |215
| |
| |Rabao
| |
| |-
| |
| |216
| |
| |Quicksand Caves: Map 1
| |
| |-
| |
| |217
| |
| |Quicksand Caves: Map 2
| |
| |-
| |
| |218
| |
| |Quicksand Caves: Map 3
| |
| |-
| |
| |219
| |
| |Quicksand Caves: Map 4
| |
| |-
| |
| |220
| |
| |Quicksand Caves: Map 5
| |
| |-
| |
| |221
| |
| |Quicksand Caves: Map 6
| |
| |-
| |
| |222
| |
| |Quicksand Caves: Map 7
| |
| |-
| |
| |223
| |
| |Quicksand Caves: Map 8
| |
| |-
| |
| |224
| |
| |Sacrarium: Map 1
| |
| |-
| |
| |225
| |
| |Sacrarium: Map 2
| |
| |-
| |
| |226
| |
| |Carpenter's Landing: Map 1
| |
| |-
| |
| |227
| |
| |Carpenter's Landing: Map 2
| |
| |-
| |
| |228
| |
| |Sealion's Den
| |
| |-
| |
| |229
| |
| |Phomiuna Aqueducts: Map 1
| |
| |-
| |
| |230
| |
| |Phomiuna Aqueducts: Map 2
| |
| |-
| |
| |231
| |
| |Phomiuna Aqueducts: Map 3
| |
| |-
| |
| |232
| |
| |Fei'Yin: Map 1
| |
| |-
| |
| |233
| |
| |Fei'Yin: Map 2
| |
| |-
| |
| |234
| |
| |Ranguemont Pass
| |
| |-
| |
| |235
| |
| |Ordelle's Caves: Map 1
| |
| |-
| |
| |236
| |
| |Ordelle's Caves: Map 2
| |
| |-
| |
| |237
| |
| |Ordelle's Caves: Map 3
| |
| |-
| |
| |238
| |
| |Maze of Shakhrami: Map 1
| |
| |-
| |
| |239
| |
| |Maze of Shakhrami: Map 2
| |
| |-
| |
| |240
| |
| |Grand Palace of Hu'Xzoi: Map 1
| |
| |-
| |
| |241
| |
| |Grand Palace of Hu'Xzoi: Map 2
| |
| |-
| |
| |242
| |
| |Grand Palace of Hu'Xzoi: Map 3
| |
| |-
| |
| |243
| |
| |Labyrinth of Onzozo
| |
| |-
| |
| |244
| |
| |King Ranperres Tomb: Map 1
| |
| |-
| |
| |245
| |
| |King Ranperres Tomb: Map 2
| |
| |-
| |
| |246
| |
| |Outter Horutoto: Map 1
| |
| |-
| |
| |247
| |
| |Outter Horutoto: Map 2
| |
| |-
| |
| |248
| |
| |Outter Horutoto: Map 3
| |
| |-
| |
| |249
| |
| |Outter Horutoto: Map 4
| |
| |-
| |
| |250
| |
| |Outter Horutoto: Map 5
| |
| |-
| |
| |251
| |
| |Oldton Movalpolos
| |
| |-
| |
| |252
| |
| |Cape Teriggan
| |
| |-
| |
| |253
| |
| |Toraimarai Canal: Map 1
| |
| |-
| |
| |254
| |
| |Toraimarai Canal: Map 2
| |
| |-
| |
| |255
| |
| |Hall of the Gods
| |
| |-
| |
| |256
| |
| |Ve'Lugannon Palace: Map 1
| |
| |-
| |
| |257
| |
| |Ve'Lugannon Palace: Map 2
| |
| |-
| |
| |258
| |
| |Ve'Lugannon Palace: Map 3
| |
| |-
| |
| |259
| |
| |Ve'Lugannon Palace: Map 4
| |
| |-
| |
| |260
| |
| |Ve'Lugannon Palace: Map 5
| |
| |-
| |
| |261
| |
| |Ve'Lugannon Palace: Map 6
| |
| |-
| |
| |262
| |
| |Ve'Lugannon Palace: Map 6
| |
| |-
| |
| |263
| |
| |Ve'Lugannon Palace: Map 7
| |
| |-
| |
| |264
| |
| |Ve'Lugannon Palace: Map 8
| |
| |-
| |
| |265
| |
| |Ve'Lugannon Palace: Map 9
| |
| |-
| |
| |266
| |
| |The Shrine of Ru'Avitau: Map 1
| |
| |-
| |
| |267
| |
| |The Shrine of Ru'Avitau: Map 2
| |
| |-
| |
| |268
| |
| |The Shrine of Ru'Avitau: Map 3
| |
| |-
| |
| |269
| |
| |The Shrine of Ru'Avitau: Map 4
| |
| |-
| |
| |270
| |
| |The Shrine of Ru'Avitau: Map 5
| |
| |-
| |
| |271
| |
| |The Shrine of Ru'Avitau: Map 6
| |
| |-
| |
| |272
| |
| |Den of Rancor: Map 1
| |
| |-
| |
| |273
| |
| |Den of Rancor: Map 2
| |
| |-
| |
| |274
| |
| |Den of Rancor: Map 3
| |
| |-
| |
| |275
| |
| |Den of Rancor: Map 4
| |
| |-
| |
| |276
| |
| |Den of Rancor: Map 5
| |
| |-
| |
| |277
| |
| |Den of Rancor: Map 6
| |
| |-
| |
| |278
| |
| |Den of Rancor: Map 7
| |
| |-
| |
| |279
| |
| |Den of Rancor: Map 8
| |
| |-
| |
| |280
| |
| |Den of Rancor: Map 9
| |
| |-
| |
| |281
| |
| |Dragon's Aery
| |
| |-
| |
| |282
| |
| |Ro'Maeve
| |
| |-
| |
| |283
| |
| |Ifrit's Cauldron: Map 1
| |
| |-
| |
| |284
| |
| |Ifrit's Cauldron: Map 2
| |
| |-
| |
| |285
| |
| |Ifrit's Cauldron: Map 3
| |
| |-
| |
| |286
| |
| |Ifrit's Cauldron: Map 4
| |
| |-
| |
| |287
| |
| |Ifrit's Cauldron: Map 5
| |
| |-
| |
| |288
| |
| |Ifrit's Cauldron: Map 6
| |
| |-
| |
| |289
| |
| |Ifrit's Cauldron: Map 7
| |
| |-
| |
| |290
| |
| |Ifrit's Cauldron: Map 8
| |
| |-
| |
| |291
| |
| |Kazham
| |
| |-
| |
| |292
| |
| |Newton Movalpolos
| |
| |-
| |
| |293
| |
| |Valley of Sorrows
| |
| |-
| |
| |294
| |
| |Al Zahbi
| |
| |-
| |
| |295
| |
| |Aht Urhgan Whitegate
| |
| |-
| |
| |296
| |
| |Bhaflau Thickets: Map 1
| |
| |-
| |
| |297
| |
| |Bhaflau Thickets: Map 2
| |
| |-
| |
| |298
| |
| |Wajaom Woodlands
| |
| |-
| |
| |299
| |
| |Aydeewa Subterrane: Map 1
| |
| |-
| |
| |300
| |
| |Aydeewa Subterrane: Map 2
| |
| |-
| |
| |301
| |
| |Aydeewa Subterrane: Map 3
| |
| |-
| |
| |302
| |
| |Aydeewa Subterrane: Map 4
| |
| |-
| |
| |303
| |
| |Aydeewa Subterrane: Map 5
| |
| |-
| |
| |304
| |
| |Aydeewa Subterrane: Map 6
| |
| |-
| |
| |305
| |
| |Aydeewa Subterrane: Map 7
| |
| |-
| |
| |306
| |
| |Mamook: Map 1
| |
| |-
| |
| |307
| |
| |Mamook: Map 2
| |
| |-
| |
| |308
| |
| |Mamook: Map 3
| |
| |-
| |
| |309
| |
| |Alzadaal Undersea Ruins: Map 1
| |
| |-
| |
| |310
| |
| |Alzadaal Undersea Ruins: Map 2
| |
| |-
| |
| |311
| |
| |Alzadaal Undersea Ruins: Map 3
| |
| |-
| |
| |312
| |
| |Alzadaal Undersea Ruins: Map 4
| |
| |-
| |
| |313
| |
| |Alzadaal Undersea Ruins: Map 5
| |
| |-
| |
| |314
| |
| |Alzadaal Undersea Ruins: Map 6
| |
| |-
| |
| |315
| |
| |Alzadaal Undersea Ruins: Map 7
| |
| |-
| |
| |316
| |
| |Alzadaal Undersea Ruins: Map 8
| |
| |-
| |
| |317
| |
| |Alzadaal Undersea Ruins: Map 9
| |
| |-
| |
| |318
| |
| |Alzadaal Undersea Ruins: Map 10
| |
| |-
| |
| |319
| |
| |Nyzul Isle: Map 1
| |
| |-
| |
| |320
| |
| |Nyzul Isle: Map 2
| |
| |-
| |
| |321
| |
| |Nyzul Isle: Map 3
| |
| |-
| |
| |322
| |
| |Nyzul Isle: Map 4
| |
| |-
| |
| |323
| |
| |Nyzul Isle: Map 5
| |
| |-
| |
| |324
| |
| |Nyzul Isle: Map 6
| |
| |-
| |
| |325
| |
| |Nyzul Isle: Map 7
| |
| |-
| |
| |326
| |
| |Nyzul Isle: Map 8
| |
| |-
| |
| |327
| |
| |Mount Zhayolm
| |
| |-
| |
| |328
| |
| |Nashmau
| |
| |-
| |
| |329
| |
| |Caedarva Mire: Map 1
| |
| |-
| |
| |330
| |
| |Caedarva Mire: Map 2
| |
| |-
| |
| |331
| |
| |Caedarva Mire: Map 3
| |
| |-
| |
| |332
| |
| |Caedarva Mire: Map 4
| |
| |-
| |
| |333
| |
| |Arrapago Reef: Map 1
| |
| |-
| |
| |334
| |
| |Arrapago Reef: Map 2
| |
| |-
| |
| |335
| |
| |Arrapago Reef: Map 3
| |
| |-
| |
| |336
| |
| |Arrapago Reef: Map 4
| |
| |-
| |
| |337
| |
| |Arrapago Reef: Map 5
| |
| |-
| |
| |338
| |
| |Arrapago Reef: Map 6
| |
| |-
| |
| |339
| |
| |Arrapago Reef: Map 7
| |
| |-
| |
| |340
| |
| |Arrapago Reef: Map 8
| |
| |-
| |
| |341
| |
| |Arrapago Reef: Map 9
| |
| |-
| |
| |342
| |
| |Arrapago Reef: Map 10
| |
| |-
| |
| |343
| |
| |Arrapago Reef: Map 11
| |
| |-
| |
| |344
| |
| |Mamool Ja Training Grounds: Map 1
| |
| |-
| |
| |345
| |
| |Mamool Ja Training Grounds: Map 2
| |
| |-
| |
| |346
| |
| |Mamool Ja Training Grounds: Map 3
| |
| |-
| |
| |347
| |
| |Mamool Ja Training Grounds: Map 4
| |
| |-
| |
| |348
| |
| |Mamool Ja Training Grounds: Map 5
| |
| |-
| |
| |349
| |
| |Mamool Ja Training Grounds: Map 6
| |
| |-
| |
| |350
| |
| |Mamool Ja Training Grounds: Map 7
| |
| |-
| |
| |351
| |
| |Mamool Ja Training Grounds: Map 8
| |
| |-
| |
| |352
| |
| |Mamool Ja Training Grounds: Map 9
| |
| |-
| |
| |353
| |
| |Mamool Ja Training Grounds: Map 10
| |
| |-
| |
| |354
| |
| |Talacca Cove
| |
| |-
| |
| |355
| |
| |Silver Sea Remnants: Map 1
| |
| |-
| |
| |356
| |
| |Silver Sea Remnants: Map 2
| |
| |-
| |
| |357
| |
| |Silver Sea Remnants: Map 3
| |
| |-
| |
| |358
| |
| |Silver Sea Remnants: Map 4
| |
| |-
| |
| |359
| |
| |Silver Sea Remnants: Map 5
| |
| |-
| |
| |360
| |
| |Arrapago Remnants: Map 1
| |
| |-
| |
| |361
| |
| |Arrapago Remnants: Map 2
| |
| |-
| |
| |362
| |
| |Arrapago Remnants: Map 3
| |
| |-
| |
| |363
| |
| |Arrapago Remnants: Map 4
| |
| |-
| |
| |364
| |
| |Arrapago Remnants: Map 5
| |
| |-
| |
| |365
| |
| |Arrapago Remnants: Map 6
| |
| |-
| |
| |366
| |
| |Arrapago Remnants: Map 7
| |
| |-
| |
| |367
| |
| |Zhayolm Remnants: Map 1
| |
| |-
| |
| |368
| |
| |Zhayolm Remnants: Map 2
| |
| |-
| |
| |369
| |
| |Zhayolm Remnants: Map 3
| |
| |-
| |
| |370
| |
| |Zhayolm Remnants: Map 4
| |
| |-
| |
| |371
| |
| |Zhayolm Remnants: Map 5
| |
| |-
| |
| |372
| |
| |Zhayolm Remnants: Map 6
| |
| |-
| |
| |373
| |
| |Zhayolm Remnants: Map 7
| |
| |-
| |
| |374
| |
| |Lebros Cavern: Map 1
| |
| |-
| |
| |375
| |
| |Lebros Cavern: Map 2
| |
| |-
| |
| |376
| |
| |Lebros Cavern: Map 3
| |
| |-
| |
| |377
| |
| |Lebros Cavern: Map 4
| |
| |-
| |
| |378
| |
| |Lebros Cavern: Map 5
| |
| |-
| |
| |379
| |
| |Lebros Cavern: Map 6
| |
| |-
| |
| |380
| |
| |Lebros Cavern: Map 7
| |
| |-
| |
| |381
| |
| |Lebros Cavern: Map 8
| |
| |-
| |
| |382
| |
| |Lebros Cavern: Map 9
| |
| |-
| |
| |383
| |
| |Lebros Cavern: Map 10
| |
| |-
| |
| |384
| |
| |Halvung: Map 1
| |
| |-
| |
| |385
| |
| |Halvung: Map 2
| |
| |-
| |
| |386
| |
| |Halvung: Map 3
| |
| |-
| |
| |387
| |
| |Halvung: Map 4
| |
| |-
| |
| |388
| |
| |Periqia: Map 1
| |
| |-
| |
| |389
| |
| |Periqia: Map 2
| |
| |-
| |
| |390
| |
| |Periqia: Map 3
| |
| |-
| |
| |391
| |
| |Periqia: Map 4
| |
| |-
| |
| |392
| |
| |Periqia: Map 5
| |
| |-
| |
| |393
| |
| |Periqia: Map 6
| |
| |-
| |
| |394
| |
| |Periqia: Map 7
| |
| |-
| |
| |395
| |
| |Periqia: Map 8
| |
| |-
| |
| |396
| |
| |Periqia: Map 9
| |
| |-
| |
| |397
| |
| |Periqia: Map 10
| |
| |-
| |
| |398
| |
| |Leujaoam Sanctum: Map 1
| |
| |-
| |
| |399
| |
| |Leujaoam Sanctum: Map 2
| |
| |-
| |
| |400
| |
| |Leujaoam Sanctum: Map 3
| |
| |-
| |
| |401
| |
| |Leujaoam Sanctum: Map 4
| |
| |-
| |
| |402
| |
| |Leujaoam Sanctum: Map 5
| |
| |-
| |
| |403
| |
| |Leujaoam Sanctum: Map 6
| |
| |-
| |
| |404
| |
| |Leujaoam Sanctum: Map 7
| |
| |-
| |
| |405
| |
| |Leujaoam Sanctum: Map 8
| |
| |-
| |
| |406
| |
| |Leujaoam Sanctum: Map 9
| |
| |-
| |
| |407
| |
| |Leujaoam Sanctum: Map 10
| |
| |-
| |
| |408
| |
| |Ilrusi Atoll: Map 1
| |
| |-
| |
| |409
| |
| |Ilrusi Atoll: Map 2
| |
| |-
| |
| |410
| |
| |Ilrusi Atoll: Map 3
| |
| |-
| |
| |411
| |
| |Ilrusi Atoll: Map 4
| |
| |-
| |
| |412
| |
| |Ilrusi Atoll: Map 5
| |
| |-
| |
| |413
| |
| |Ilrusi Atoll: Map 6
| |
| |-
| |
| |414
| |
| |Ilrusi Atoll: Map 7
| |
| |-
| |
| |415
| |
| |Ilrusi Atoll: Map 8
| |
| |-
| |
| |416
| |
| |Ilrusi Atoll: Map 9
| |
| |-
| |
| |417
| |
| |Ilrusi Atoll: Map 10
| |
| |}
| |
|
| |
| == Nerd Alert == | | == Nerd Alert == |
| The map is powered by Leaflet, an open-source JavaScript library for interactive map enthusiasts. The software gives us the ability to use available map images and, in the case of the world map, a custom tile server. The bulk of all map related interactive features is housed in a custom extension, built specifically for the HorizonXI Wiki. | | The map is powered by Leaflet, an open-source JavaScript library for interactive map enthusiasts. The software gives us the ability to use available map images and, in the case of the world map, a custom tile server. The bulk of all map related interactive features is housed in a custom extension, built specifically for the HorizonXI Wiki. |
The Basics
This new map provides easy access to all available map images for available HorizonXI content. Currently the map has interactive features that both help the user navigate between desired maps and increase convenience. All map images are a compilation from multiple sources. Map images from the Remapster project were prioritized, followed by those from SquareEnix. All maps within Rise of the Zilart, Chains of Promathia, and Treasures of Aht Urhgan. Some interactive map features within Treasures of Aht Urhgan are still under construction, but the maps themselves are available.
Features
The map was designed originally to give the user the freedom to quickly switch between connecting maps. The HorizonXI watermark at the bottom reinforces that this map was built/designed exclusively for the HorizonXI server.
| Demonstration |
Feature |
Description
|
 |
Zoom Controls |
The user has two options for zooming in/out of any maps - either using the controls available on the map itself, or using the mouse wheel.
|
 |
Search Icon |
Use the search icon to open a search bar. Inside the search bar you can search for any map using the name of the map, or the map id. The map id is typically used for wiki editors and can be found here Template:FFXIMap .
|
 |
Connections |
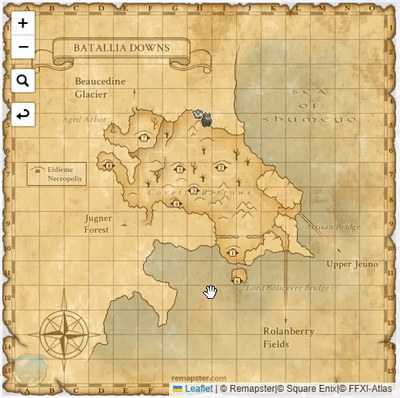
Locations for connections to adjacent maps are displayed when the mouse cursor moves over either a connection or a label for a connection. The demo gif demonstrates how this is displayed on the map. If there are more than one location on the map that connect to the same adjacent map then all connections will be highlighted with the appropriate animation. Battalia Downs demonstrates this well. The actual animation marker is typically placed as close to the zone location as possible.
|
 |
Back Icon |
The back icon allows the user to move to the previous map. This icon only appears when you have a history of viewed maps.
|
Showing NPCs & Map Details
NPCs displayed on Map
The example image here shows NPCs, as icons, in Upper Jeuno. This is made possible by adding known points available from the AirSkyBoat project and from HorizonXI players throughout Vana'diel. These icons are organized in categories and available to see on the map by clicking the layers button on the top right.
Additionally, when you move the mouse over an NPC on the map (or if you're on mobile just tap the NPC icon once) a tooltip opens and shows you the current HorizonXI image for that NPC, along with the name and current in-game coordinates. Clicking the NPC icon again (or on mobile just tap again) will open that NPCs wiki page in another browser window.
This feature is about 50% complete, with new wiki editors and users helping contribute daily. If you are interested, just reach out anywhere on our Discord and we will assist with more specifics !
How can I contribute?
Great question ! First, I would highly encourage anyone excited about editing any portion of the HorizonXI Wiki to check out Editing Guidelines and Editor_Hub. These pages house most of the basic knowledge regarding editing/styling Wiki pages. If you're still interested in contributing to the map I would check out Template:FFXIMap and Template:FFXIMap Markers.
This template provides some slightly more detailed technical description of these features, some known fixes we are working through, and the map id number scheme used for all map programming. This page is not only a great reference for map ids but also how to set up your own interactive map for supporting any editing.
This is the current template that demonstrates how to add NPCs to the map. This is the only template we are using at the moment to add things to the map, so follow this if you are interested in adding NPCs that aren't currently displayed.
Nerd Alert
The map is powered by Leaflet, an open-source JavaScript library for interactive map enthusiasts. The software gives us the ability to use available map images and, in the case of the world map, a custom tile server. The bulk of all map related interactive features is housed in a custom extension, built specifically for the HorizonXI Wiki.
Attribution
 Additional Attribution remarks listed on the bottom right of all maps
Author: Shocks (Starfox9507), Contributors: Hugin, Spiffly, Dejey


