Windurst Mission 2-3: Difference between revisions
Created page with "{{Mission Header |Mission Name=The Three Kingdoms |Expansion=None |Start=Any Windurst Gate Guard |Description=Determine the state of affairs in San d'Oria and Bastok, and render assistance on behalf of Heavens Tower. Inquire at our consulate in each country for more information. Traveling by ship from Mhaura to Selbina is recommended. |Level=25 |Repeatable=No |Previous=Windurst Mission 2-2{{!}}A Testing Time |Next=Windurst Mission 3-1{{!}}To Each His..." Tag: visualeditor-wikitext |
No edit summary |
||
| (40 intermediate revisions by 13 users not shown) | |||
| Line 1: | Line 1: | ||
{{Mission Header | {{Mission Header | ||
|Mission Name=The Three Kingdoms | |Mission Name=The Three Kingdoms | ||
|Expansion= | |Expansion=windurst | ||
|Start=Any Windurst Gate Guard | |Start=Any [[Windurst Gate Guard]] | ||
|Description=Determine the state of affairs in [[San d'Oria]] and [[Bastok]], and render assistance on behalf of [[Heavens Tower]]. Inquire at our consulate in each country for more information. Traveling by ship from [[Mhaura]] to [[Selbina]] is recommended. | |Description=Determine the state of affairs in [[San d'Oria]] and [[Bastok]], and render assistance on behalf of [[Heavens Tower]]. Inquire at our consulate in each country for more information. Traveling by ship from [[Mhaura]] to [[Selbina]] is recommended. | ||
|Level=25 | |Items Needed=[[Mythril Sand]] (Bastok Path) | ||
|Level=25 (recommended) | |||
|Repeatable=No | |Repeatable=No | ||
|Previous=Windurst Mission 2-2{{!}}A Testing Time | |Previous=Windurst Mission 2-2{{!}}A Testing Time | ||
|Next=Windurst Mission 3-1{{!}}To Each His Own Right | |Next=Windurst Mission 3-1{{!}}To Each His Own Right | ||
|Title=Dread Dragon Slayer or Dark Dragon Slayer | |Title=Dread Dragon Slayer or Dark Dragon Slayer<br>Warchief Wrecker<br>Certified Adventurer | ||
|Reward= | |Reward=Rank 3<br>3,000 gil<br>[[Mog Wardrobe]]: 10 Slots {{changes}}<br>Level 10 [[Outpost Teleportation]] from [[Jeuno]] {{changes}}<br>{{KeyItem}}[[Adventurer's Certificate]] | ||
}} | }} | ||
== | ==Notes== | ||
* | *Trade at least six crystals to a [[Conquest Overseer]] to unlock this mission, or less if you completed Mission 2-2. If the mission does not appear, trade 1 more until it does. | ||
*This mission | *This mission is broken down into two legs. Whichever nation you choose first determines how the next plays out. | ||
* | |||
* | ==Start== | ||
*Accept the mission from any [[Windurst Gate Guard]] '''then''' | |||
*Talk to [[Kupipi]] in the clerical chamber on the ground floor of the [[Heavens Tower]] ([[Windurst Walls]] at {{Location Tooltip| area = Windurst Walls| pos = H-7}}) to get a [[Letter to the Consuls]] '''then''' | |||
*Decide which nation to go to first. If going to Bastok first, then follow '''Option 1.''' Otherwise follow '''Option 2.''' | |||
<div class="flex-container"> | |||
<div class="flex-container-item-2"> | |||
==Option 1: Bastok Path== | ==Option 1: Bastok Path== | ||
===Windurst to Bastok=== | ===Windurst to Bastok=== | ||
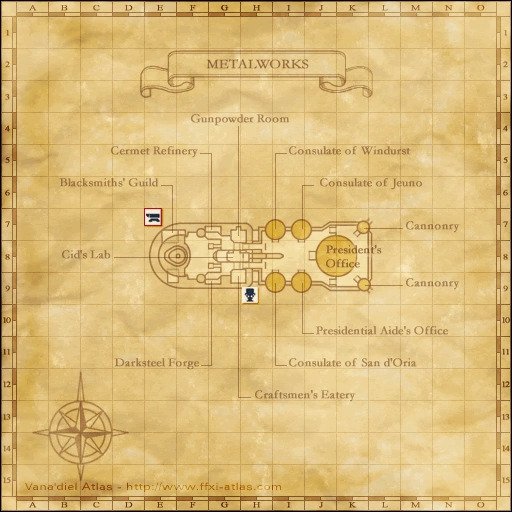
* | *Travel to [[Bastok]] [[Metalworks]]. | ||
* | *Talk to [[Patt-Pott]] on the top floor of the [[Consulate of Windurst (Bastok)|Consulate of Windurst]] ([[Metalworks]] at {{Location Tooltip| area = Metalworks | pos = I-7}}). | ||
* | *Talk to [[Pius]] in the Department of Industry (Right Side Door) inside the [[President's Office]] ([[Metalworks]] at {{Location Tooltip| area = Metalworks | pos = J-8}}). | ||
* | *Talk to [[Grohm]] in the [[Craftsmen's Eatery]] ([[Metalworks]] at {{Location Tooltip| area = Metalworks | pos = H-9}}) to get 3 [[Pickaxe]]s to mine [[Mine Gravel]] in [[Palborough Mines]] '''or purchase Mine Gravel from Auction House.''' {{Collapsible| | ||
* | **You can purchase Mine Gravel from the Auction House. Check if it's being sold before you leave. | ||
* | **Consider buying more [[Pickaxe]]s as they can break when attempting to obtain Mine Gravel. It is recommended to buy another 3 Pickaxes, as they are cheap, to lessen the chances of not obtaining Mine Gravel when using all Pickaxes. This prevents having to do a long journey back to get more. | ||
}} | |||
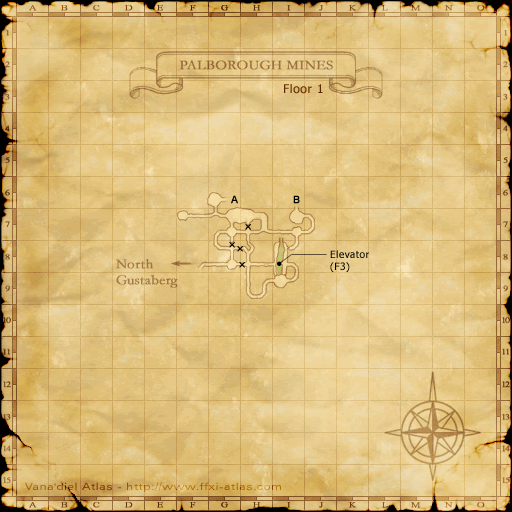
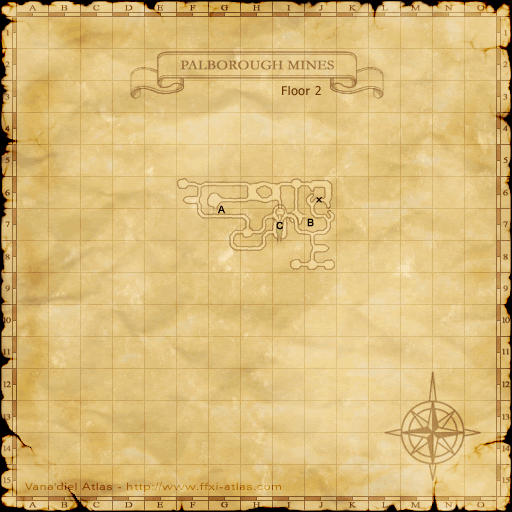
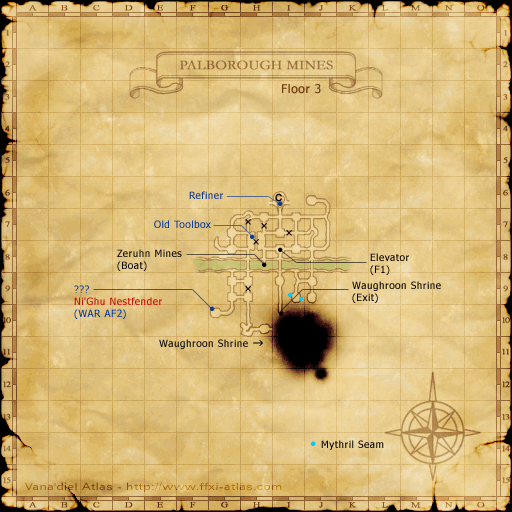
*Travel to [[Palborough Mines]] and mine a [[Mine Gravel]] from any of the ''Mythril Seam''s. The easiest nodes to reach are F-7 & I-8(NW). {{Collapsible| | |||
**Trade the [[Pickaxe]] to the ''Mythril Seam'' until you receive some [[Mine Gravel]]. | |||
**There is one on the first floor at {{Location Tooltip| area = Palborough Mines | map = Map 1 | pos = I-8}}, one on the second floor at {{Location Tooltip| area = Palborough Mines | map = Map 2 | pos = I-8}} and one on the third floor at {{Location Tooltip| area = Palborough Mines | map = Map 3 | pos = I-9}}. | |||
}} | |||
*Once you receive the [[Mine Gravel]], '''trade''' it to the Refiner Lid. '''Then''' activate the lever to the right. | |||
{{Collapsible|**Taking the shortest direct route is dangerous as the path is littered with level 18-20 aggressive monsters. A safer route can be found by taking the northwest exit on the ground floor at {{Location Tooltip| area = Palborough Mines | map = Map 1 | pos = G-6}} and using the refiner at {{Location Tooltip| area = Palborough Mines | map = Map 2 | pos = I-7}}. Otherwise take the shorter route on the third floor at {{Location Tooltip| area = Palborough Mines | map = Map 3 | pos = I-6}} and pull the lever.}} | |||
*Drop off the ledge to the second floor and pull another lever to receive [[Mythril Sand]]. | |||
*Return to [[Patt-Pott]] in the [[Consulate of Windurst (Bastok)|Consulate of Windurst]] ([[Metalworks]] at {{Location Tooltip| area = Metalworks | pos = I-7}}) and trade the [[Mythril Sand]] to him. | |||
*Talk to [[Patt-Pott]] once more. | |||
===Bastok to San d'Oria=== | ===Bastok to San d'Oria=== | ||
* | *Travel to [[Northern San d'Oria]] | ||
* | *Talk to [[Kasaroro]] in the [[Consulate of Windurst (San d'Oria)|Consulate of Windurst]] ([[Northern San d'Oria]] at {{Location Tooltip| area = Northern San d'Oria| pos = H-9}}). | ||
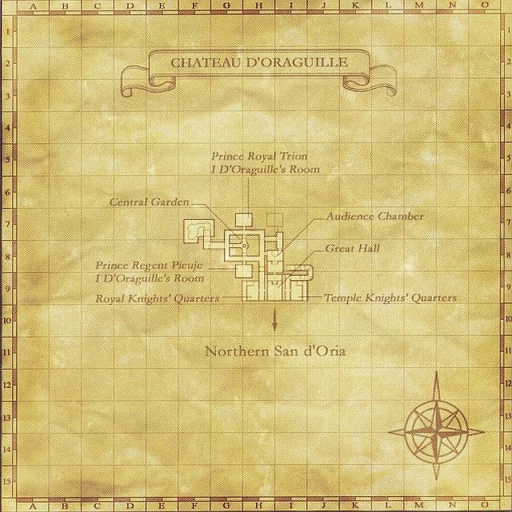
* | *Talk to [[Halver]] in [[Chateau d'Oraguille]] ({{Location Tooltip| area = Chateau d'Oraguille| pos = I-9}}). | ||
*Next, travel through [[Ghelsba Outpost]] to [[Horlais Peak]]. | |||
** | *Examine the Burning Circle inside to enter the BCNM "The Rank 2 Final Mission". {{Collapsible| | ||
** | **Inside you will find a [[Spotter]] and [[Dread Dragon]]. | ||
** | **The battle is capped at level 25. | ||
**It is recommended to sleep the [[Dread Dragon]] while you take out the [[Spotter]] first. | |||
**If you are low level it can easily be defeated with a [[MNK]]/[[WAR]] and [[WHM]]/[[BLM]]. | |||
**If you are low level it can easily be defeated with a [[MNK]]/[[WAR]] and [[WHM]]/[[BLM]]. Can be soloed by some jobs with a lot of meds, and duoed by almost any melee job with a [[WHM]] healer. | **Can be soloed by some jobs with a lot of meds, and duoed by almost any melee job with a [[WHM]] healer. | ||
*Return to [[Kasaroro]] | }} | ||
*Return to [[Kasaroro]] in the [[Consulate of Windurst (San d'Oria)|Consulate of Windurst]] ([[Northern San d'Oria]] at {{Location Tooltip| area = Northern San d'Oria| pos = H-9}}), who will give you the {{KeyItem}}[[Kindred Report]] and prompt you to '''return to [[Windurst]]'''. | |||
</div> | |||
<div class="flex-container-item-2"> | |||
==Option 2: San d'Oria Path== | ==Option 2: San d'Oria Path== | ||
===Windurst to San d'Oria=== | ===Windurst to San d'Oria=== | ||
* | *Travel to [[Northern San d'Oria]] | ||
*Talk to [[Heruze-Moruze]] in the [[Consulate of Windurst (San d'Oria)|Consulate of Windurst]] ([[Northern San d'Oria]] at {{Location Tooltip| area = Northern San d'Oria| pos = H-9}}). | |||
*[[Ghelsba Outpost]] | *Talk to [[Kasaroro]] in the [[Consulate of Windurst (San d'Oria)|Consulate of Windurst]]. in ([[Northern_San d'Oria]] | ||
** | *Talk to [[Halver]] in [[Chateau d'Oraguille]] ({{Location Tooltip| area = Chateau d'Oraguille| pos = I-9}}). | ||
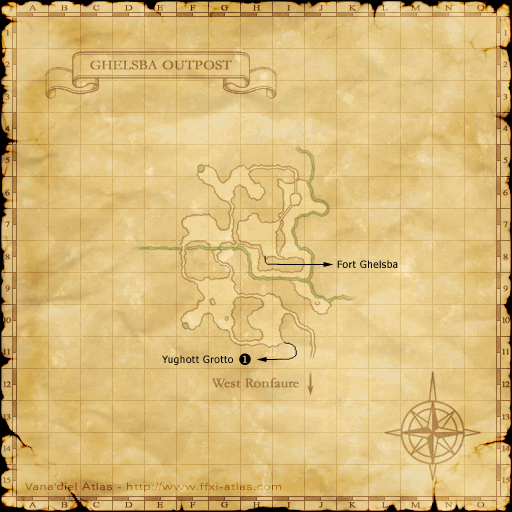
* | *Travel to [[Ghelsba Outpost]] and defeat [[Warchief Vatgit]] ({{Location Tooltip| area = Ghelsba Outpost| map = Map 1 | pos = H-7}}). {{Collapsible| | ||
**may not be at H-7, found him at I-5 near the northernmost walkway | |||
**easily soloable by most jobs at 20. | |||
}} | |||
*Return to [[Kasaroro]] in the [[Consulate of Windurst (San d'Oria)|Consulate of Windurst]] ([[Northern San d'Oria]] at ([[Northern San d'Oria]] at {{Location Tooltip| area = Northern San d'Oria| pos = H-9}}). | |||
===San d'Oria to Bastok=== | ===San d'Oria to Bastok=== | ||
* | *Travel to [[Bastok]] [[Metalworks]]. | ||
* | *Talk to [[Patt-Pott]] on the top floor of the [[Consulate of Windurst (Bastok)|Consulate of Windurst]] ([[Metalworks]] at {{Location Tooltip| area = Metalworks | pos = I-7}}). | ||
*Talk to [[Pius]] in the Department of Industry inside the [[President's Office]] ([[Metalworks]] at {{Location Tooltip| area = Metalworks | pos = J-8}}). | |||
* | *Talk to [[Grohm]] in the [[Craftsmen's Eatery]] ([[Metalworks]] at {{Location Tooltip| area = Metalworks | pos = H-9}}). | ||
* | *Next, travel through [[Palborough Mines]] to [[Waughroon Shrine]]. | ||
* | *Examine the Burning Circle inside to enter the BCNM "The Rank 2 Final Mission". {{Collapsible| | ||
*It | **Inside you will find a [[Seeker]] and [[Dark Dragon]]. | ||
* | **The battle is capped at level 25. | ||
* | **It is recommended to sleep the [[Dark Dragon]] while you take out the [[Seeker]] first. | ||
}} | |||
*Return to [[Patt-Pott]] in the [[Consulate of Windurst (Bastok)|Consulate of Windurst]] ([[Metalworks]] at {{Location Tooltip| area = Metalworks | pos = I-7}}). | |||
* [[Patt-Pott]] will give you the {{KeyItem}}[[Kindred Report]] and prompt you to '''return to [[Windurst]]'''. | |||
</div> | |||
</div> | |||
==Finish== | |||
*Finally, talk to [[Kupipi]] in the clerical chamber on the ground floor of the [[Heavens Tower]] ([[Windurst Walls]] at {{Location Tooltip| area = Windurst Walls| pos = H-7}}) to complete this mission and gain Windurst Rank 3. | |||
**To unlock the next mission, you need to fill your rank bar, either by trading crystals to a [[Conquest Overseer]] (6 crystals was enough to unlock the next mission) or repeating a repeatable mission. | |||
<br> | <br> | ||
'''Note:''' This mission is essentially identical for all 3 nations. While each nation requires you to travel to the other two, they all follow the same path. San d'Orians and Windurstians who choose Bastok first will do the same things. Therefore, it IS possible to group people together from different nations to ultimately end up on the same BCNM fight. A Windurstian may choose to do the Bastok portion first, and San d'Orian portion second, while a Bastokan can do the Windurstian portion first, and the San d'Orian portion second. In this scenario, Windurstians and Bastokans can enter the same BCNM for the San d'Orian portion. <br> | '''Note:''' This mission is essentially identical for all 3 nations. While each nation requires you to travel to the other two, they all follow the same path. San d'Orians and Windurstians who choose Bastok first will do the same things. Therefore, it IS possible to group people together from different nations to ultimately end up on the same BCNM fight. A Windurstian may choose to do the Bastok portion first, and San d'Orian portion second, while a Bastokan can do the Windurstian portion first, and the San d'Orian portion second. In this scenario, Windurstians and Bastokans can enter the same BCNM for the San d'Orian portion. <br> | ||
'''Note 2:''' Players who have already completed this mission (for any nation) may enter any of the BC, | '''Note 2:''' Players who have already completed this mission (for any nation) may enter any of the BC, regardless of their current or former allegiance.<br> | ||
[[Category:Windurst Missions]] | [[Category:Windurst Missions]] | ||
Latest revision as of 07:09, 14 September 2025
| The Three Kingdoms | |
|---|---|
| Series | Windurst Missions |
| Starting NPC | Any Windurst Gate Guard |
| Level Restriction: | Level 25 (recommended) |
| Items Needed | Mythril Sand (Bastok Path) |
| Title | Dread Dragon Slayer or Dark Dragon Slayer Warchief Wrecker Certified Adventurer |
| Repeatable | No |
| Description | Determine the state of affairs in San d'Oria and Bastok, and render assistance on behalf of Heavens Tower. Inquire at our consulate in each country for more information. Traveling by ship from Mhaura to Selbina is recommended. |
| Rewards | |
| Rank 3 3,000 gil Mog Wardrobe: 10 Slots  Level 10 Outpost Teleportation from Jeuno  | |
| ← Previous Mission | Next Mission → |
|---|---|
| A Testing Time | To Each His Own Right |
Notes
- Trade at least six crystals to a Conquest Overseer to unlock this mission, or less if you completed Mission 2-2. If the mission does not appear, trade 1 more until it does.
- This mission is broken down into two legs. Whichever nation you choose first determines how the next plays out.
Start
- Accept the mission from any Windurst Gate Guard then
- Talk to Kupipi in the clerical chamber on the ground floor of the Heavens Tower (Windurst Walls at H-7) to get a Letter to the Consuls then
- Decide which nation to go to first. If going to Bastok first, then follow Option 1. Otherwise follow Option 2.
Option 1: Bastok Path
Windurst to Bastok
- Travel to Bastok Metalworks.
- Talk to Patt-Pott on the top floor of the Consulate of Windurst (Metalworks at I-7).
- Talk to Pius in the Department of Industry (Right Side Door) inside the President's Office (Metalworks at J-8).
- Talk to Grohm in the Craftsmen's Eatery (Metalworks at H-9) to get 3 Pickaxes to mine Mine Gravel in Palborough Mines or purchase Mine Gravel from Auction House.
- You can purchase Mine Gravel from the Auction House. Check if it's being sold before you leave.
- Consider buying more Pickaxes as they can break when attempting to obtain Mine Gravel. It is recommended to buy another 3 Pickaxes, as they are cheap, to lessen the chances of not obtaining Mine Gravel when using all Pickaxes. This prevents having to do a long journey back to get more.
- Travel to Palborough Mines and mine a Mine Gravel from any of the Mythril Seams. The easiest nodes to reach are F-7 & I-8(NW).
- Trade the Pickaxe to the Mythril Seam until you receive some Mine Gravel.
- There is one on the first floor at I-8, one on the second floor at I-8 and one on the third floor at I-9.
- Once you receive the Mine Gravel, trade it to the Refiner Lid. Then activate the lever to the right.
**Taking the shortest direct route is dangerous as the path is littered with level 18-20 aggressive monsters. A safer route can be found by taking the northwest exit on the ground floor at G-6 and using the refiner at I-7. Otherwise take the shorter route on the third floor at I-6 and pull the lever.
- Drop off the ledge to the second floor and pull another lever to receive Mythril Sand.
- Return to Patt-Pott in the Consulate of Windurst (Metalworks at I-7) and trade the Mythril Sand to him.
- Talk to Patt-Pott once more.
Bastok to San d'Oria
- Travel to Northern San d'Oria
- Talk to Kasaroro in the Consulate of Windurst (Northern San d'Oria at H-9).
- Talk to Halver in Chateau d'Oraguille (I-9).
- Next, travel through Ghelsba Outpost to Horlais Peak.
- Examine the Burning Circle inside to enter the BCNM "The Rank 2 Final Mission".
- Inside you will find a Spotter and Dread Dragon.
- The battle is capped at level 25.
- It is recommended to sleep the Dread Dragon while you take out the Spotter first.
- If you are low level it can easily be defeated with a MNK/WAR and WHM/BLM.
- Can be soloed by some jobs with a lot of meds, and duoed by almost any melee job with a WHM healer.
- Return to Kasaroro in the Consulate of Windurst (Northern San d'Oria at H-9), who will give you the
 Kindred Report and prompt you to return to Windurst.
Option 2: San d'Oria Path
Windurst to San d'Oria
- Travel to Northern San d'Oria
- Talk to Heruze-Moruze in the Consulate of Windurst (Northern San d'Oria at H-9).
- Talk to Kasaroro in the Consulate of Windurst. in (Northern_San d'Oria
- Talk to Halver in Chateau d'Oraguille (I-9).
- Travel to Ghelsba Outpost and defeat Warchief Vatgit (H-7).
- may not be at H-7, found him at I-5 near the northernmost walkway
- easily soloable by most jobs at 20.
- Return to Kasaroro in the Consulate of Windurst (Northern San d'Oria at (Northern San d'Oria at H-9).
San d'Oria to Bastok
- Travel to Bastok Metalworks.
- Talk to Patt-Pott on the top floor of the Consulate of Windurst (Metalworks at I-7).
- Talk to Pius in the Department of Industry inside the President's Office (Metalworks at J-8).
- Talk to Grohm in the Craftsmen's Eatery (Metalworks at H-9).
- Next, travel through Palborough Mines to Waughroon Shrine.
- Examine the Burning Circle inside to enter the BCNM "The Rank 2 Final Mission".
- Inside you will find a Seeker and Dark Dragon.
- The battle is capped at level 25.
- It is recommended to sleep the Dark Dragon while you take out the Seeker first.
- Return to Patt-Pott in the Consulate of Windurst (Metalworks at I-7).
- Patt-Pott will give you the
 Kindred Report and prompt you to return to Windurst.
Finish
- Finally, talk to Kupipi in the clerical chamber on the ground floor of the Heavens Tower (Windurst Walls at H-7) to complete this mission and gain Windurst Rank 3.
- To unlock the next mission, you need to fill your rank bar, either by trading crystals to a Conquest Overseer (6 crystals was enough to unlock the next mission) or repeating a repeatable mission.
Note: This mission is essentially identical for all 3 nations. While each nation requires you to travel to the other two, they all follow the same path. San d'Orians and Windurstians who choose Bastok first will do the same things. Therefore, it IS possible to group people together from different nations to ultimately end up on the same BCNM fight. A Windurstian may choose to do the Bastok portion first, and San d'Orian portion second, while a Bastokan can do the Windurstian portion first, and the San d'Orian portion second. In this scenario, Windurstians and Bastokans can enter the same BCNM for the San d'Orian portion.
Note 2: Players who have already completed this mission (for any nation) may enter any of the BC, regardless of their current or former allegiance.

