Bastok Mission 2-3: Difference between revisions
From HorizonXI Wiki
m linebreak html tag instead of list for mission rewards |
adjusted formatting to show map tooltips for coordinates |
||
| Line 24: | Line 24: | ||
===Bastok to San d'Oria=== | ===Bastok to San d'Oria=== | ||
*Travel to [[Northern San d'Oria]] | *Travel to [[Northern San d'Oria]] | ||
*Speak to [[Baraka]] in the [[Consulate of Bastok (San d'Oria)|Consulate of Bastok]] | *Speak to [[Baraka]] in the [[Consulate of Bastok (San d'Oria)|Consulate of Bastok]] ([[Northern San d'Oria]] at {{Location Tooltip| area = Northern San d'Oria| pos = K-10}}). | ||
*Speak to [[Helaku]] in the back room of the [[Consulate of Bastok (San d'Oria)|Consulate of Bastok]]. | *Speak to [[Helaku]] in the back room of the [[Consulate of Bastok (San d'Oria)|Consulate of Bastok]]. | ||
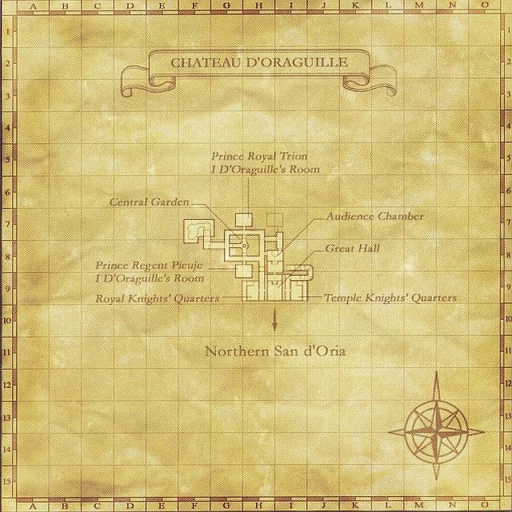
*Speak to [[Halver]] in [[Chateau d'Oraguille]] (I-9) | *Speak to [[Halver]] in [[Chateau d'Oraguille]] ({{Location Tooltip| area = Chateau d'Oraguille| pos = I-9}}). | ||
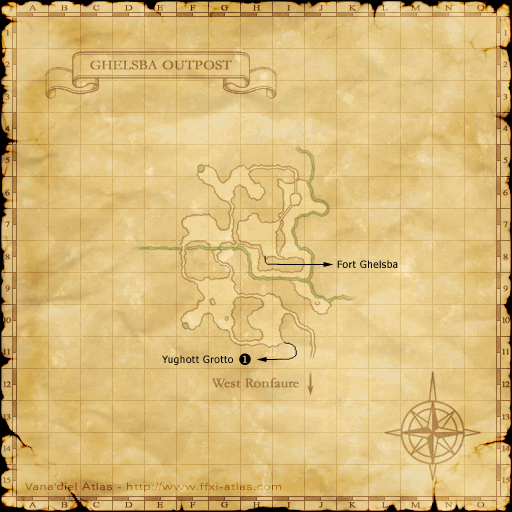
* Travel to [[Ghelsba Outpost]] and defeat [[Warchief Vatgit]] (H-7). | * Travel to [[Ghelsba Outpost]] and defeat [[Warchief Vatgit]] ({{Location Tooltip| area = Ghelsba Outpost| pos = H-7}}). | ||
** may not be at H-7, found him at I-5 near the northernmost walkway | ** may not be at H-7, found him at I-5 near the northernmost walkway | ||
**easily soloable by most jobs at 20 | **easily soloable by most jobs at 20 | ||
*Return to [[Helaku]] in the [[Consulate of Bastok (San d'Oria)|Consulate of Bastok]] | *Return to [[Helaku]] in the [[Consulate of Bastok (San d'Oria)|Consulate of Bastok]] ([[Northern San d'Oria]] at {{Location Tooltip| area = Northern San d'Oria| pos = K-10}}). | ||
===San d'Oria to Windurst=== | ===San d'Oria to Windurst=== | ||
*Travel to [[Port Windurst]] | *Travel to [[Port Windurst]] | ||
*Speak to [[Melek]] in the [[Consulate of Bastok (Windurst)|Consulate of Bastok]] | *Speak to [[Melek]] in the [[Consulate of Bastok (Windurst)|Consulate of Bastok]] ([[Port Windurst]] at {{Location Tooltip| area = Port Windurst| pos = F-6}}). | ||
*Speak to [[Kupipi]] in the clerical chamber on the ground floor of the [[Heavens Tower]] to get the [[Dark Key]]. | *Speak to [[Kupipi]] in the clerical chamber on the ground floor of the [[Heavens Tower]] ([[Windurst Walls]] at {{Location Tooltip| area = Windurst Walls| pos = H-7}}) to get the [[Dark Key]]. | ||
*Next, travel through [[Giddeus]] to [[Balga's Dais]] | *Next, travel through [[Giddeus]] to [[Balga's Dais]] | ||
**Inside you will find a [[Seeker]] and [[Black Dragon]]. | **Inside you will find a [[Seeker]] and [[Black Dragon]]. | ||
**The battle is capped at level 25. | **The battle is capped at level 25. | ||
**It is recommended to sleep the [[Black Dragon]] while you take out the [[Seeker]] first. | **It is recommended to sleep the [[Black Dragon]] while you take out the [[Seeker]] first. | ||
*Return to [[Melek]] in the [[Consulate of Bastok (Windurst)|Consulate of Bastok]] | *Return to [[Melek]] in the [[Consulate of Bastok (Windurst)|Consulate of Bastok]] ([[Port Windurst]] at {{Location Tooltip| area = Port Windurst| pos = F-6}}). | ||
*Speak with [[Naji]] outside the President's Office in the [[Metalworks]] to complete the mission and advance to Rank 3. | *Speak with [[Naji]] outside the President's Office in the [[Metalworks]] to complete the mission and advance to Rank 3. | ||
**To unlock the next mission, you need to fill your rank bar, either by trading crystals to a [[Conquest Overseer]] (6 crystals was enough to unlock the next mission) or repeating a repeatable mission. | **To unlock the next mission, you need to fill your rank bar, either by trading crystals to a [[Conquest Overseer]] (6 crystals was enough to unlock the next mission) or repeating a repeatable mission. | ||
| Line 47: | Line 47: | ||
===Bastok to Windurst=== | ===Bastok to Windurst=== | ||
*Travel to [[Port Windurst]] | *Travel to [[Port Windurst]] | ||
*Speak to [[Melek]] in the [[Consulate of Bastok (Windurst)|Consulate of Bastok]] | *Speak to [[Melek]] in the [[Consulate of Bastok (Windurst)|Consulate of Bastok]] ([[Port Windurst]] at {{Location Tooltip| area = Port Windurst| pos = F-6}}). | ||
*Speak to [[Kupipi]] in the clerical chamber on the ground floor of the [[Heavens Tower]] to get the [[Sword offering]]. | *Speak to [[Kupipi]] in the clerical chamber on the ground floor of the [[Heavens Tower]] ([[Windurst Walls]] at {{Location Tooltip| area = Windurst Walls| pos = H-7}}) to get the [[Sword offering]]. | ||
*Speak to [[Gold Skull]] in the [[Consulate of Bastok (Windurst)|Consulate of Bastok]] | *Speak to [[Gold Skull]] in the [[Consulate of Bastok (Windurst)|Consulate of Bastok]] ([[Port Windurst]] at {{Location Tooltip| area = Port Windurst| pos = F-6}}) to get the [[Dull sword]]. | ||
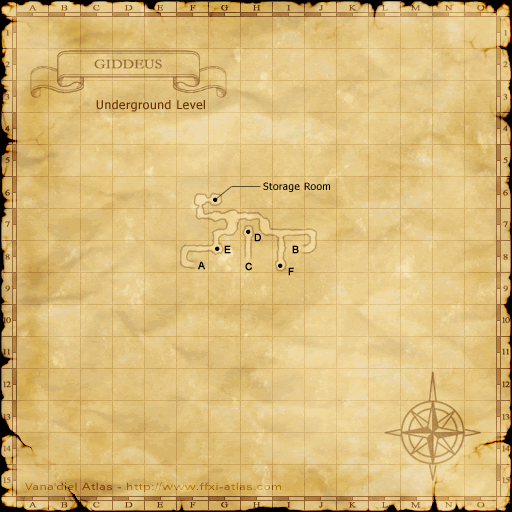
*Travel to [[Giddeus]] and speak to [[Uu Zhoumo]] (F-7 | *Travel to [[Giddeus]] and speak to [[Uu Zhoumo]] (Map 2: {{Location Tooltip| area = Giddeus| map = Underground Level| pos = F-7}}). | ||
*Kill [[Eyy Mon the Ironbreaker]] (G-7 | *Kill [[Eyy Mon the Ironbreaker]] (Map 2: {{Location Tooltip| area = Giddeus| map = Underground Level| pos = G-7}}) to obtain an [[Aspir Knife]]. | ||
*Trade the [[Aspir Knife]] to [[Uu Zhoumo]]. | *Trade the [[Aspir Knife]] to [[Uu Zhoumo]]. | ||
*Return to [[Melek]] in the [[Consulate of Bastok (Windurst)|Consulate of Bastok]] | *Return to [[Melek]] in the [[Consulate of Bastok (Windurst)|Consulate of Bastok]] ([[Port Windurst]] at {{Location Tooltip| area = Port Windurst| pos = F-6}}). | ||
===Windurst to San d'Oria=== | ===Windurst to San d'Oria=== | ||
*Travel to [[Northern San d'Oria]] | *Travel to [[Northern San d'Oria]] | ||
*Speak to [[Helaku]] in the [[Consulate of Bastok (San d'Oria)|Consulate of Bastok]] | *Speak to [[Helaku]] in the [[Consulate of Bastok (San d'Oria)|Consulate of Bastok]] ([[Northern San d'Oria]] at {{Location Tooltip| area = Northern San d'Oria| pos = K-10}}). | ||
*Speak to [[Halver]] in [[Chateau d'Oraguille]] (I-9). | *Speak to [[Halver]] in [[Chateau d'Oraguille]] ({{Location Tooltip| area = Chateau d'Oraguille| pos = I-9}}). | ||
*Next, travel through [[Ghelsba Outpost]] to [[Horlais Peak]]. | *Next, travel through [[Ghelsba Outpost]] to [[Horlais Peak]]. | ||
*Examine the Burning Circle inside to enter the BCNM "The Rank 2 Final Mission". | *Examine the Burning Circle inside to enter the BCNM "The Rank 2 Final Mission". | ||
| Line 63: | Line 63: | ||
**The battle is capped at level 25. | **The battle is capped at level 25. | ||
**It is recommended to sleep the [[Dread Dragon]] while you take out the [[Spotter]] first. | **It is recommended to sleep the [[Dread Dragon]] while you take out the [[Spotter]] first. | ||
*Return to [[Helaku]] in the [[Consulate of Bastok (San d'Oria)|Consulate of Bastok]] | *Return to [[Helaku]] in the [[Consulate of Bastok (San d'Oria)|Consulate of Bastok]] ([[Northern San d'Oria]] at {{Location Tooltip| area = Northern San d'Oria| pos = K-10}}). | ||
*Finally, speak to [[Naji]] to complete this mission and gain Bastok Rank 3. | *Finally, speak to [[Naji]] to complete this mission and gain Bastok Rank 3. | ||
**To unlock the next mission, you need to fill your rank bar, either by trading crystals to a [[Conquest Overseer]] (6 crystals was enough to unlock the next mission) or repeating a repeatable mission. | **To unlock the next mission, you need to fill your rank bar, either by trading crystals to a [[Conquest Overseer]] (6 crystals was enough to unlock the next mission) or repeating a repeatable mission. | ||
[[Category:Bastok Missions]] | [[Category:Bastok Missions]] | ||
Revision as of 09:33, 8 August 2023
| The Emissary | |
|---|---|
| Series | Missions |
| Starting NPC | Any Bastok Gate Guard |
| Title | Black Dragon Slayer or Dread Dragon Slayer (BCNM), Warchief Wrecker (NM), Certified Adventurer (upon completion) |
| Repeatable | No |
| Description | Gather information on San d'Oria and Windurst. The Bastokan consulates in those two countries will provide you with a detailed briefing. |
| Rewards | |
| Rank 3 3,000gil Adventurer's Certificate 10 Mog Wardrobe | |
| ← Previous Mission | Next Mission → |
|---|---|
| Wading Beasts | The Four Musketeers |
Walkthrough
- Trade three crystals to unlock this mission, or one crystal if you completed Mission 2-2.
- Accept the mission from any Gate Guard.
- Talk to Naji outside the President's Office in the Metalworks. You will be escorted to President Karst
- You will be able to ask him a series of questions. Once you are done you will be asked to head to either San d'Oria or Windurst
- Select the bottom option to skip the questions.
Option 1: San d'Oria Path
Bastok to San d'Oria
- Travel to Northern San d'Oria
- Speak to Baraka in the Consulate of Bastok (Northern San d'Oria at K-10).
- Speak to Helaku in the back room of the Consulate of Bastok.
- Speak to Halver in Chateau d'Oraguille (I-9).
- Travel to Ghelsba Outpost and defeat Warchief Vatgit (H-7).
- may not be at H-7, found him at I-5 near the northernmost walkway
- easily soloable by most jobs at 20
- Return to Helaku in the Consulate of Bastok (Northern San d'Oria at K-10).
San d'Oria to Windurst
- Travel to Port Windurst
- Speak to Melek in the Consulate of Bastok (Port Windurst at F-6).
- Speak to Kupipi in the clerical chamber on the ground floor of the Heavens Tower (Windurst Walls at H-7) to get the Dark Key.
- Next, travel through Giddeus to Balga's Dais
- Inside you will find a Seeker and Black Dragon.
- The battle is capped at level 25.
- It is recommended to sleep the Black Dragon while you take out the Seeker first.
- Return to Melek in the Consulate of Bastok (Port Windurst at F-6).
- Speak with Naji outside the President's Office in the Metalworks to complete the mission and advance to Rank 3.
- To unlock the next mission, you need to fill your rank bar, either by trading crystals to a Conquest Overseer (6 crystals was enough to unlock the next mission) or repeating a repeatable mission.
Option 2: Windurst Path
Bastok to Windurst
- Travel to Port Windurst
- Speak to Melek in the Consulate of Bastok (Port Windurst at F-6).
- Speak to Kupipi in the clerical chamber on the ground floor of the Heavens Tower (Windurst Walls at H-7) to get the Sword offering.
- Speak to Gold Skull in the Consulate of Bastok (Port Windurst at F-6) to get the Dull sword.
- Travel to Giddeus and speak to Uu Zhoumo (Map 2: F-7).
- Kill Eyy Mon the Ironbreaker (Map 2: G-7) to obtain an Aspir Knife.
- Trade the Aspir Knife to Uu Zhoumo.
- Return to Melek in the Consulate of Bastok (Port Windurst at F-6).
Windurst to San d'Oria
- Travel to Northern San d'Oria
- Speak to Helaku in the Consulate of Bastok (Northern San d'Oria at K-10).
- Speak to Halver in Chateau d'Oraguille (I-9).
- Next, travel through Ghelsba Outpost to Horlais Peak.
- Examine the Burning Circle inside to enter the BCNM "The Rank 2 Final Mission".
- Inside you will find a Spotter and Dread Dragon.
- The battle is capped at level 25.
- It is recommended to sleep the Dread Dragon while you take out the Spotter first.
- Return to Helaku in the Consulate of Bastok (Northern San d'Oria at K-10).
- Finally, speak to Naji to complete this mission and gain Bastok Rank 3.
- To unlock the next mission, you need to fill your rank bar, either by trading crystals to a Conquest Overseer (6 crystals was enough to unlock the next mission) or repeating a repeatable mission.


