Bastok Mission 2-3: Difference between revisions
added walkthrough for the trip to horlais peak |
added walkthrough for the trip to Eyy Mon the Ironbreaker |
||
| Line 59: | Line 59: | ||
*Talk to [[Kupipi]] in the clerical chamber on the ground floor of the [[Heavens Tower]] ([[Windurst Walls]] at {{Location Tooltip| area = Windurst Walls| pos = H-7}}) to get the [[Sword offering]]. | *Talk to [[Kupipi]] in the clerical chamber on the ground floor of the [[Heavens Tower]] ([[Windurst Walls]] at {{Location Tooltip| area = Windurst Walls| pos = H-7}}) to get the [[Sword offering]]. | ||
*Talk to [[Gold Skull]] in the [[Consulate of Bastok (Windurst)|Consulate of Bastok]] ([[Port Windurst]] at {{Location Tooltip| area = Port Windurst| pos = F-6}}) to get the [[Dull sword]]. | *Talk to [[Gold Skull]] in the [[Consulate of Bastok (Windurst)|Consulate of Bastok]] ([[Port Windurst]] at {{Location Tooltip| area = Port Windurst| pos = F-6}}) to get the [[Dull sword]]. | ||
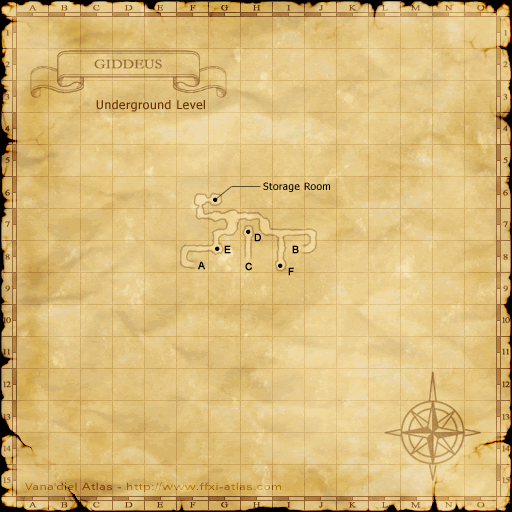
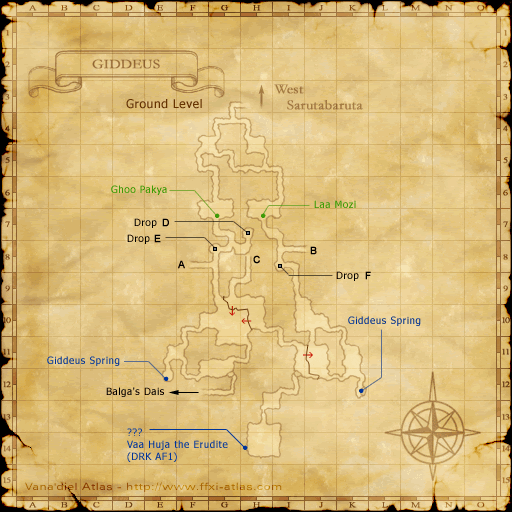
*Travel to [[Giddeus]] and talk to [[Uu Zhoumo]] ( | *Travel to [[Giddeus]] and talk to [[Uu Zhoumo]] (Underground level at {{Location Tooltip| area = Giddeus| map = Underground Level | pos = F-7}}). {{Collapsible| | ||
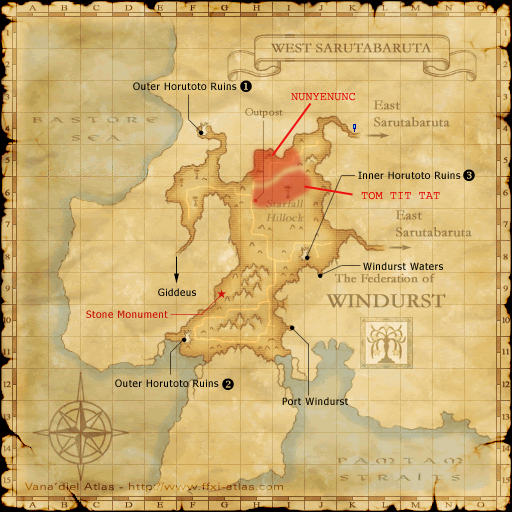
*Kill [[Eyy Mon the Ironbreaker]] ( | **Enter [[Giddeus]] from [[West Sarutabaruta]] at {{Location Tooltip| area = West Sarutabaruta | pos = F-8}} | ||
**In [[Giddeus]], proceed from {{Location Tooltip| area = Giddeus| map = Ground Level| pos = H-3}} to {{Location Tooltip| area = Giddeus| map = Ground Level| pos = G-8}}, where you drop down to the underground level through drop E. | |||
**From {{Location Tooltip| area = Giddeus| map = Underground Level| pos = G-8}} on the underground level, go to {{Location Tooltip| area = Giddeus| map = Underground Level | pos = F-7}} to find [[Uu Zhoumo]]. | |||
}} | |||
*Kill [[Eyy Mon the Ironbreaker]] (Underground level at {{Location Tooltip| area = Giddeus| map = Underground Level| pos = G-7}}) to obtain an [[Aspir Knife]]. | |||
*Trade the [[Aspir Knife]] to [[Uu Zhoumo]]. | *Trade the [[Aspir Knife]] to [[Uu Zhoumo]]. | ||
*Return to [[Melek]] in the [[Consulate of Bastok (Windurst)|Consulate of Bastok]] ([[Port Windurst]] at {{Location Tooltip| area = Port Windurst| pos = F-6}}). | *Return to [[Melek]] in the [[Consulate of Bastok (Windurst)|Consulate of Bastok]] ([[Port Windurst]] at {{Location Tooltip| area = Port Windurst| pos = F-6}}). | ||
===Windurst to San d'Oria=== | ===Windurst to San d'Oria=== | ||
*Travel to [[Northern San d'Oria]] | *Travel to [[Northern San d'Oria]] | ||
Revision as of 12:50, 14 August 2023
| The Emissary | |
|---|---|
| Series | Missions |
| Starting NPC | Any Bastok Gate Guard |
| Level Restriction: | Level 25 (recommended) |
| Title | Black Dragon Slayer or Dread Dragon Slayer (BCNM), Warchief Wrecker (NM), Certified Adventurer (upon completion) |
| Repeatable | No |
| Description | Gather information on San d'Oria and Windurst. The Bastokan consulates in those two countries will provide you with a detailed briefing. |
| Rewards | |
| Rank 3 3,000 gil 10 Mog Wardrobe  | |
| ← Previous Mission | Next Mission → |
|---|---|
| Wading Beasts | The Four Musketeers |
Notes
- Trade three crystals to a Conquest Overseer to unlock this mission, or one crystal if you completed Mission 2-2.
Start
- Accept the mission from any Bastok Gate Guard.
- Talk to Naji outside the President's Office in the Metalworks. You will be escorted to President Karst
- You will be able to ask him a series of questions. Once you are done you will be asked to head to either San d'Oria or Windurst
- Select the bottom option to skip the questions.
Option 1: San d'Oria Path
Bastok to San d'Oria
- Travel to Northern San d'Oria
- Talk to Baraka in the Consulate of Bastok (Northern San d'Oria at K-10).
- Talk to Helaku in the back room of the Consulate of Bastok.
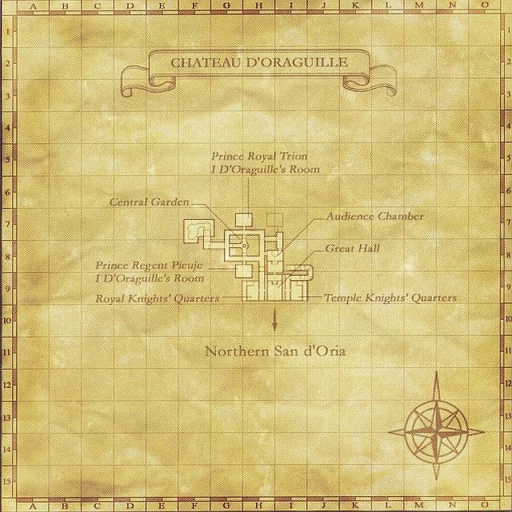
- Talk to Halver in Chateau d'Oraguille (I-9).
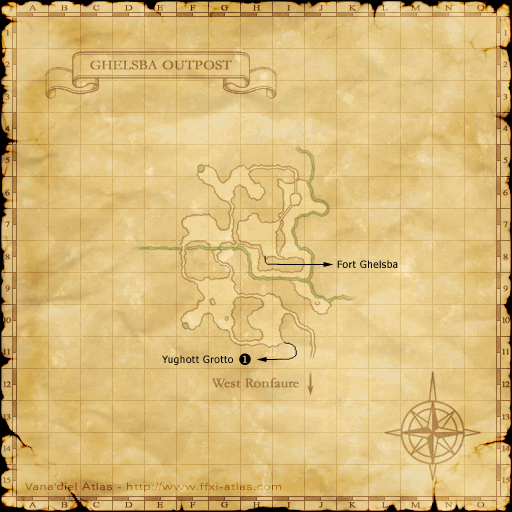
- Travel to Ghelsba Outpost and defeat Warchief Vatgit (H-7).
- may not be at H-7, found him at I-5 near the northernmost walkway
- easily soloable by most jobs at 20
- Return to Helaku in the Consulate of Bastok (Northern San d'Oria at K-10).
San d'Oria to Windurst
- Travel to Port Windurst
- Talk to Melek in the Consulate of Bastok (Port Windurst at F-6).
- Talk to Kupipi in the clerical chamber on the ground floor of the Heavens Tower (Windurst Walls at H-7) to get the Dark Key.
- Next, travel through Giddeus to Balga's Dais.
- Examine the Burning Circle inside to enter the BCNM "The Rank 2 Final Mission".
- Inside you will find a Seeker and Black Dragon.
- The battle is capped at level 25.
- It is recommended to sleep the Black Dragon while you take out the Seeker first.
- Return to Melek in the Consulate of Bastok (Port Windurst at F-6), who will prompt you to return to Bastok.
Option 2: Windurst Path
Bastok to Windurst
- Travel to Port Windurst
- Talk to Melek in the Consulate of Bastok (Port Windurst at F-6).
- Talk to Kupipi in the clerical chamber on the ground floor of the Heavens Tower (Windurst Walls at H-7) to get the Sword offering.
- Talk to Gold Skull in the Consulate of Bastok (Port Windurst at F-6) to get the Dull sword.
- Travel to Giddeus and talk to Uu Zhoumo (Underground level at F-7).
- Kill Eyy Mon the Ironbreaker (Underground level at G-7) to obtain an Aspir Knife.
- Trade the Aspir Knife to Uu Zhoumo.
- Return to Melek in the Consulate of Bastok (Port Windurst at F-6).
Windurst to San d'Oria
- Travel to Northern San d'Oria
- Talk to Helaku in the Consulate of Bastok (Northern San d'Oria at K-10).
- Talk to Halver in Chateau d'Oraguille (I-9).
- Next, travel through Ghelsba Outpost to Horlais Peak.
- Preparation notes:
- Orcs in Yughott Grotto and Fort Ghelsba are level 21-23 and will sight-aggro to players under level 35 unless they are Invisible.
- Bats will aggro by sound.
- You will need at least 3 Silent Oil/Prism Powder to get to Horlais Peak safely since the effect wears off when zoning.
- You will need another 3 Silent Oil/Prism Powder if you plan to walk back after the battle. Alternatively bring a Scroll of Instant Warp.
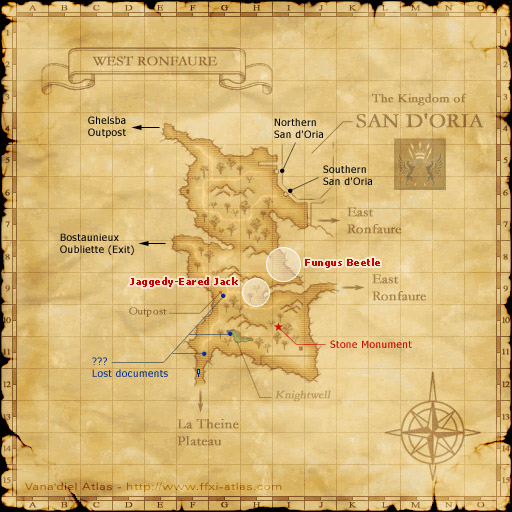
- Enter Ghelsba Outpost through West Ronfaure at E-4.
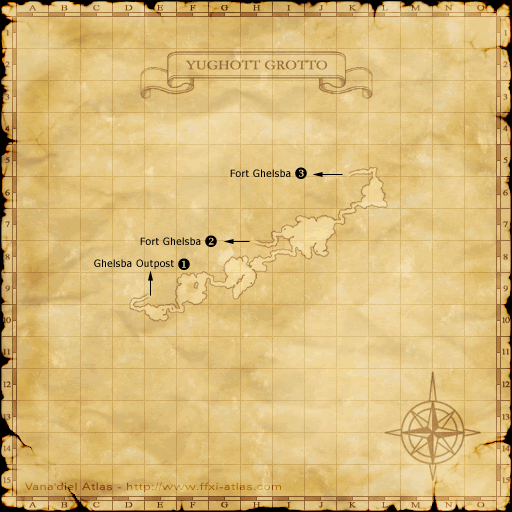
- In Ghelsba Outpost, go from J-11 to I-11 where you enter Yughott Grotto.
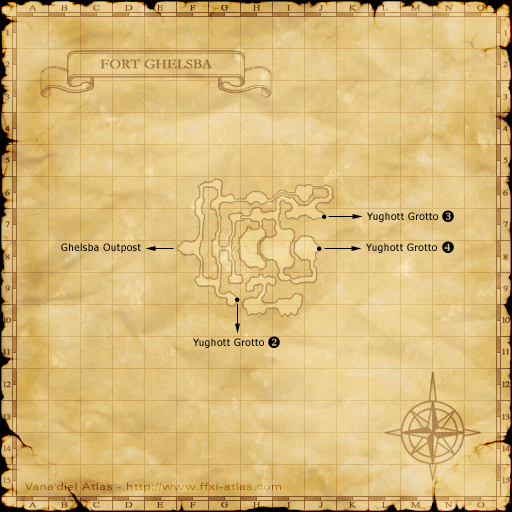
- Traverse the entire Yughott Grotto from E-9 to exit at K-5 into Fort Ghelsba.
- One Silent Oil/Prism Powder application just about suffices if you don't stop.
- In Fort Ghelsba, travel from J-7 to J-8, where you enter Yughott Grotto again on Map 2.
- In Yughott Grotto, make your way from F-7 to K-6 to enter Horlais Peak.
- Preparation notes:
- Examine the Burning Circle inside to enter the BCNM "The Rank 2 Final Mission".
- Inside you will find a Spotter and Dread Dragon.
- The battle is capped at level 25.
- It is recommended to sleep the Dread Dragon while you take out the Spotter first.
- Return to Helaku in the Consulate of Bastok (Northern San d'Oria at K-10), who will prompt you to return to Bastok.
Finish
- Finally, talk to Naji to complete this mission and gain Bastok Rank 3.
- To unlock the next mission, you need to fill your rank bar, either by trading crystals to a Conquest Overseer (6 crystals was enough to unlock the next mission) or repeating a repeatable mission.
Note: This mission is essentially identical for all 3 nations. While each nation requires you to travel to the other two, they all follow the same path. San d'Orians and Windurstians who choose Bastok first will do the same things. Therefore, it IS possible to group people together from different nations to ultimately end up on the same BCNM fight. A Windurstian may choose to do the Bastok portion first, and San d'Orian portion second, while a Bastokan can do the Windurstian portion first, and the San d'Orian portion second. In this scenario, Windurstians and Bastokans can enter the same BCNM for the San d'Orian portion.
Note 2: Players who have already completed this mission (for any nation) may enter any of the BC, except for the one associated with their nation (A Windurstian who has completed 2-3 is unable to enter the Giddeus BCNM to help others, unless they have completed this battle through another nation's 2-3 mission).

