Yhoator Jungle/Harvesting: Difference between revisions
From HorizonXI Wiki
No edit summary |
No edit summary |
||
| Line 4: | Line 4: | ||
|- | |- | ||
|[[Woozyshroom]] | |[[Woozyshroom]] | ||
|<section begin=Woozyshroom/>{{Abundance| | |<section begin=Woozyshroom/>{{Abundance|59|141}}<section end=Woozyshroom/> | ||
|- | |- | ||
|[[Danceshroom]] | |[[Danceshroom]] | ||
|<section begin=Danceshroom/>{{Abundance| | |<section begin=Danceshroom/>{{Abundance|32|141}}<section end=Danceshroom/> | ||
|- | |- | ||
|[[Sleepshroom]] | |[[Sleepshroom]] | ||
|<section begin=Sleepshroom/>{{Abundance| | |<section begin=Sleepshroom/>{{Abundance|31|141}}<section end=Sleepshroom/> | ||
|- | |- | ||
|[[Scream Fungus]] | |[[Scream Fungus]] | ||
|<section begin=Scream Fungus/>{{Abundance| | |<section begin=Scream Fungus/>{{Abundance|9|141}}<section end=Scream Fungus/> | ||
|- | |- | ||
|[[Coral Fungus]] | |[[Coral Fungus]] | ||
|<section begin=Coral Fungus/>{{Abundance| | |<section begin=Coral Fungus/>{{Abundance|7|141}}<section end=Coral Fungus/> | ||
|- | |- | ||
|[[Reishi Mushroom]] | |[[Reishi Mushroom]] | ||
|<section begin=Reishi Mushroom/>{{Abundance| | |<section begin=Reishi Mushroom/>{{Abundance|1|141}}<section end=Reishi Mushroom/> | ||
|- | |- | ||
|[[Mushroom Locust]] | |[[Mushroom Locust]] | ||
|<section begin=Mushroom Locust/>{{Abundance| | |<section begin=Mushroom Locust/>{{Abundance|2|141}}<section end=Reishi Mushroom/> | ||
|- | |- | ||
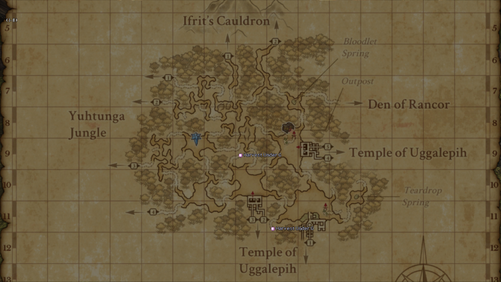
!align="center" colspan="2" style="padding: 10px";|'''Harvesting Map''' | !align="center" colspan="2" style="padding: 10px";|'''Harvesting Map''' | ||
{{Template:Tooltip-Map|text= [[file:YhoatorJungleHarvesting.png|50px]]|map=YhoatorJungleHarvesting.png|mapsize = 501}} | {{Template:Tooltip-Map|text= [[file:YhoatorJungleHarvesting.png|50px]]|map=YhoatorJungleHarvesting.png|mapsize = 501}} | ||
|} | |} | ||
Revision as of 23:40, 16 September 2023
| Item | Abundance |
|---|---|
| Woozyshroom | Very Common(41.8%) |
| Danceshroom | Very Common(22.7%) |
| Sleepshroom | Very Common(22%) |
| Scream Fungus | Rare(6.4%) |
| Coral Fungus | Very Rare(5%) |
| Reishi Mushroom | Extremely Rare(0.7%) |
| Mushroom Locust | Very Rare(1.4%) |
| Harvesting Map | |


