Template:FFXIMap
Description
This is an interactive FFXI map. This extension is designed specifically to work with the HorizonXI Wiki (https://horizonffxi.wiki/), and is built using the Leaflet library (https://leafletjs.com/).
The project was started to give players a more intuitive FFXI map tool. Basic functionality includes displaying a zone map (ie: Upper Jeuno) in a custom sized window, zoom controls, and clickable links for all zone connections. Advanced functionality includes displaying pulsating icons on the map for user defined things, for instance NPCs in a city or Treasure Coffers in a zone. The advanced functions work in a local testing environment and are currently being migrated to the Wiki for editors to evaluate.
The Basics
To have an interactive map displayed on a wiki page you would add the following to a page
<FFXIMap />
to the page. Every parameter added to the tag is "optional" and by omitting any particular parameter the extension will just apply a default value in it's place (see Parameters table below for details).
This is an example of a working tag with some commonly used parameters for displaying a map:
<FFXIMap mapid=62 zoom=1 width=512 />
In this example we have chosen to display the "Upper Jeuno" map, with a desired width and height and a particular zoom level.
- Please always include the "mapID" parameter with a desired map number, and ensure it is not 0. MapID 0 is saved for the "world map".
Coordinate Systems
General rules of thumb:
- You must know if the map you are adding to is using IN-GAME or BASIC coordinates. To determine this you would open the details pane on the bottom left of the map by adding the 'showdetails=true' parameter to the FFXIMap tag on the wiki page. This is what it should look like:
<FFXIMap mapID=62 zoom=1 width=800 showdetails=true/>
- IN-GAME coordinates are based on the coordinates in-game. Simply target an NPC/entity you wish to create a marker for, and use those X and Y values for the mapx and mapy listed below.
- BASIC coordinates are based on a 0-256 pixel grid, where the bottom left of the map is [0,0] and the top right of the map is [256,256]. In order to get these coordinates you need to add the 'showdetails=true' attribute to your instance of FFXIMap. With this set as true you can see the coordinates as you move your mouse on the map, and clicking the map will post those coordinates below the map for you to copy paste.
Background / Context
Before proceeding you must take a second to understand and appreciate the coordinate systems available. In Vana'diel every zone has its own [X,Y, Z] based coordinate system. At the inception of this interactive maps project we did not anticipate using the actual in-game coordinates for any map, because putting markers on the map was never really part of the plan. So from the beginning each map used the same [X,Y] coordinate system, where the bottom left of the map was [0,0] and the top right of the map was [256,256]. Most maps are still on this coordinate system. We have only recently begun to add the actual in-game coordinates to each map, and this is a lengthy process.
When adding markers to the map you must know exactly which coordinate system the zone map is using. You can determine this by editing the
FFXIMap tag and adding the 'showdetails=true' attribute.
This is an example of what the map will display. In this case, it is Upper Jeuno and this particular map is using the IN-GAME coordinates:
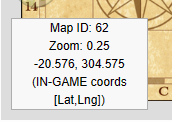
IN-GAME coordinates are based on latitude and longitude, so when you see these coordinates in this info box on the bottom left they will be displayed as [LAT,LNG] which is actually [Y,X]. Hovering over any marker with your mouse will display the coordinates properly as [X,Y].
Tag Parameters
| parameter | default | type | description |
|---|---|---|---|
| mapid | 0 | number | mapid corresponds with the map name, listed below. See table "Map ID Data" below for details on these values. As of release of this map feature, please use values > 0. The World Map feature is being released at a later date and is not currently working. |
| zoom | 1 | number | Values range from 0-6, with 0 being very "zoomed out" and 6 being very "zoomed in". |
| width | 512 | [number]px, [number]%, [number] | Width of window displaying the map. All testing has been with "square" maps where width and height matched values. Height is auto-calculated based on width. There are three methods to declare width: include 'px' at the end to determine pixel size, include '%' at the end to declare a percentage, or list only a number. Listing only a number will imply the number is in pixels. |
| height | 512 (or defaults to width) | [number]px, [number], [number]% | Height of window displaying the map. All testing has been with "square" maps where width and height matched values. Rectangular shaped windows appear to work with current settings. It is recommended to leave this blank and only adjust the width. Height is set automatically based on width. |
| showdetails | false | text [ true/false ] | Displays mouse coordinates on bottom left of window. When mouse is clicked on map the coordinates of the mouse are printed to a new below the map. is reset if mouse clicks a new zone connection in map. This is primarily used for editors to help grab coordinate arrays quickly.
|
| showconnections | false | text [ true/false ] | Displays all polygons associated with connections to other maps. Very helpful for editors when quickly putting together new connections or identifying improperly placed connections. |
Map Markers / Icons / Styling
This map was designed with the intent of giving wiki users/editors the ability to add things to the maps. To understand more about how to add these features to the maps, please see this page Template:FFXIMap Markers.
All markers can be styled directly using CSS at MediaWiki:FFXIMap Styles.css. Below is a list of corresponding entity types, associated classnames, default icons, and default styling. Most entities have been imported from the AirSkyBoat github repository, so most entities will have a default value of "NPC". The table below shows you the current markers available, and the default styles. At this time we don't have the ability to change the style of a single entity. If you change the style for NPC, then all NPCs sharing that style will change. All entities share the same labeling and scale transformations, so adjusting those will change all entities as such. If you did want to make specific adjustments to a single entity this is very possible, please reach out to the editors on Discord so we can discuss it.
| Additional Elements | Class name | Description | Default Styling |
|---|---|---|---|
| All entities will show labels when zooming in. Labels are removed when zoomed out due to the density of entities on some maps (mainly towns). Display inline-block was used to keep labels with multiple words in 1 line. | display: inline-block; position: absolute; top: 4px; left: 17px; white-space: nowrap; color: #ffffff; font-style: italic; text-shadow: 2px 2px 4px #000000; | ||
| All entities currently transform their appearance by scaling up 1.75x at a particular zoom level. To adjust this scale size, or apply any additional transformations, use the classname listed above with a '-2X' after it (ie: ffximap-marker-clammingpoint-2X) | transform: scale(1.75); | ||
| All entities currently animate in the same manner. | animation: fade 1s infinite alternate; | ||
| All entities display the same 'tooltip' when you put your mouse cursor over them. | background-color: #edeadc; |
Map Details
The chart below shows the current status of each map. All maps listed are available for viewing.
- Coordinate / Status: in-game coordinate used to convert all zone coordinates
- Entities validated: status of entities based on what users are seeing on the map
| Map ID | Map Name | In-Game Coordinates / Status | Entities validated | Enemies validated |
|---|---|---|---|---|
| 0 | World Map | N/A | ||
| 1 | Bastok Markets | Complete | ||
| 2 | Bastok Minesval | Complete | ||
| 3 | Battalia Downs | Complete | ||
| 4 | Beaucedine Glacier | Complete | ||
| 5 | Chateau d'Oraguille | Complete | ||
| 6 | Konschtat Highlands | Complete | ||
| 7 | La Theine Plateau | Complete | Need to validate the NPC group around G-H/10.. appear to be cutscene NPCs | |
| 8 | Lower Delkfutt's Tower: Map 1 | Complete | ||
| 9 | Lower Delkfutt's Tower: Map 2 | Complete | ||
| 10ra | Lower Delkfutt's Tower: Map 3 | Complete | ||
| 11 | Lower Delkfutt's Tower: Map 4 | Complete | ||
| 12 | Lower Jeuno | Complete | ||
| 13 | Metalworks | Complete | ||
| 14 | Mhaura | Complete | ||
| 15 | Middle Delkfutt's Tower: Map 1 | Complete | ||
| 16 | Middle Delkfutt's Tower: Map 2 | Complete | ||
| 17 | Middle Delkfutt's Tower: Map 3 | Complete | ||
| 18 | Middle Delkfutt's Tower: Map 4 | Complete | ||
| 19 | Middle Delkfutt's Tower: Map 5 | Complete | ||
| 20 | Middle Delkfutt's Tower: Map 6 | Complete | ||
| 21 | Norg | Complete | Complete | |
| 22 | Northern San d'Oria | Complete | ||
| 23 | Port Bastok | Complete | ||
| 24 | Port Jeuno | Complete | ||
| 25 | Port San d'Oria | Complete | ||
| 26 | Port Windurst | Complete | ||
| 27 | Pso'Xja: Map 1 | |||
| 28 | Pso'Xja: Map 2 | |||
| 29 | Pso'Xja: Map 3 | |||
| 30 | Pso'Xja: Map 4 | |||
| 31 | Pso'Xja: Map 5 | ( 201, 279.973) Z:0 G8 | ||
| 32 | Pso'Xja: Map 6 | ( -320.33 , -200.79 ) Z:16 I-7 | ||
| 33 | Pso'Xja: Map 7 | ( 275.029 ,281.447 ) Z:48 I8 | ||
| 34 | Pso'Xja: Map 8 | (-278.789, -241.709 ) Z:6 J8 | ||
| 35 | Pso'Xja: Map 9 | (-278.789, -241.709 ) Z:16 J8 | ||
| 36 | Pso'Xja: Map 10 | (-320.843, -241.192 ) Z:32 I8 | ||
| 37 | Pso'Xja: Map 11 | |||
| 38 | Pso'Xja: Map 12 | (-300.267, 239.986) Z:0 I-9 | ||
| 39 | Pso'Xja: Map 13 | ( -338.902, 319.776) Z:16 H7 | ||
| 40 | Pso'Xja: Map 14 | ( -380.065, 359.458) Z:32 G6 | ||
| 41 | Pso'Xja: Map 15 | (380, 359.816) Z:48 G6 | ||
| 42 | Pso'Xja: Map 16 | ( -160.444 , -40.651) Z:0 H9 | ||
| 43 | Pso'Xja: Map 17 | |||
| 44 | Pso'Xja: Map 18 | |||
| 45 | Pso'Xja: Map 19 | ( 0.843 , 41.55) Z:0 I-7 | ||
| 46 | Pso'Xja: Map 20 | ( -39.66 , 39.051 ) Z:32 H7 | ||
| 47 | Qufim Island | Complete | ||
| 48 | Rolanberry Fields | Complete | ||
| 49 | Ru'Lude Gardens | Complete | ||
| 50 | Sauromugue Champaign | Complete | ||
| 51 | Southern San d'Oria | Complete | ||
| 52 | Tahrongi Canyon | Complete | ||
| 53 | Tavnazian Safehold: Map 1 | Complete | ||
| 54 | Tavnazian Safehold: Map 2 | Complete | ||
| 55 | Tavnazian Safehold: Map 3 | Complete | ||
| 56 | Upper Delkfutt's Tower: Map 1 | Complete | ||
| 57 | Upper Delkfutt's Tower: Map 2 | Complete | ||
| 58 | Upper Delkfutt's Tower: Map 3 | Complete | ||
| 59 | Upper Delkfutt's Tower: Map 4 | Complete - Transition map - no coords necessary | ||
| 60 | Upper Delkfutt's Tower: Map 5 | Complete - Transition map - no coords necessary | ||
| 61 | Upper Delkfutt's Tower: Map 6 | Complete - Transition map - no coords necessary | ||
| 62 | Upper Jeuno | Complete | ||
| 63 | Valkurm Dunes | Complete | ||
| 64 | Windurst Walls | Complete | ||
| 65 | Windurst Waters: North | Complete | ||
| 66 | Windurst Waters: South | Complete | ||
| 67 | Windurst Woods | Complete | ||
| 68 | Al'Taieu | Complete | ||
| 69 | Altar Room | Complete | ||
| 70 | Apollyon: Map 1 | Not needed, no mobs | ||
| 71 | Apollyon: Map 2 | Not needed, no mobs | ||
| 72 | Apollyon: Map 3 (NE) | ( 390.032, 83.707) Z:0 H-11 | ||
| 73 | Apollyon: Map 4 (NW) | (-423.75, -13.13) Z:0 I-12 | ||
| 74 | Apollyon: Map 5 (SE) | (400.08, -520.50) Z:0 I-9 | ||
| 75 | Apollyon: Map 6 (SW) | (-399.85, -524.34) Z:0 H-9 | ||
| 76 | Apollyon: Map 7 (Central) | (8.29, 183.69) Z:0 I-7 | ||
| 77 | Apollyon: Map 8 (CS) | (13.67, -175.95) Z:0 I-8 | ||
| 78 | Attohwa Chasm | Complete | ||
| 79 | Beadeaux: Map 1 | Complete | ||
| 80 | Beadeaux: Map 2 | Complete | ||
| 81 | Behemoth's Dominion | Complete | ||
| 82 | Bibiki Bay: Map 1 | Complete | ||
| 83 | Bibiki Bay ( P. Isle ) : Map 2 | Complete | ||
| 84 | Bostaunieux Oubliette: Map 1 | Complete | ||
| 85 | Bostaunieux Oubliette: Map 2 | Complete | ||
| 86 | Bostaunieux Oubliette: Map 3 | Complete | ||
| 87 | Buburimu Peninsula | Complete | ||
| 88 | Castle Oztroja: Map 1 | (39.63, -121.18) Z=0.25 H-7 | ||
| 89 | Castle Oztroja: Map 2 | (41.05, -41.66 ) z=-15.75 J-8 | ||
| 90 | Castle Oztroja: Map 3 | (-120.122, -40.167) Z:-40 H-8 | ||
| 91 | Castle Oztroja: Map 4 | ( -119.196 , -160.740) Z:-71 H-8 | ||
| 92 | Castle Oztroja: Map 5 | (82.154, -120.601 ) Z:-16 (upper level) I-7 | ||
| 93 | Castle Oztroja: Map 6 | (-201.80, 160.03 ) z=0, I-7 | ||
| 94 | Castle Oztroja: Map 7 | (-121.55, 199.85) Z=-15 H-5 | ||
| 95 | Castle Zvahl Baileys: Map 1 | ( 280.671 , 39.721) Z:-20 I=7 | ||
| 96 | Castle Zvahl Baileys: Map 2 | ( 00 ,38.263 ) Z:-20 I-7 | ||
| 97 | Castle Zvahl Baileys: Map 3 | ( 2.015, 118.444) Z:4 I-6 | ||
| 98 | Castle Zvahl Baileys: Map 4 | ( -79.106, 38.581 ) Z:19 H-7 | ||
| 99 | Castle Zvahl Keep: Map 1 | (-77.874, -41.225) Z:0 H-8 | ||
| 100 | Castle Zvahl Keep: Map 2 | ( -79.119, -119.777 ) Z:-16 H-9 | ||
| 101 | Castle Zvahl Keep: Map 3 | ( -317.424, -41.791) Z:-52 H-8 | ||
| 102 | Castle Zvahl Keep: Map 4 | (-439.162, 118.779) Z:-68 I-6 | ||
| 103 | Crawler's Nest: Map 1 | Complete | ||
| 104 | Crawler's Nest: Map 2 | Complete | ||
| 105 | Crawler's Nest: Map 3 | Complete | ||
| 106 | Dangruf Wadi | Complete | ||
| 107 | Davoi | Complete | ||
| 108 | East Ronfaure | Complete | ||
| 109 | East Sarutabaruta | Complete | ||
| 110 | Fort Ghelsba | Complete | ||
| 111 | Garlaige Citadel: Map 1 | ( -318.227 , 319.098) Z:0 H-7 | ||
| 112 | Garlaige Citadel: Map 2 | (-41.95, 239.53) H/I 7/8 | ||
| 113 | Garlaige Citadel: Map 3 | ( 3.479, 80.135) Z:6 H-7 | ||
| 114 | Garlaige Citadel: Map 4 | (-278.974, 238.658) Z:19 H-7 | ||
| 115 | Ghelsba Outpost: Map 1 | (-160.186, 77.765) Z:-10 G-9 | ||
| 116 | Ghelsba Outpost: Map 2 | (-160.186, 77.765) Z:-3,-9 G-9 | ||
| 117 | Giddeus: Map 1 | ( -159.062, -239.952) Z:1 G-11 | ||
| 118 | Giddeus: Map 2 | ( -159.713 , 78.887) Z:17 G-7 | ||
| 119 | Gusgen Mines: Map 1 | ( 0 , -199.718 ) Z:-60 H-8 | ||
| 120 | Gusgen Mines: Map 2 | ( -0.558, 158.742) Z:-20 H-6 | ||
| 121 | Gusgen Mines: Map 3 | ( -79.433 , 278.105 ) Z:-20 G-8 | ||
| 122 | Gusgen Mines: Map 4 | (-158.082, 319.158) Z:1 H-7 | ||
| 123 | Gustav Tunnel: Map 1 | ( 240.925, 0.04) Z:-18.75 K-7 | ||
| 124 | Gustav Tunnel: Map 2 | ( -98.135, -60.887) Z:0 H-9 | ||
| 125 | Inner Horutoto Ruins: Map 1 | (400.859, 37.809) Z:0 I-8 | ||
| 126 | Inner Horutoto Ruins: Map 2 | (281.523, -0.227 ) Z:0.3 K-8 | ||
| 127 | Inner Horutoto Ruins: Map 3 | ( -237.141, -80.943) Z:0 I-9 | ||
| 128 | Inner Horutoto Ruins: Map 4 | ( -236.326, 161.345 ) Z:0 I-6 | ||
| 129 | Jugner Forest | Complete | ||
| 130 | Korroloka Tunnel: Map 1 | (381.53, 160.53) Z=-20 M-6 | ||
| 131 | Korroloka Tunnel: Map 2 | ( -220.02, -0.78) Z=1 J-8 | ||
| 132 | Korroloka Tunnel: Map 3 | (-80.89, 79.86) Z=-5.5 J-8 | ||
| 133 | Korroloka Tunnel: Map 4 | (-160.55, -81.81) Z=-0.07 F-8 | ||
| 134 | Korroloka Tunnel: Map 5 | (-330.42, 80.33) Z=-5.5 I-10 | ||
| 135 | Kuftal Tunnel: Map 1 | ( 0.861, -220.329) Z:-20 I-8 | ||
| 136 | Kuftal Tunnel: Map 2 | ( 1.253, -80.603) Z:0 G-11 | ||
| 137 | Kuftal Tunnel: Map 3 | (110.446, 39.501) Z:18 J-8 | ||
| 138 | Kuftal Tunnel: Map 4 | (120.493, -60.497) Z: 5-20 I-6 | ||
| 139 | Lufaise Meadows | Complete | ||
| 140 | Meriphataud Mountains | Complete | ||
| 141 | Misareaux Coast | Complete | ||
| 142 | Monastic Cavern | Complete | ||
| 143 | North Gustaberg | Complete | ||
| 144 | Palborough Mines: Map 1 | ( 81.34 , 118.72) Z=0.16 H-7 | ||
| 145 | Palborough Mines: Map 2 | ( 0.85, 200 ) Z=-15.76, -30 G-6 | ||
| 146 | Palborough Mines: Map 3 | (161.74, 78.58) Z= -32 I-7 | ||
| 147 | Pashhow Marshlands | Complete | ||
| 148 | Promyvion Dem | Complete | ||
| 149 | Promyvion Holla | Complete | ||
| 150 | Promyvion Mea | Complete | ||
| 151 | Promyvion Vahzl | Complete | ||
| 152 | Qulun Dome | Complete | ||
| 153 | Riverne Site #A01 - Map 1 | Complete | ||
| 154 | Riverne Site #A01 - Map 2 | Complete | ||
| 155 | Ru'Aun Gardens | Complete | ||
| 156 | Sea Serpent Grotto: Map 1 | Complete | Mobs incomplete | |
| 157 | Sea Serpent Grotto: Map 2 | Complete | ||
| 158 | Sea Serpent Grotto: Map 3 | Complete | ||
| 159 | Sea Serpent Grotto: Map 4 | Complete | ||
| 160 | Sea Serpent Grotto: Map 5 | (122.06, -180.79) Z: 1.25 I-7 | ||
| 161 | Selbina | Complete | ||
| 162 | South Gustaberg | Complete | ||
| 163 | Temenos North: Map 1 | (371.554, 407.695) Z:74 I-9 | ||
| 164 | Temenos North: Map 2 | (189.542, 460.690) Z:-82 H-7 | ||
| 165 | Temenos North: Map 3 | ( 49.351 , 404.410) Z:80 I-8 | ||
| 166 | Temenos North: Map 4 | (-155.035, 409.519) Z:-80 G-8 | ||
| 167 | Temenos North: Map 5 | (-244.662, 409.158) Z:80 J-8 | ||
| 168 | Temenos North: Map 6 | (-474.598, 409.200) Z:-78 G-8 | ||
| 169 | Temenos North: Map 7 | (-588.917, 427.504) Z:84 I-8 | ||
| 170 | Temenos East: Map 1 | (346.87, 148.44) Z:0 H-8 | ||
| 171 | Temenos East: Map 2 | (190.19, 180.19) Z:-162 H-7 | ||
| 172 | Temenos East: Map 3 | (26.86, 144.52) Z:6 H-7 | ||
| 173 | Temenos East: Map 4 | (-154.30, 128.33) Z:-160 G-8 | ||
| 174 | Temenos East: Map 5 | (-246.13, 129.07) Z:0 J-8 | ||
| 175 | Temenos East: Map 6 | (-449.79, 154.07) Z:-158 H-7 | ||
| 176 | Temenos East: Map 7 | (-590.08, 169.02) Z:5 I-7 | ||
| 177 | Temenos West: Map 1 | (369.95, -154.11) Z:74 I-9 | ||
| 178 | Temenos West: Map 2 | (193.77, -145.23) Z:-80 J-9 | ||
| 179 | Temenos West: Map 3 | (51.70, -158.52) Z:80 I-8 | ||
| 180 | Temenos West: Map 4 | (-154.09, -151.46) Z:-80 G-8 | ||
| 181 | Temenos West: Map 5 | (-246.12, -150) Z:80 J-8 | ||
| 182 | Temenos West: Map 6 | (-475.41, -125.54) Z:-78 G-7 | ||
| 183 | Temenos West: Map 7 | (-589.97, -110.73) Z:85 I-7 | ||
| 184 | Temenos Center: Map 1 | (223.16 , -403.82 ) Z:-164.28 F-6 | ||
| 185 | Temenos Center: Map 2 | (13.57, -471.76) Z: -6 I-8 | ||
| 186 | Temenos Center: Map 3 | (-335.32, -495.48) Z:-160 F-10 | ||
| 187 | Temenos Center: Map 4 | (-545.48, -496.01) Z:0? I-10 | ||
| 188 | Temenos Center: Basement | (594.54, -471.50) Z:0 J-8 | ||
| 189 | Temenos Entrance | No mobs, not needed | ||
| 190 | Temple of Uggalepih: Map 1 | (80.63,-3) (F,G)/(7/8) | ||
| 191 | Temple of Uggalepih: Map 2 | (-79.528, 39.198 ) Z:-8 I-6 | ||
| 192 | Temple of Uggalepih: Map 3 | (200.105, 279.919) Z:-16 G-7 | ||
| 193 | Temple of Uggalepih: Map 4 | (-99.134, -80.477) Z:-9 G-8 | ||
| 194 | The Boyahda Tree: Map 1 | (201.29, -41.58) H/I 8/9 | ||
| 195 | The Boyahda Tree: Map 2 | (-39.93, -1.17) F/G 6/7 | ||
| 196 | The Boyahda Tree: Map 3 | (-121.08, -201.41) G/H 8/9 | ||
| 197 | The Boyahda Tree: Map 4 | (-159.550, 199.657 ) Z:6 I-5 | ||
| 198 | The Eldieme Necropolis: Map 1 | (282.35, 39.48) H/I 7/8 | ||
| 199 | The Eldieme Necropolis: Map 2 | Complete | Coffers Good, add Chests | |
| 200 | The Eldieme Necropolis: Map 3 | ( 240.104, -160.450) Z:-8-16 H-7 | ||
| 201 | The Santuary of Zi'Tah | (120.26, -162.64) H/I 9/10 | ||
| 202 | Uleguerand Range: Map 1 | (401.467, -201.041) Z: <20 K-9 | ||
| 203 | Uleguerand Range: Map 2 | (401.467, -201.041) Z: >=20 K-9 | ||
| 204 | West Ronfaure | Complete | ||
| 205 | West Sarutabaruta | Complete | ||
| 206 | Riverne Site #B01 - Map 1 | ( -478.851, 758.399) Z:0 F-6 | ||
| 207 | Xarcabard | (122.51, -163.27) G/H 8/9 | ||
| 208 | Yhoator Jungle | Complete | Harvesting & Logging Good | |
| 209 | Yughott Grotto: Map 1 | Complete | Complete | |
| 210 | Yughott Grotto: Map 2 | Complete | Complete | |
| 211 | Yuhtunga Jungle | Complete | Harvesting & Logging Good | |
| 212 | Zeruhn Mines | (38.87, -41.51) I-6 | ||
| 213 | Eastern Altepa Desert | Complete | Harvesting Points are wrong | |
| 214 | Western Altepa Desert | (443.95, 119.74) K-L 6-7, 160 | ||
| 215 | Rabao | Complete | Complete | |
| 216 | Quicksand Caves: Map 1 | Complete | ||
| 217 | Quicksand Caves: Map 2 | Complete | ||
| 218 | Quicksand Caves: Map 3 | Complete | Significant fixes needed for all entities (prob a continuation of entities from Map 2, and so forth...) | |
| 219 | Quicksand Caves: Map 4 | Complete | ||
| 220 | Quicksand Caves: Map 5 | Complete | ||
| 221 | Quicksand Caves: Map 6 | ( -80.184, 319.937 ) Z:-14 K-9 | ||
| 222 | Quicksand Caves: Map 7 | ( -639.431, -400.585) Z:0 F-7 | ||
| 223 | Quicksand Caves: Map 8 | (-80.16, -200.59) Z: 1.10 H/I 7/8 | ||
| 224 | Sacrarium: Map 1 | ( -160.229 , -0.914 ) Z:0 G-8 | ||
| 225 | Sacrarium: Map 2 | ( 0.262 , -60.289 ) Z:0 G-8 - mobs>X=0 | ||
| 226 | Carpenter's Landing: Map 1 | (162.523, -601.589) Z:-5 J-10 | ||
| 227 | Carpenter's Landing: Map 2 | (-397.140, 598.584) Z:-6 H-7 | ||
| 228 | Sealion's Den | ( 600.48, 799.95) H-5 | ||
| 229 | Phomiuna Aqueducts: Map 1 | ( 241.32 , -281.40) J-10 z=0 | ||
| 230 | Phomiuna Aqueducts: Map 2 | ( -41.36, 41.17) z=1 H-8 | ||
| 231 | Phomiuna Aqueducts: Map 3 | ( 160.565 , 80.122 ) Z:-24 L-7 | ||
| 232 | Fei'Yin: Map 1 | (-121.16,-80.79) F/G 9-10 | ||
| 233 | Fei'Yin: Map 2 | ( 43.12 , 80.80) H/I 7-8 | ||
| 234 | Ranguemont Pass | ( -199.060, -240.322) Z:5 F-10 | ||
| 235 | Ordelle's Caves: Map 1 | Complete | Entities good | |
| 236 | Ordelle's Caves: Map 2 | Complete | Entities good | |
| 237 | Ordelle's Caves: Map 3 | Complete | Entities good | |
| 238 | Maze of Shakhrami: Map 1 | (-240.14, -123.03) (D/E) (8/9) | ||
| 239 | Maze of Shakhrami: Map 2 | (-79.57,-39.92) Z:19.70 (F/G) (7/8) | ||
| 240 | Grand Palace of Hu'Xzoi: Map 1 | (-138.88, 459.49) Z: -0.33 L-7 | ||
| 241 | Grand Palace of Hu'Xzoi: Map 2 | (381.03, 699.42) Z: -0.25 H-4 | ||
| 242 | Grand Palace of Hu'Xzoi: Map 3 | Not needed, no mobs | ||
| 243 | Labyrinth of Onzozo | (41.79, -80.69) Z:-0.73 I-8 | ||
| 244 | King Ranperres Tomb: Map 1 | (-158.207, 239.362) Z:0 G-5 | ||
| 245 | King Ranperres Tomb: Map 2 | ( -118.817, -200.343 ) Z:7 G-7 | ||
| 246 | Outter Horutoto: Map 1 | ( -278.596, 798.068) Z:0 I-5 | ||
| 247 | Outter Horutoto: Map 2 | ( -278.596, 798.068) Z:0 I-5 | ||
| 248 | Outter Horutoto: Map 3 | (520.91, -680.27) Z:0 I-8 | ||
| 249 | Outter Horutoto: Map 4 | (-359.17, -681.74) Z:-0.16 J8 | ||
| 250 | Outter Horutoto: Map 5 | (-278.73, 638.46) Z:0 I-7 | ||
| 251 | Oldton Movalpolos | (-122.07, -79.35) Z=22.83 H-10 | ||
| 252 | Cape Teriggan | (-80.26, 78.68) H-7 | ||
| 253 | Toraimarai Canal: Map 1 | ( -279.666, 239.980 ) Z:16 G-5 | ||
| 254 | Toraimarai Canal: Map 2 | (39.42, -161.54) Z:14, G-9 | ||
| 255 | Hall of the Gods | (19.67, 9.64) I-7 | ||
| 256 | Ve'Lugannon Palace: Map 1 | (-39.36, -400.08) Z:0.5 H-13 | ||
| 257 | Ve'Lugannon Palace: Map 2 | (-359.41, 318.76) Z:16 H-8 | ||
| 258 | Ve'Lugannon Palace: Map 3 | (-199.98 , 399.04) Z:16 H-8 | ||
| 259 | Ve'Lugannon Palace: Map 4 | (239.32, 398.55) Z:16 J-8 | ||
| 260 | Ve'Lugannon Palace: Map 5 | (321.46, 361.18) Z:16 H-7 | ||
| 261 | Ve'Lugannon Palace: Map 6 | (-398.52, -40.53) Z:16 I-8 | ||
| 262 | No map listed | |||
| 263 | Ve'Lugannon Palace: Map 7 | (-359.10, -201.18) Z:16 | ||
| 264 | Ve'Lugannon Palace: Map 8 | ( 359.16 , -201.18) Z:16 H-7 | ||
| 265 | Ve'Lugannon Palace: Map 9 | (440.92, -40.23) Z:16 I-8 | ||
| 266 | The Shrine of Ru'Avitau: Map 1 | (-101.73, 0.98) Z:32 F-8 | ||
| 267 | The Shrine of Ru'Avitau: Map 2 | (-119.90, -120.24) Z:0 G-10 | ||
| 268 | The Shrine of Ru'Avitau: Map 3 | (-139.21, 79.32) Z:-16 E-5 | ||
| 269 | The Shrine of Ru'Avitau: Map 4 | (740.08, 658.31) Z:100 G-6 | ||
| 270 | The Shrine of Ru'Avitau: Map 5 | (781.42, 39.88) Z:0 H-7 | ||
| 271 | The Shrine of Ru'Avitau: Map 6 | (861.27, -581.63) Z:-99 J-8 | ||
| 272 | Den of Rancor: Map 1 | (80.76, 20.24) Z:16 I-4 | ||
| 273 | Den of Rancor: Map 2 | (81.36, -202.04) Z:36 I-10 | ||
| 274 | Den of Rancor: Map 3 | (110.74, -340.05) Z:26 J-8 | ||
| 275 | Den of Rancor: Map 4 | (-58.42, -260.15) Z:26 I-8 | ||
| 276 | Den of Rancor: Map 5 | (-139.44, -140.55) Z:6 I-8 | ||
| 277 | Den of Rancor: Map 6 | (180.71, -60.96) Z:35 I-7 | ||
| 278 | Den of Rancor: Map 7 | (421.23, 219.88) Z:-4 J-9 | ||
| 279 | Den of Rancor: Map 8 | (399.78, 359) Z:26 H-6 | ||
| 280 | Den of Rancor: Map 9 | (319.79, 230.56 ) Z:16 I-6 | ||
| 281 | Dragon's Aery | ( -40.978, -0.424) Z:-1 G-8 | ||
| 282 | Ro'Maeve | (100.74, 49.81) J/K 6/7 | ||
| 283 | Ifrit's Cauldron: Map 1 | (119.75, -82.14) Z:4 G-8 | ||
| 284 | Ifrit's Cauldron: Map 2 | ( -0.25 , -81.22) Z:0 I-9 | ||
| 285 | Ifrit's Cauldron: Map 3 | (-100.19, 181.27) Z:3.08 G-8 | ||
| 286 | Ifrit's Cauldron: Map 4 | (82.64, -301.54) Z:0 K-9 | ||
| 287 | Ifrit's Cauldron: Map 5 | (-260.27, -140.79) Z:4 G-8 | ||
| 288 | Ifrit's Cauldron: Map 6 | (121.08, 140.06) Z:20 I-7 | ||
| 289 | Ifrit's Cauldron: Map 7 | (81.52, 159.73) Z:10 K-3 | ||
| 290 | Ifrit's Cauldron: Map 8 | (-238.81, 78.65) Z:40 H-9 | ||
| 291 | Kazham | Complete | ||
| 292 | Newton Movalpolos | ( -179.63, -161.59) Z=12 G-10 | ||
| 293 | Valley of Sorrows | (121.69, -41.79) Z:0 J-8 | ||
| 294 | Al Zahbi | |||
| 295 | Aht Urhgan Whitegate | |||
| 296 | Bhaflau Thickets: Map 1 | |||
| 297 | Bhaflau Thickets: Map 2 | |||
| 298 | Wajaom Woodlands | |||
| 299 | Aydeewa Subterrane: Map 1 | |||
| 300 | Aydeewa Subterrane: Map 2 | |||
| 301 | Aydeewa Subterrane: Map 3 | |||
| 302 | Aydeewa Subterrane: Map 4 | |||
| 303 | Aydeewa Subterrane: Map 5 | |||
| 304 | Aydeewa Subterrane: Map 6 | |||
| 305 | Aydeewa Subterrane: Map 7 | |||
| 306 | Mamook: Map 1 | |||
| 307 | Mamook: Map 2 | |||
| 308 | Mamook: Map 3 | |||
| 309 | Alzadaal Undersea Ruins: Map 1 | |||
| 310 | Alzadaal Undersea Ruins: Map 2 | |||
| 311 | Alzadaal Undersea Ruins: Map 3 | |||
| 312 | Alzadaal Undersea Ruins: Map 4 | |||
| 313 | Alzadaal Undersea Ruins: Map 5 | |||
| 314 | Alzadaal Undersea Ruins: Map 6 | |||
| 315 | Alzadaal Undersea Ruins: Map 7 | |||
| 316 | Alzadaal Undersea Ruins: Map 8 | |||
| 317 | Alzadaal Undersea Ruins: Map 9 | |||
| 318 | Alzadaal Undersea Ruins: Map 10 | |||
| 319 | Nyzul Isle: Map 1 | |||
| 320 | Nyzul Isle: Map 2 | |||
| 321 | Nyzul Isle: Map 3 | |||
| 322 | Nyzul Isle: Map 4 | |||
| 323 | Nyzul Isle: Map 5 | |||
| 324 | Nyzul Isle: Map 6 | |||
| 325 | Nyzul Isle: Map 7 | |||
| 326 | Nyzul Isle: Map 8 | |||
| 327 | Mount Zhayolm | |||
| 328 | Nashmau | |||
| 329 | Caedarva Mire: Map 1 | |||
| 330 | Caedarva Mire: Map 2 | |||
| 331 | Caedarva Mire: Map 3 | |||
| 332 | Caedarva Mire: Map 4 | |||
| 333 | Arrapago Reef: Map 1 | |||
| 334 | Arrapago Reef: Map 2 | |||
| 335 | Arrapago Reef: Map 3 | |||
| 336 | Arrapago Reef: Map 4 | |||
| 337 | Arrapago Reef: Map 5 | |||
| 338 | Arrapago Reef: Map 6 | |||
| 339 | Arrapago Reef: Map 7 | |||
| 340 | Arrapago Reef: Map 8 | |||
| 341 | Arrapago Reef: Map 9 | |||
| 342 | Arrapago Reef: Map 10 | |||
| 343 | Arrapago Reef: Map 11 | |||
| 344 | Mamool Ja Training Grounds: Map 1 | |||
| 345 | Mamool Ja Training Grounds: Map 2 | |||
| 346 | Mamool Ja Training Grounds: Map 3 | |||
| 347 | Mamool Ja Training Grounds: Map 4 | |||
| 348 | Mamool Ja Training Grounds: Map 5 | |||
| 349 | Mamool Ja Training Grounds: Map 6 | |||
| 350 | Mamool Ja Training Grounds: Map 7 | |||
| 351 | Mamool Ja Training Grounds: Map 8 | |||
| 352 | Mamool Ja Training Grounds: Map 9 | |||
| 353 | Mamool Ja Training Grounds: Map 10 | |||
| 354 | Talacca Cove | |||
| 355 | Silver Sea Remnants: Map 1 | |||
| 356 | Silver Sea Remnants: Map 2 | |||
| 357 | Silver Sea Remnants: Map 3 | |||
| 358 | Silver Sea Remnants: Map 4 | |||
| 359 | Silver Sea Remnants: Map 5 | |||
| 360 | Arrapago Remnants: Map 1 | |||
| 361 | Arrapago Remnants: Map 2 | |||
| 362 | Arrapago Remnants: Map 3 | |||
| 363 | Arrapago Remnants: Map 4 | |||
| 364 | Arrapago Remnants: Map 5 | |||
| 365 | Arrapago Remnants: Map 6 | |||
| 366 | Arrapago Remnants: Map 7 | |||
| 367 | Zhayolm Remnants: Map 1 | |||
| 368 | Zhayolm Remnants: Map 2 | |||
| 369 | Zhayolm Remnants: Map 3 | |||
| 370 | Zhayolm Remnants: Map 4 | |||
| 371 | Zhayolm Remnants: Map 5 | |||
| 372 | Zhayolm Remnants: Map 6 | |||
| 373 | Zhayolm Remnants: Map 7 | |||
| 374 | Lebros Cavern: Map 1 | |||
| 375 | Lebros Cavern: Map 2 | |||
| 376 | Lebros Cavern: Map 3 | |||
| 377 | Lebros Cavern: Map 4 | |||
| 378 | Lebros Cavern: Map 5 | |||
| 379 | Lebros Cavern: Map 6 | |||
| 380 | Lebros Cavern: Map 7 | |||
| 381 | Lebros Cavern: Map 8 | |||
| 382 | Lebros Cavern: Map 9 | |||
| 383 | Lebros Cavern: Map 10 | |||
| 384 | Halvung: Map 1 | |||
| 385 | Halvung: Map 2 | |||
| 386 | Halvung: Map 3 | |||
| 387 | Halvung: Map 4 | |||
| 388 | Periqia: Map 1 | |||
| 389 | Periqia: Map 2 | |||
| 390 | Periqia: Map 3 | |||
| 391 | Periqia: Map 4 | |||
| 392 | Periqia: Map 5 | |||
| 393 | Periqia: Map 6 | |||
| 394 | Periqia: Map 7 | |||
| 395 | Periqia: Map 8 | |||
| 396 | Periqia: Map 9 | |||
| 397 | Periqia: Map 10 | |||
| 398 | Leujaoam Sanctum: Map 1 | |||
| 399 | Leujaoam Sanctum: Map 2 | |||
| 400 | Leujaoam Sanctum: Map 3 | |||
| 401 | Leujaoam Sanctum: Map 4 | |||
| 402 | Leujaoam Sanctum: Map 5 | |||
| 403 | Leujaoam Sanctum: Map 6 | |||
| 404 | Leujaoam Sanctum: Map 7 | |||
| 405 | Leujaoam Sanctum: Map 8 | |||
| 406 | Leujaoam Sanctum: Map 9 | |||
| 407 | Leujaoam Sanctum: Map 10 | |||
| 408 | Ilrusi Atoll: Map 1 | |||
| 409 | Ilrusi Atoll: Map 2 | |||
| 410 | Ilrusi Atoll: Map 3 | |||
| 411 | Ilrusi Atoll: Map 4 | |||
| 412 | Ilrusi Atoll: Map 5 | |||
| 413 | Ilrusi Atoll: Map 6 | |||
| 414 | Ilrusi Atoll: Map 7 | |||
| 415 | Ilrusi Atoll: Map 8 | |||
| 416 | Ilrusi Atoll: Map 9 | |||
| 417 | Ilrusi Atoll: Map 10 |
Known Issues
Broken Map links (needs updating)
| Map | Issue |
|---|---|
| Metalworks | doesnt have a direct connection listed on the map, add a custom image overlay? |
| Lower Delkfutt's Tower: Map 4: | Add connections to Embassy links? |
| Delkfultts Tower | teleports can take you to more than one place... make sure 'multiple links' is set up |
| Middle Delkfutt's Tower: Map 2 | where does that go? [G-6] |
| Pso'Xja: Map 20 | stone door and other exit? |
| Upper Delkfutt's Tower: Map 3 | #5 connection? |
| Upper Delkfutt's Tower: Map 4-6 | need connections |
| All Crags | need Al'Taieu added |
| All Apollyon zone maps | |
| All Burning Circles | connections purposefully left out |
| All Promys | no connections inside |
| Ru'Aun Gardens | need to add layers that depict the teleporters |
| Uleguard Range | underground connections not listed on map 1; need to adjust hover/pulse coordinates when graphics updated |
| Inner Horu | add West Saruta[205] |
| Yuhtunga Jungle | 3/4/5 into Ifrit's Cauldron? Not listed on Ifrit Cauldron maps... |
| Grand Palace of Hu'Xzoi - maps 1 and 2 | no connections |
| The Shrine of Ru'Avitau: Map 1 | e & f are not connected |
| Castle Oztroja: Map 4 | K connection broken ? probably linked to Map 4 incorrectly |
| Crawlers Nest -> Rolanberry Fields | recheck connections 1 and 2, 2 is incorrect |
| Alzadaal Undersea Ruins: Map 5 | Multiple telelports |
| Alzadaal Undersea Ruins: Map 11 & 12 | Maps missing form database |
| Nyzul Isle: Maps 319 to 326 | Teleports are random |
| Caedarva Mire: Map 1 | Connection 3 to Underseas Ruins not connected(Ruins map 12 missing) |
| Caedarva Mire: Map 2 | Connection 2 to Underseas Ruins not connected(Ruins map 12 missing) |
| Caedarva Mire: Map 3 | no connections? Unsure if CS zone or has links |

