One Good Deed?
From HorizonXI Wiki
| One Good Deed? | |
|---|---|
| Starting NPC | Chipmy-Popmy, Port Windurst (C-8)
|
| Required Fame | Windurst Level 5 |
| Title | Deed Verifier |
| Repeatable | No |
| Description | A mysterious character living on Purgonorgo Isle in Bibiki Bay insists that the island belongs to him. Chipmy-Popmy wants you to participate in the next "debate" over ownership, set to take place in the center of the island. |
| Rewards | |
| 3,200 Gil | |
Walkthrough
- Talk to Chipmy-Popmy to get a cutscene. (You may have to talk to him twice to get the cutscene.)
- Take the Manaclipper in Bibiki Bay to Bibiki Bay - Purgonorgo Isle. The clipper does three tours. You want the tour that goes out to Bibiki Bay - Purgonorgo Isle.
- Once on the Isle, follow the path to (H-9), near the center of the isle. There is a ???.
- Examine the ??? to spawn six Peerifools (Mandragora-type monsters). Defeat them.
- The Peerifools use Dream Flower rapidly, often within seconds of each other when they are awake, but a 75 character should have no difficulty evading or resisting the sleep effect.
- They are very susceptible to a BLM's Sleep spells.
- Will link with any other Mandragora mobs in the area. Not really a threat, but you should be aware of this.
- Their attacks have a chance of processing an "Additional Effect: Sleep" when they hit you.
- Once defeated, examine the ??? again for a cutscene and the Deed to Purgonorgo Isle.
- Return to Chipmy-Popmy for another cutscene. (You may have to talk to him twice again to get the cutscene.)

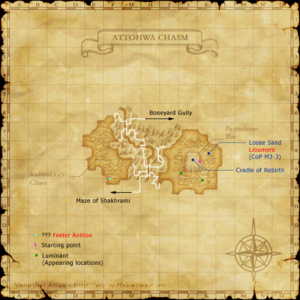
- Now you need to track down one of the Mithran Trackers in Attohwa Chasm. She is actually located in Boneyard Gully, so you could use the Home Point in Attohwa Chasm if you have previously unlocked it.
- Enter Attohwa Chasm from the Maze of Shakhrami; the entrance is labeled on your map.
- Cross the bridge (this is very important) and follow the path.
- At (H-10), there is an intersection. You want to head east, not west. This will take you into the lower-leveled eastern side of the map.
- Follow the mountainside north to (I-8). There is a cave to take you back into the mountain/chasm area.
- Follow the path (there is another intersection shortly into the area; head south, not north). The path winds in all directions and takes you all over the chasm. There will be a fork in the path, follow either one south.
- You will come to another bridge that crosses the chasm. Continue west.
- At (G-7), there is another intersection; head north, not east. You will cross three bridges before you get to the end.
- Be very careful once you see the tunnel exit, as Antlions come very close to the mountain. Use Sneak and Invisible and follow the mountain north again.
- Also beware of the gasponia flowers along the way, as they can cause a very potent poison effect when getting too close.
- Antlions detect by sound so it is safe to renew Invisible near one while avoiding the goblins. As most people know you can cast invisible while its still up so as long as the mob does not detect magic (if you're not using ninjutsu).
- At (F-6), there is another tunnel entrance. Follow this tunnel, one bridge to the Boneyard Gully zone, in the eastern part of (G-6).
- Once you zone, you will have another cutscene, at the end of which you will receive the Map of the Attohwa Chasm.
- Return to Chipmy-Popmy to complete the quest and receive the 3200gil reward.
- You will need to speak to Chipmy-Popmy three times to activate this scene if you are on the final portion of Promathia Mission 8-4:Dawn.


