
Qu'Bia Arena: Difference between revisions
From HorizonXI Wiki
No edit summary Tag: visualeditor |
No edit summary |
||
| Line 1: | Line 1: | ||
[[Category: | {{Zone Infobox | ||
[[Category: | | ToC = | ||
[[#Involved in Quests/Missions|Quests/Missions]] • [[#Battlefield Events|Battlefield]] | |||
| Description = The mysterious inner sanctum of the [[Fei'Yin|Ruins of Fei'Yin]] where the seal closing off the frozen northlands was placed after the [[Crystal War|Great War]]. It is the entrance to a number of different [[BCNM]] battles as well as some battles for [[missions]] and [[:Category:Quests|quests]]. You must use the Burning Circle to do battle. | |||
[[File:Qu'biaarenapic.jpg|250px|center]] | |||
| Connections = | |||
[[Fei'Yin]] | |||
<br>[[escape|Escapes]] to: [[Beaucedine Glacier]] (J-5) | |||
<!-- | |||
<br> From [[Lower Jeuno]] via [[Domenic]] | |||
--> | |||
| Maps = No Map | |||
| Stats = {{Tractor}} {{Escape}} | |||
| Region = Fauregandi | |||
| Type = Battlefield | |||
| HELM = None | |||
| Map Acquisition = N/A | |||
| Restrictions = None | |||
| Requirements = None | |||
| Expansion = Original | |||
| Weather = Shared with [[Fei'Yin]] | |||
| BGM = "Tough Battle" (normal)<br>"Fury" (Vassago) | |||
}} | |||
__NOTOC__ | |||
[[Category:Battlefields]] | |||
== Involved in [[:Category:Quests|Quests]]/[[:Category:Missions|Missions]] == | |||
{{TableQuestHeader}} | |||
<!-- | |||
{{TableQuestLine |Name= A Furious Finale | Type= [[Genkai]] (DNC)| Starter= [[Laila]]| Zone= [[Upper Jeuno]]| Coordinates= G-7}} | |||
{{TableQuestLine |Name=Beyond Infinity| Type= [[Genkai]]| Starter= [[Nomad Moogle]]| Zone = [[Ru'Lude Gardens]]| Coordinates = H-5}} | |||
--> | |||
{{TableQuestLine |Name= Shattering Stars| Type= [[Genkai]] (PLD, DRK, BRD)| Starter= [[Maat]]| Zone= [[Ru'Lude Gardens]]| Coordinates= H-5}} | |||
<!-- | |||
{{TableQuestLine |Name= Mirror Images| Type= Fellow Bond Cap| Starter= [[Luto Mewrilah]]| Zone= [[Upper Jeuno]]| Coordinates= G-8 }} | |||
{{TableQuestLine |Name= Clash of the Comrades| Type= Fellow Level Cap| Starter= [[Luto Mewrilah]]| Zone= [[Upper Jeuno]]| Coordinates= G-8 }} | |||
--> | |||
{{TableMissionHeader}} | |||
{{TableMissionLine |Name = Darkness Rising|Darkness Rising| Nation= [[Bastok Missions|Bastok ]]| Starter= [[Bastok Gate Guard]]| Zone= [[Bastok]]| Coordinates= }} | |||
{{TableMissionLine |Name = The Ruins of Fei'Yin|The Ruins of Fei'Yin| Nation= [[San d'Oria Missions|San d'Oria]]| Starter= [[San d'Orian Gate Guard]]| Zone= [[San d'Oria]]| Coordinates= }} | |||
{{TableMissionLine |Name = The Heir to the Light|The Heir to the Light| Nation= [[San d'Oria Missions|San d'Oria]]| Starter= [[San d'Orian Gate Guard]]| Zone= [[San d'Oria]]| Coordinates= }} | |||
{{TableMissionLine |Name = The Final Seal|The Final Seal| Nation= [[Windurst Missions|Windurst]]| Starter= [[Windurst Gate Guard]]| Zone= [[Windurst]]| Coordinates= }} | |||
<!-- | |||
{{TableMissionLine |Name = Those Who Lurk in Shadows (III)| Nation= [[A Crystalline Prophecy Missions|A Crystalline Prophecy]]| Starter=--- | Zone=--- | Coordinates= }} | |||
--> | |||
{{TableQuestFooter}} | |||
== Battlefield Events == | |||
{| border="0" width="100%" cellpadding="3" cellspacing="2" | {| border="0" width="100%" cellpadding="3" cellspacing="2" | ||
| | |- BGCOLOR="#F1BF8C" | ||
| | |colspan=6|'''Entrance:''' Burning Circle | ||
| | |- BGCOLOR="#F1BF8C" | ||
|- | ! Name || Type || Item || Level || Members || Time | ||
| align="center" | |- BGCOLOR="#F9D5B0" | ||
| align="center" | |style="padding-left:1ex;"|[[Die by the Sword]] | ||
| align="center" | |align="center"|[[:Category:BCNM|BCNM]] | ||
|- | |align="center"|[[Sky Orb]] | ||
| | |align="center"|30 | ||
| | |align="center"|3 people | ||
| | |align="center"|15 minutes | ||
| | |- BGCOLOR="#F9D5B0" | ||
| | |style="padding-left:1ex;"|[[Let Sleeping Dogs Die]] | ||
|- | |align="center"|[[:Category:BCNM|BCNM]] | ||
| | |align="center"|[[Sky Orb]] | ||
| | |align="center"|30 | ||
| | |align="center"|6 people | ||
| | |align="center"|30 minutes | ||
| | |- BGCOLOR="#F9D5B0" | ||
|- | |style="padding-left:1ex;"|[[Undying Promise]] | ||
| | |align="center"|[[:Category:BCNM|BCNM]] | ||
| | |align="center"|[[Star Orb]] | ||
| | |align="center"|40 | ||
| | |align="center"|3 people | ||
| | |align="center"|15 minutes | ||
|- | |- BGCOLOR="#F9D5B0" | ||
| | |style="padding-left:1ex;"|[[Factory Rejects]] | ||
| | |align="center"|[[:Category:BCNM|BCNM]] | ||
| | |align="center"|[[Star Orb]] | ||
| | |align="center"|40 | ||
| | |align="center"|6 people | ||
|- | |align="center"|30 minutes | ||
| | |- BGCOLOR="#F9D5B0" | ||
| | |style="padding-left:1ex;"|[[An Awful Autopsy]] | ||
| | |align="center"|[[:Category:BCNM|BCNM]] | ||
| | |align="center"|[[Comet Orb]] | ||
| | |align="center"|50 | ||
|- | |align="center"|3 people | ||
| | |align="center"|15 minutes | ||
| | |- BGCOLOR="#F9D5B0" | ||
| | |style="padding-left:1ex;"|[[Idol Thoughts]] | ||
| | |align="center"|[[:Category:BCNM|BCNM]] | ||
| | |align="center"|[[Comet Orb]] | ||
|- | |align="center"|50 | ||
| | |align="center"|6 people | ||
| | |align="center"|30 minutes | ||
| | |- BGCOLOR="#F9D5B0" | ||
| | |style="padding-left:1ex;"|[[Celery]] | ||
| | |align="center"|[[:Category:BCNM|BCNM]] | ||
|- | |align="center"|[[Moon Orb]] | ||
| | |align="center"|60 | ||
| | |align="center"|3 people | ||
| | |align="center"|15 minutes | ||
| | |- BGCOLOR="#F9D5B0" | ||
| | |style="padding-left:1ex;"|[[Brothers D'Aurphe]] | ||
|- | |align="center"|[[:Category:BCNM|BCNM]] | ||
| | |align="center"|[[Moon Orb]] | ||
| | |align="center"|60 | ||
| | |align="center"|6 people | ||
| | |align="center"|30 minutes | ||
| | |- BGCOLOR="#F9D5B0" | ||
|- | |style="padding-left:1ex;"|[[Demolition Squad]] | ||
| | |align="center"|[[:Category:BCNM|BCNM]] | ||
| | |align="center"|[[Moon Orb]] | ||
| | |align="center"|60 | ||
| | |align="center"|6 people | ||
| | |align="center"|30 minutes | ||
|- | |- BGCOLOR="#F9D5B0" | ||
| | |style="padding-left:1ex;"|[[Come Into My Parlor]] | ||
| | |align="center"|[[:Category:BCNM|KSNM]] | ||
| | |align="center"|[[Clotho Orb]] | ||
| | |align="center"|--- | ||
| | |align="center"|6 people | ||
|- | |align="center"|30 minutes | ||
| | |- BGCOLOR="#F9D5B0" | ||
| | |style="padding-left:1ex;"|[[E-vase-ive Action]] | ||
| | |align="center"|[[:Category:BCNM|KSNM]] | ||
| | |align="center"|[[Lachesis Orb]] | ||
| | |align="center"|--- | ||
|align="center"|6 people | |||
|align="center"|30 minutes | |||
|- BGCOLOR="#F9D5B0" | |||
|style="padding-left:1ex;"|[[Infernal Swarm]] | |||
|align="center"|[[:Category:BCNM|KSNM]] | |||
|align="center"|[[Atropos Orb]] | |||
|align="center"|--- | |||
|align="center"|6 people | |||
|align="center"|30 minutes | |||
|- BGCOLOR="#F9D5B0" | |||
|style="padding-left:1ex;"|[[Darkness Rising]] | |||
|align="center"|Mission | |||
|align="center"|{{KeyItem}}[[New Fei'Yin Seal]] | |||
|align="center"|75 | |||
|align="center"|6 people | |||
|align="center"|15 minutes | |||
|- BGCOLOR="#F9D5B0" | |||
|style="padding-left:1ex;"|[[The Ruins of Fei'Yin]] | |||
|align="center"|Mission | |||
|align="center"|{{KeyItem}}[[New Fei'Yin Seal]] | |||
|align="center"|75 | |||
|align="center"|6 people | |||
|align="center"|15 minutes | |||
|- BGCOLOR="#F9D5B0" | |||
|style="padding-left:1ex;"|[[The Final Seal]] | |||
|align="center"|Mission | |||
|align="center"|{{KeyItem}}[[New Fei'Yin Seal]] | |||
|align="center"|75 | |||
|align="center"|6 people | |||
|align="center"|15 minutes | |||
|- BGCOLOR="#F9D5B0" | |||
|style="padding-left:1ex;"|[[The Heir to the Light]] | |||
|align="center"|Mission | |||
|align="center"|-- | |||
|align="center"|75 | |||
|align="center"|6 people | |||
|align="center"|30 minutes | |||
<!-- | |||
|- BGCOLOR="#F9D5B0" | |||
|style="padding-left:1ex;"|[[Those Who Lurk in Shadows (III)]] | |||
|align="center"|Mission | |||
|align="center"|-- | |||
|align="center"|75 | |||
|align="center"|6 people | |||
|align="center"|30 minutes | |||
--> | |||
|- BGCOLOR="#F9D5B0" | |||
|style="padding-left:1ex;"|[[Shattering Stars/Bard|Shattering Stars (Bard)]] | |||
|align="center"|Limit | |||
|align="center"|[[Bard's Testimony]] | |||
|align="center"|70/75 | |||
|align="center"|1 person | |||
|align="center"|10 minutes | |||
|- BGCOLOR="#F9D5B0" | |||
|style="padding-left:1ex;"|[[Shattering Stars/Dark Knight|Shattering Stars (Dark Knight)]] | |||
|align="center"|Limit | |||
|align="center"|[[Dark Knight's Testimony]] | |||
|align="center"|70/75* | |||
|align="center"|1 person | |||
|align="center"|10 minutes | |||
|- BGCOLOR="#F9D5B0" | |||
|style="padding-left:1ex;"|[[Shattering Stars/Paladin|Shattering Stars (Paladin)]] | |||
|align="center"|Limit | |||
|align="center"|[[Paladin's Testimony]] | |||
|align="center"|70/75* | |||
|align="center"|1 person | |||
|align="center"|10 minutes | |||
<!-- | |||
|- BGCOLOR="#F9D5B0" | |||
|style="padding-left:1ex;"|[[A Furious Finale|A Furious Finale (Dancer)]] | |||
|align="center"|Limit | |||
|align="center"|[[Dancer's Testimony]] | |||
|align="center"|70/75* | |||
|align="center"|1 person | |||
|align="center"|10 minutes | |||
--> | |||
<!-- | |||
|- BGCOLOR="#F9D5B0" | |||
|style="padding-left:1ex;"|[[Beyond Infinity]] | |||
|align="center"|Limit | |||
|align="center"|{{KeyItem}}[[Soul gem clasp]] | |||
|align="center"|--- | |||
|align="center"|6 people | |||
|align="center"|10 minutes | |||
--> | |||
<!-- | |||
|- BGCOLOR="#F9D5B0" | |||
|style="padding-left:1ex;"|[[Mirror Images]] | |||
|align="center"|Fellow | |||
|align="center"|-- | |||
|align="center"|50 | |||
|align="center"|1 person | |||
|align="center"|15 minutes | |||
--> | |||
<!-- | |||
|- BGCOLOR="#F9D5B0" | |||
|style="padding-left:1ex;"|[[Clash of the Comrades]] | |||
|align="center"|Fellow | |||
|align="center"|-- | |||
|align="center"|75 | |||
|align="center"|1 person | |||
|align="center"|10 minutes | |||
--> | |||
<!-- | |||
|- BGCOLOR="#F9D5B0" | |||
|style="padding-left:1ex;"|[[Demolition Squad II]] | |||
|align="center"|[[Reforged Armor]] | |||
|align="center"|[[Macrocosmic Orb]] | |||
|align="center"|None | |||
|align="center"|6 people | |||
|align="center"|30 minutes | |||
|- BGCOLOR="#F9D5B0" | |||
|style="padding-left:1ex;"|[[Brothers D'Aurphe II]] | |||
|align="center"|[[Reforged Armor]] | |||
|align="center"|[[Macrocosmic Orb]] | |||
|align="center"|None | |||
|align="center"|6 people | |||
|align="center"|30 minutes | |||
--> | |||
|} | |} | ||
*''Limit break battles are capped at your current level, which will be a maximum of 70 if you have never completed a level 71 limit break fight.'' | |||
Revision as of 19:42, 1 June 2023
Description
The mysterious inner sanctum of the Ruins of Fei'Yin where the seal closing off the frozen northlands was placed after the Great War. It is the entrance to a number of different BCNM battles as well as some battles for missions and quests. You must use the Burning Circle to do battle.
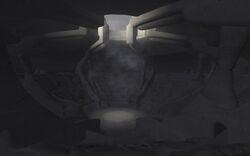

Table of Contents
Connections
Interactive Map
| Zone Information | |
|---|---|
| Area Name | Qu'Bia Arena |
| Type | Battlefield |
| Maps | No Map |
| Map Acquisition | N/A |
| Miscellaneous | |
| Hobbies | None |
| Weather | Shared with Fei'Yin |
| Region | Fauregandi |
| Expansion | Original |
| Requirements | None |
| Restrictions | None |
| Background music | "Tough Battle" (normal) "Fury" (Vassago) |
| Notes | None |
Weather Forecast
| VanaDays from Today | Normal (50%) | Common (35%) | Rare (15%) |
|---|---|---|---|
Involved in Quests/Missions
| Quest | Type | Starter | Location |
|---|---|---|---|
| Shattering Stars | Genkai (PLD, DRK, BRD) | Maat | Ru'Lude Gardens (H-5) |
| Mission | Nation | Starter | Location |
| Darkness Rising | Bastok | Bastok Gate Guard | Bastok |
| The Ruins of Fei'Yin | San d'Oria | San d'Orian Gate Guard | San d'Oria |
| The Heir to the Light | San d'Oria | San d'Orian Gate Guard | San d'Oria |
| The Final Seal | Windurst | Windurst Gate Guard | Windurst |

Battlefield Events
| Entrance: Burning Circle | |||||
| Name | Type | Item | Level | Members | Time |
|---|---|---|---|---|---|
| Die by the Sword | BCNM | Sky Orb | 30 | 3 people | 15 minutes |
| Let Sleeping Dogs Die | BCNM | Sky Orb | 30 | 6 people | 30 minutes |
| Undying Promise | BCNM | Star Orb | 40 | 3 people | 15 minutes |
| Factory Rejects | BCNM | Star Orb | 40 | 6 people | 30 minutes |
| An Awful Autopsy | BCNM | Comet Orb | 50 | 3 people | 15 minutes |
| Idol Thoughts | BCNM | Comet Orb | 50 | 6 people | 30 minutes |
| Celery | BCNM | Moon Orb | 60 | 3 people | 15 minutes |
| Brothers D'Aurphe | BCNM | Moon Orb | 60 | 6 people | 30 minutes |
| Demolition Squad | BCNM | Moon Orb | 60 | 6 people | 30 minutes |
| Come Into My Parlor | KSNM | Clotho Orb | --- | 6 people | 30 minutes |
| E-vase-ive Action | KSNM | Lachesis Orb | --- | 6 people | 30 minutes |
| Infernal Swarm | KSNM | Atropos Orb | --- | 6 people | 30 minutes |
| Darkness Rising | Mission | 75 | 6 people | 15 minutes | |
| The Ruins of Fei'Yin | Mission | 75 | 6 people | 15 minutes | |
| The Final Seal | Mission | 75 | 6 people | 15 minutes | |
| The Heir to the Light | Mission | -- | 75 | 6 people | 30 minutes |
| Shattering Stars (Bard) | Limit | Bard's Testimony | 70/75 | 1 person | 10 minutes |
| Shattering Stars (Dark Knight) | Limit | Dark Knight's Testimony | 70/75* | 1 person | 10 minutes |
| Shattering Stars (Paladin) | Limit | Paladin's Testimony | 70/75* | 1 person | 10 minutes |
- Limit break battles are capped at your current level, which will be a maximum of 70 if you have never completed a level 71 limit break fight.