Chasing Quotas: Difference between revisions
From HorizonXI Wiki
No edit summary |
|||
| (5 intermediate revisions by 2 users not shown) | |||
| Line 1: | Line 1: | ||
:''This is the second [[Dragoon]] [[Artifact Armor]] quest - otherwise known as AF2.'' | :''This is the second [[Dragoon]] [[Artifact Armor]] quest - otherwise known as AF2.'' | ||
{{Quest | {{Quest Header | ||
| | | Start=[[Ceraulian]] | ||
| | | Start Location = {{location|Port San d'Oria|I-10}} | ||
| | | Requirements=[[Dragoon]] 50+ | ||
| | | Items Needed ={{Item Tooltip|Gold Hairpin}} | ||
| | | Title= | ||
| | | Repeatable=Yes, see [[Vingijard]] after AF is complete | ||
| | | Rewards={{Item Tooltip|Drachen Brais}} | ||
| | | Previous=[[A Craftsman's Work]] | ||
| Next=[[Knight Stalker]] and<br>[[Borghertz's Dragon Hands]] | |||
}} | }} | ||
== Walkthrough == | == Walkthrough == | ||
*With your [[Main Job]] set to [[Dragoon]], go to Cargo Room A | *With your [[Main Job]] set to [[Dragoon]], go to Cargo Room A located at {{location|Port San d'Oria|I-10}} and talk to [[Arminibit]] or [[Ceraulian]]. | ||
**''Talking with either one will start the quest. It doesn't matter who you pick. | **''Talking with either one will start the quest. It doesn't matter who you pick. | ||
*During the cut-scene, agree to help [[Ceraulian]] obtain a [[Gold Hairpin]]. | *During the cut-scene, agree to help [[Ceraulian]] obtain a [[Gold Hairpin]]. | ||
| Line 18: | Line 19: | ||
*Trade a [[Gold Hairpin]] to [[Ceraulian]] for a cut-scene. | *Trade a [[Gold Hairpin]] to [[Ceraulian]] for a cut-scene. | ||
*Wait '''AFTER JP MIDNIGHT''' and talk to [[Ceraulian]] again for another cut-scene. | *Wait '''AFTER JP MIDNIGHT''' and talk to [[Ceraulian]] again for another cut-scene. | ||
*Go to | *Go to {{location|Northern San d'Oria|E-6}} and talk to [[Miaux]], on the upper level in front of the Blacksmith's Guild shop for a cut-scene. She will give you the {{KeyItem}}[[Shiny Earring]] | ||
*'''(Optional)''' You may now speak with [[Ceraulian]] for a clue to visit the Goldsmith's Guild. | *'''(Optional)''' You may now speak with [[Ceraulian]] for a clue to visit the Goldsmith's Guild. | ||
*Got to | *Got to {{location|Bastok Markets|H-8}} and talk to [[Ardea]] in front of the Goldsmiths Guild. | ||
*Make your way to | *Make your way to {{location|West Ronfaure|F-6}} and into the tower, speak with [[Esca]] for a cut-scene. She will mention you must go to the small island in [[Batallia Downs]], which can only be reached through [[The Eldieme Necropolis]]. | ||
*Go to {{location|Batallia Downs|J-10}} and locate the small cave on the side of the hill. Follow the tunnel into [[The Eldieme Necropolis]]. | |||
*Go to | *Head to {{location|The Eldieme Necropolis|G-9}}, Point D's hole at. | ||
* | |||
*You will need at least one other person with you to operate the gates inside of [[The Eldieme Necropolis]] as follows. | *You will need at least one other person with you to operate the gates inside of [[The Eldieme Necropolis]] as follows. | ||
:::*There is a switch to manipulate the gates in each of the four large square rooms. | :::*There is a switch to manipulate the gates in each of the four large square rooms. | ||
:::*Wait at (H-9) where [[Lich]] spawn and face South at the closed Titan's Gate. | :::*Wait at (H-9) where [[Lich]] spawn and face South at the closed Titan's Gate. | ||
:::*Once there, have someone flip the switch at (H-8) to open Titan's Gate. | :::*Once there, have someone flip the switch at (H-8) to open Titan's Gate. | ||
:::*If you require their assistance for the upcoming fight, you will need to operate a second switch in your area at (G-9) before they will be able to join you | :::*If you require their assistance for the upcoming fight, you will need to operate a second switch in your area at (G-9) before they will be able to join you. | ||
:*If [[Lich]] and [[Tomb Wolf]] aggro to you, then you must put [[Sneak]] up before falling down. | :*If [[Lich]] and [[Tomb Wolf]] aggro to you, then you must put [[Sneak]] up before falling down. | ||
*Once you are at the bottom, follow the path until it forks and turn right. Proceed South and zone at | *Once you are at the bottom, follow the path until it forks and turn right. Proceed South and zone at {{location|The Eldieme Necropolis|map = Map 3|J-9}} out to [[Batallia Downs]]. | ||
*Outside on the island, make a turn to the north-west of the entrance (left) and go to the depression on the edge of the island. | *Outside on the island, make a turn to the north-west of the entrance (left) and go to the depression on the edge of the island. | ||
*Examine the [[???]] | *Examine the [[???]] {{location|Batallia Downs|I-11}} to spawn the NM [[Sturmtiger]]. | ||
::*The [[???]] is on the opposite side of the island from the Stone Monument. | ::*The [[???]] is on the opposite side of the island from the Stone Monument. | ||
::*Sturmtiger attacks extremely fast, so Blink-Tanking will be relatively ineffective. | ::*Sturmtiger attacks extremely fast, so Blink-Tanking will be relatively ineffective. | ||
| Line 42: | Line 40: | ||
::*Susceptible to [[bind]], [[gravity]] and [[sleep]]. | ::*Susceptible to [[bind]], [[gravity]] and [[sleep]]. | ||
::* ''(see [[Talk:{{PAGENAME}}#Testimonials|testimonials]])'' | ::* ''(see [[Talk:{{PAGENAME}}#Testimonials|testimonials]])'' | ||
*Defeat it, and examine the [[???]] again for {{KeyItem}}[[Ranchuriome's Legacy]]. Bring it back to [[Ceraulian]] to finish the quest. | *Defeat it, and examine the [[???]] again for {{KeyItem}}[[Ranchuriome's Legacy]]. Bring it back to [[Ceraulian]] {{location|Port San d'Oria|I-10}} to finish the quest. | ||
Latest revision as of 20:24, 2 September 2024
- This is the second Dragoon Artifact Armor quest - otherwise known as AF2.
| Chasing Quotas | |
|---|---|
| Starting NPC | Ceraulian, Port San d'Oria (I-10) |
| Required Fame | None |
| Items Needed | Gold Hairpin |
| Additional Requirements | Dragoon 50+ |
| Title | None |
| Repeatable | Yes, see Vingijard after AF is complete |
| Rewards | |
| Drachen Brais | |
| ← Previous Quest | Next Quest → |
|---|---|
| A Craftsman's Work | Knight Stalker and Borghertz's Dragon Hands |
Walkthrough
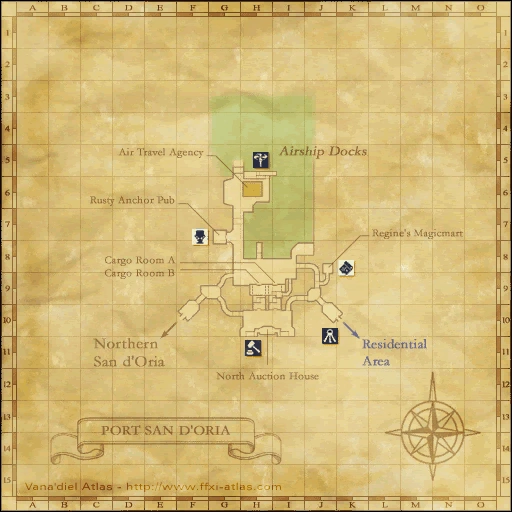
- With your Main Job set to Dragoon, go to Cargo Room A located at Port San d'Oria (I-10) and talk to Arminibit or Ceraulian.
- Talking with either one will start the quest. It doesn't matter who you pick.
- During the cut-scene, agree to help Ceraulian obtain a Gold Hairpin.
- From this point on, you can change to any other job to complete the quest. Once you've flagged the quest, you don't need to be Dragoon to finish.
- Trade a Gold Hairpin to Ceraulian for a cut-scene.
- Wait AFTER JP MIDNIGHT and talk to Ceraulian again for another cut-scene.
- Go to Northern San d'Oria (E-6) and talk to Miaux, on the upper level in front of the Blacksmith's Guild shop for a cut-scene. She will give you the
 Shiny Earring
 - (Optional) You may now speak with Ceraulian for a clue to visit the Goldsmith's Guild.
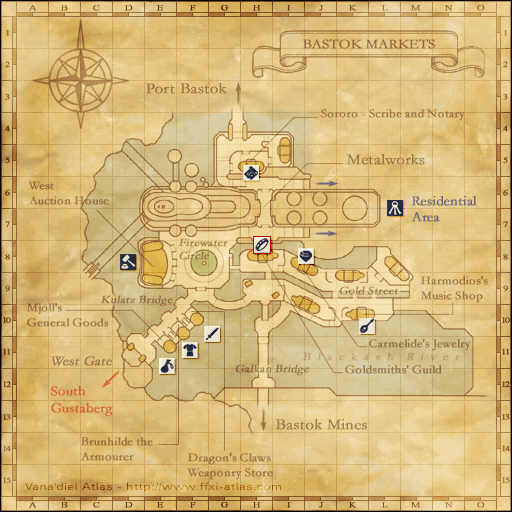
- Got to Bastok Markets (H-8) and talk to Ardea in front of the Goldsmiths Guild.
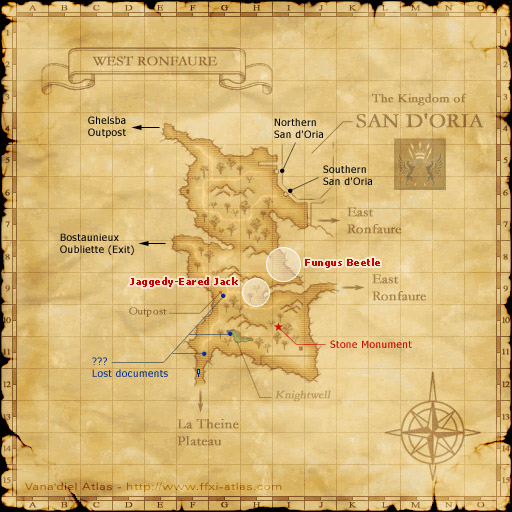
- Make your way to West Ronfaure (F-6) and into the tower, speak with Esca for a cut-scene. She will mention you must go to the small island in Batallia Downs, which can only be reached through The Eldieme Necropolis.
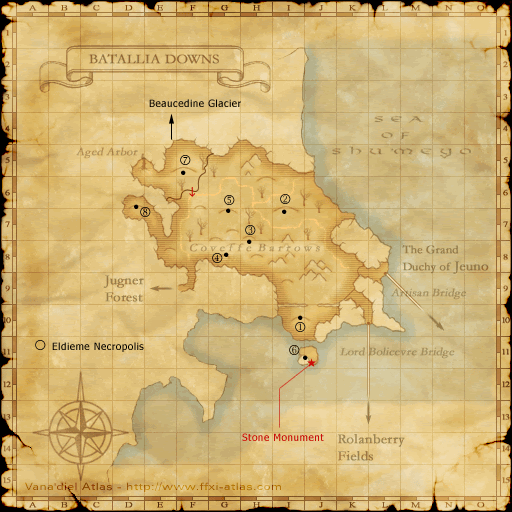
- Go to Batallia Downs (J-10) and locate the small cave on the side of the hill. Follow the tunnel into The Eldieme Necropolis.
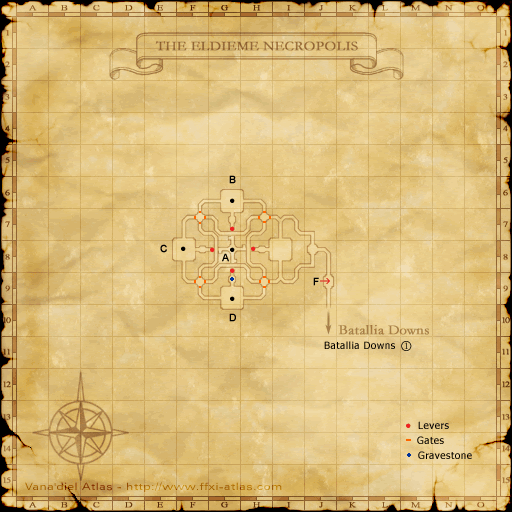
- Head to The Eldieme Necropolis (G-9), Point D's hole at.
- You will need at least one other person with you to operate the gates inside of The Eldieme Necropolis as follows.
- There is a switch to manipulate the gates in each of the four large square rooms.
- Wait at (H-9) where Lich spawn and face South at the closed Titan's Gate.
- Once there, have someone flip the switch at (H-8) to open Titan's Gate.
- If you require their assistance for the upcoming fight, you will need to operate a second switch in your area at (G-9) before they will be able to join you.
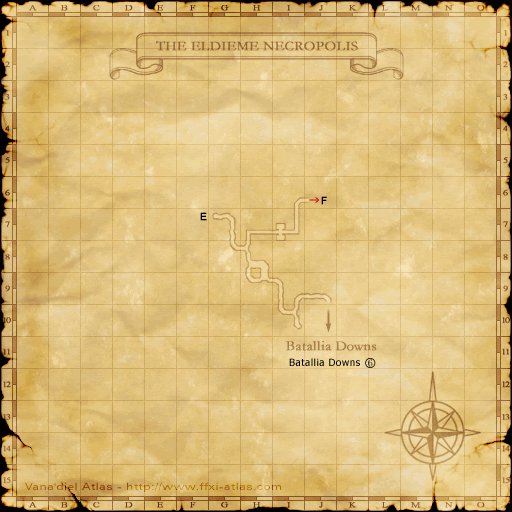
- Once you are at the bottom, follow the path until it forks and turn right. Proceed South and zone at The Eldieme Necropolis, Map 3 (J-9) out to Batallia Downs.
- Outside on the island, make a turn to the north-west of the entrance (left) and go to the depression on the edge of the island.
- Examine the ??? Batallia Downs (I-11) to spawn the NM Sturmtiger.
- Defeat it, and examine the ??? again for
 Ranchuriome's Legacy. Bring it back to Ceraulian Port San d'Oria (I-10) to finish the quest.
