Chips: Difference between revisions
reworked the nue tower section with tooltips |
→Farming Locations: map tooltips |
||
| (2 intermediate revisions by the same user not shown) | |||
| Line 45: | Line 45: | ||
*The [[Cyan Chip]] can be farmed here from [[Archaic Chest]]s (level 80). | *The [[Cyan Chip]] can be farmed here from [[Archaic Chest]]s (level 80). | ||
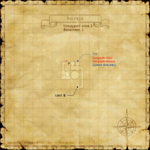
{{Zone Tooltip Map|Map 1 | |||
|zone=Pso'Xja | |||
|size=150 | |||
|caption=Ground Floor | |||
|underline=none | |||
}} | |||
{{Zone Tooltip Map|Map 2 | |||
|zone=Pso'Xja | |||
|size=150 | |||
|caption=Basement 1 | |||
|underline=none | |||
}} | |||
{{Zone Tooltip Map|Map 3 | |||
|zone=Pso'Xja | |||
|size=150 | |||
|caption=Basement 2 | |||
|underline=none | |||
}} | |||
{{Zone Tooltip Map|Map 4 | |||
|zone=Pso'Xja | |||
|size=150 | |||
|caption=Basement 3 | |||
|underline=none | |||
}} | |||
====Route Overview==== | ====Route Overview==== | ||
From the ground floor, take the eastern route by dropping down at {{Position|Pso'Xja|map=Map 1|I-8}} (Drop "G"). From there you can take multiple routes, depending on where you drop down further. Each route passes spawns of 2 [[Snow Lizard]]s, 4 [[Diremite Assaulter]]s, 2 [[Frost Lizard]]s and 2 [[Diremite Dominator]]s. | From the ground floor, take the eastern route by dropping down at {{Position|Pso'Xja|map=Map 1|I-8}} (Drop "G"). From there you can take multiple routes, depending on where you drop down further. Each route passes spawns of 2 [[Snow Lizard]]s, 4 [[Diremite Assaulter]]s, 2 [[Frost Lizard]]s and 2 [[Diremite Dominator]]s. | ||
| Line 59: | Line 78: | ||
====Route Details==== | ====Route Details==== | ||
*'''{{Location Tooltip|area=Pso'Xja|map=Map 1|text=Ground Floor}}:''' The [[Diremite]]s found around {{Position|Pso'Xja|map=Map 1|H-8}} are the easiest chip mobs. They are level 42-45 and drop the [[Gray Chip]] with a 10% droprate. | *'''{{Location Tooltip|area=Pso'Xja|map=Map 1|text=Ground Floor}}:''' The [[Diremite]]s found around {{Position|Pso'Xja|map=Map 1|H-8}} are the easiest chip mobs. They are level 42-45 and drop the [[Gray Chip]] with a 10% droprate. | ||
*'''{{Location Tooltip|area=Pso'Xja|map=Map 2| | *'''{{Location Tooltip | ||
|area=Pso'Xja | |||
|map=Map 2 | |||
|custom overlay={{#section:Pso'Xja/Maps|Overlay G/H/L}} | |||
|text=Basement 1, ("G/H/L" area) | |||
}}:''' If you drop down from the ground floor at {{Position|Pso'Xja|map=Map 1|I-8}} (Drop "G"), you can find 2 [[Snow Lizard]]s and 4 [[Diremite Assaulter]]s. | |||
**These mobs are level 63-68 and drop their respective chips with a 15% droprate. | **These mobs are level 63-68 and drop their respective chips with a 15% droprate. | ||
**Note: It is possible to use ranged attacks to pull the [[Frost Lizard]]s from the floor below up onto the floor where the 2 [[Snow Lizard]]s live, and avoid dropping down while farming [[Carmine Chip]]s. {{verification}} | **Note: It is possible to use ranged attacks to pull the [[Frost Lizard]]s from the floor below up onto the floor where the 2 [[Snow Lizard]]s live, and avoid dropping down while farming [[Carmine Chip]]s. {{verification}} | ||
*'''{{Location Tooltip|area=Pso'Xja|map=Map 3| | *'''{{Location Tooltip | ||
|area=Pso'Xja | |||
|map=Map 3 | |||
|custom overlay={{#section:Pso'Xja/Maps|Overlay L/M/N}} | |||
|text=Basement 2, ("L/M/N" area) | |||
}}:''' If you drop down further at {{Position|Pso'Xja|map=Map 2|J-7}} (Drop "L"), you can find 2 [[Frost Lizard]]s and 2 [[Diremite Dominator]]s. | |||
**These mobs are 73-77 and drop their respective chips with 15% ([[Snow Lizard]]s) and 24% ([[Diremite Dominator]]s). | **These mobs are 73-77 and drop their respective chips with 15% ([[Snow Lizard]]s) and 24% ([[Diremite Dominator]]s). | ||
:*'''{{Location Tooltip|area=Pso'Xja|map=Map 4|pos=J-6|pos 2=J-7|pos 3=J-8|text=Basement 3, ("M/V" area)}}''': If you drop down at {{Position|Pso'Xja|map=Map 3|J-6}} (Drop "M"), you find 2 [[Diremite Dominator]]s and a staircase to the ground level. | :*'''{{Location Tooltip|area=Pso'Xja|map=Map 4|pos=J-6|pos 2=J-7|pos 3=J-8|text=Basement 3, ("M/V" area)}}''': If you drop down at {{Position|Pso'Xja|map=Map 3|J-6}} (Drop "M"), you find 2 [[Diremite Dominator]]s and a staircase to the ground level. | ||
:*'''{{Location Tooltip|area=Pso'Xja|map=Map 4|pos=G-6|pos 2=H-6|pos 3=I-6|text=Basement 3, ("N/O/P/Q" area)}}''': If you drop down at {{Position|Pso'Xja|map=Map 3|I-6}} (Drop "N"), you find 2 [[Frost Lizard]]s and the elevator to the ground level. | :*'''{{Location Tooltip|area=Pso'Xja|map=Map 4|pos=G-6|pos 2=H-6|pos 3=I-6|text=Basement 3, ("N/O/P/Q" area)}}''': If you drop down at {{Position|Pso'Xja|map=Map 3|I-6}} (Drop "N"), you find 2 [[Frost Lizard]]s and the elevator to the ground level. | ||
* | *{{Location Tooltip | ||
|area=Pso'Xja | |||
|map=Map 3 | |||
|custom overlay={{#section:Pso'Xja/Maps|Overlay H/S/O}} | |||
|text='''Basement 2, ("H/S/O" area)''' | |||
}}: Alternatively, if you drop down at {{Position|Pso'Xja|map=Map 2|I-7}} (Drop "H"), you will also find 2 [[Frost Lizard]]s and 2 [[Diremite Dominator]]s. | |||
:*'''{{Location Tooltip|area=Pso'Xja|map=Map 4|pos=G-6|pos 2=H-6|pos 3=I-6|text=Basement 3, ("N/O/P/Q" area)}}''': If you drop down at {{Position|Pso'Xja|map=Map 3|H-6}} (Drop "O"), you find 2 [[Frost Lizard]]s and the elevator to the ground level. | :*'''{{Location Tooltip|area=Pso'Xja|map=Map 4|pos=G-6|pos 2=H-6|pos 3=I-6|text=Basement 3, ("N/O/P/Q" area)}}''': If you drop down at {{Position|Pso'Xja|map=Map 3|H-6}} (Drop "O"), you find 2 [[Frost Lizard]]s and the elevator to the ground level. | ||
:*'''{{Location Tooltip|area=Pso'Xja|map=Map 4|pos=G-6|pos 2=H-6|pos 3=I-6|pos 4=H-7|text=Basement 3, ("S/T" area)}}''': If you drop down at {{Position|Pso'Xja|map=Map 3|I-6}} (Drop "S"), you will find 2 [[Archaic Chest]]s. | :*'''{{Location Tooltip|area=Pso'Xja|map=Map 4|pos=G-6|pos 2=H-6|pos 3=I-6|pos 4=H-7|text=Basement 3, ("S/T" area)}}''': If you drop down at {{Position|Pso'Xja|map=Map 3|I-6}} (Drop "S"), you will find 2 [[Archaic Chest]]s. | ||
:**The [[Archaic Chest]]s are level 80 and have a droprate for [[Cyan Chip]]s of only 10% {{verification}}. Fighting the [[Treasure Chest (Monster)]] in the "Ranguemont Tower" is much easier since they are level 55-60 and have a similar droprate. | :**The [[Archaic Chest]]s are level 80 and have a droprate for [[Cyan Chip]]s of only 10% {{verification}}. Fighting the [[Treasure Chest (Monster)]] in the "Ranguemont Tower" is much easier since they are level 55-60 and have a similar droprate. | ||
:**Elementals often pop in the [[Archaic Chest]]s' place. Be careful and pull the elementals away before engaging the [[Archaic Chest]]. | :**Elementals often pop in the [[Archaic Chest]]s' place. Be careful and pull the elementals away before engaging the [[Archaic Chest]]. | ||
==={{Location|Beaucedine Glacier|G-9}} entrance ("Ranguemont Tower")=== | ==={{Location|Beaucedine Glacier|G-9}} entrance ("Ranguemont Tower")=== | ||
The [[Cyan Chip]] is usually farmed here, and often the [[Gray Chip]] as well. | The [[Cyan Chip]] is usually farmed here, and often the [[Gray Chip]] as well. | ||
{{Zone Tooltip Map|Map 6 | |||
|zone=Pso'Xja | |||
|size=150 | |||
|caption=Ground Floor | |||
|underline=none | |||
}} | |||
{{Zone Tooltip Map|Map 5 | |||
|zone=Pso'Xja | |||
|size=150 | |||
|caption=Upper Floor | |||
|underline=none | |||
}} | |||
{{Zone Tooltip Map|Map 7 | |||
|zone=Pso'Xja | |||
|size=150 | |||
|caption=Basement | |||
|underline=none | |||
}} | |||
This map is a bit of a puzzle; the Stone Doors marked on the map require the matching [[Blue Bracelet]] or [[Green Bracelet]] ([[Key Item|key item]]) to pass through. | This map is a bit of a puzzle; the Stone Doors marked on the map require the matching [[Blue Bracelet]] or [[Green Bracelet]] ([[Key Item|key item]]) to pass through. | ||
* When you touch the colored [[???]]s in I-8 on the upper floor (Blue) and H-7 in the basement (Green), the door closes behind you and two [[:category:Dolls|Dolls]] spawn and attack. | * When you touch the colored [[???]]s in I-8 on the upper floor (Blue) and H-7 in the basement (Green), the door closes behind you and two [[:category:Dolls|Dolls]] spawn and attack. | ||
| Line 95: | Line 144: | ||
* There are 4 [[Diremite Assaulter]]s in the lower basement. | * There are 4 [[Diremite Assaulter]]s in the lower basement. | ||
=== | ==={{Location|Beaucedine Glacier|I-7}} entrance ("Three Taru Tower")=== | ||
The [[Carmine Chip]] can be farmed here | This area consists of two floors that are linked by elevators. However, navigation is difficult in this tower since the layout changes dynamically and may also be bugged leading to some parts of it being inaccessible {{verification}}. | ||
*The [[Carmine Chip]] can be farmed here from 4 [[Snow Lizard]]s (level 63-68). | |||
{{Zone Tooltip Map|Map 9 | |||
|zone=Pso'Xja | |||
|size=150 | |||
|caption=Ground Floor | |||
|underline=none | |||
}} | |||
{{Zone Tooltip Map|Map 10 | |||
|zone=Pso'Xja | |||
|size=150 | |||
|caption=Basement | |||
|underline=none | |||
}} | |||
== Notes == | == Notes == | ||
Latest revision as of 12:50, 5 July 2025
| Chips | |
|---|---|
| Starting NPC | Ghebi Damomohe, Lower Jeuno (I-7) |
| Required Fame | None |
| Items Needed | Carmine Chip Gray Chip Cyan Chip |
| Title | None |
| Repeatable | Yes |
| Rewards | |
| CCB Polymer Pump | |

| ← Previous Quest | Next Quest → |
|---|---|
| Promathia Mission 6-3: More Questions Than Answers | None |
Composite Map of Pso'Xja

Walkthrough
- Talk to Ghebi Damomohe at the Neptune's Spire.
- Pick the first dialogue option to start the quest. Otherwise you will have to zone to restart the quest.
- Even though the quest is started in Lower Jeuno with Ghebi Damomohe, the quest appears as a Bastok quest.
- Farm the chips in Pso'Xja, and then trade them all to Cid.
- The Gray Chip is dropped by all Diremite type mobs.
- The Carmine Chip is dropped by Snow Lizards and Frost Lizards.
(Note that Maze Lizards and Labyrinth Lizards do not drop Carmine Chips.) - The Cyan Chip is dropped by the Mimic type mobs Treasure Chests and Archaic Chest.
- To repeat the quest you only need to trade the chips to Cid. You do not need to talk to Ghebi Damomohe again.
Farming Locations
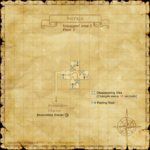
Beaucedine Glacier (F-7) entrance ("Nue Tower")

The area consists of four floors. The entrance is at the top floor and players successively drop to the lower floors in various routes until reaching the bottom floor, where a staircase or an elevator leads back to the top floor.
- The Carmine Chip can be farmed here from Snow Lizards (level 63-68) and Frost Lizards (level 73-76).
- The Gray Chip can be farmed here from Diremites (42-45) and Diremite Dominators (level 73-77).
- The Cyan Chip can be farmed here from Archaic Chests (level 80).


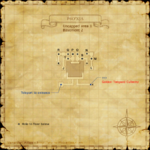


Route Overview
From the ground floor, take the eastern route by dropping down at (I-8) (Drop "G"). From there you can take multiple routes, depending on where you drop down further. Each route passes spawns of 2 Snow Lizards, 4 Diremite Assaulters, 2 Frost Lizards and 2 Diremite Dominators.
- G -> L -> M for 2 more Diremite Dominators
- G -> L -> N for 2 more Frost Lizards
- G -> H -> O for 2 more Frost Lizards
- G -> H -> S for 2 Archaic Chests
Route Details
- Ground Floor: The Diremites found around (H-8) are the easiest chip mobs. They are level 42-45 and drop the Gray Chip with a 10% droprate.
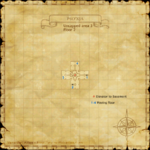
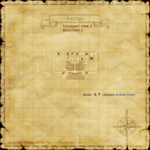
- Basement 1, ("G/H/L" area): If you drop down from the ground floor at (I-8) (Drop "G"), you can find 2 Snow Lizards and 4 Diremite Assaulters.
- These mobs are level 63-68 and drop their respective chips with a 15% droprate.
- Note: It is possible to use ranged attacks to pull the Frost Lizards from the floor below up onto the floor where the 2 Snow Lizards live, and avoid dropping down while farming Carmine Chips.

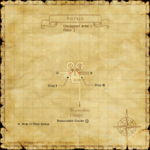
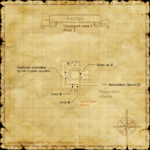
- Basement 2, ("L/M/N" area): If you drop down further at (J-7) (Drop "L"), you can find 2 Frost Lizards and 2 Diremite Dominators.
- These mobs are 73-77 and drop their respective chips with 15% (Snow Lizards) and 24% (Diremite Dominators).
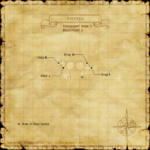
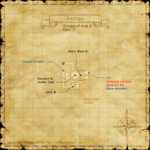
- Basement 3, ("M/V" area): If you drop down at (J-6) (Drop "M"), you find 2 Diremite Dominators and a staircase to the ground level.
- Basement 3, ("N/O/P/Q" area): If you drop down at (I-6) (Drop "N"), you find 2 Frost Lizards and the elevator to the ground level.
- Basement 2, ("H/S/O" area): Alternatively, if you drop down at (I-7) (Drop "H"), you will also find 2 Frost Lizards and 2 Diremite Dominators.
- Basement 3, ("N/O/P/Q" area): If you drop down at (H-6) (Drop "O"), you find 2 Frost Lizards and the elevator to the ground level.
- Basement 3, ("S/T" area): If you drop down at (I-6) (Drop "S"), you will find 2 Archaic Chests.
- The Archaic Chests are level 80 and have a droprate for Cyan Chips of only 10% . Fighting the Treasure Chest (Monster) in the "Ranguemont Tower" is much easier since they are level 55-60 and have a similar droprate.
- Elementals often pop in the Archaic Chests' place. Be careful and pull the elementals away before engaging the Archaic Chest.
- The Archaic Chests are level 80 and have a droprate for Cyan Chips of only 10%
Beaucedine Glacier (G-9) entrance ("Ranguemont Tower")
The Cyan Chip is usually farmed here, and often the Gray Chip as well.


This map is a bit of a puzzle; the Stone Doors marked on the map require the matching Blue Bracelet or Green Bracelet (key item) to pass through.
- When you touch the colored ???s in I-8 on the upper floor (Blue) and H-7 in the basement (Green), the door closes behind you and two Dolls spawn and attack.
- The Blue ??? spawns Gargoyle-Kappa and Gargoyle-Iota; the Green ??? spawns Gargoyle-Lambda and Gargoyle-Mu.
- The Dolls alternate between physical immunity and very high magical resistance, each doll changing weaknesses simultaneously. This is marked by a blue- or yellow-colored sheen on each mob, so be prepared to switch targets frequently.
- When both dolls are defeated, click on the ??? again to obtain the Bracelet.
- There are 6 Treasure Chest mimics in these locations:
- Ground Level: In the F room and next to the chest spawn in NW G-8
- Upper Level: Next to the chest spawn in SE H-9
- Basement: In the E room and the room in NW G-8.
- And in the lower basement at the bottom of the elevator (no map).
- WHM spell barthundera seemed to cause these chests' death trap move to have only the poison or no effect when cast by a 75 WHM. The stun effect seemed to be no longer present. Data pool was about 10-12 chests fought.
- There are 3 Diremite Stalkers in the Basement in the hall running from I-7 to I-9.
- There are 4 Diremite Assaulters in the lower basement.
Beaucedine Glacier (I-7) entrance ("Three Taru Tower")
This area consists of two floors that are linked by elevators. However, navigation is difficult in this tower since the layout changes dynamically and may also be bugged leading to some parts of it being inaccessible ![]() .
.
- The Carmine Chip can be farmed here from 4 Snow Lizards (level 63-68).