Windurst Mission 8-2: Difference between revisions
From HorizonXI Wiki
Potatoking90 (talk | contribs) mNo edit summary |
Potatoking90 (talk | contribs) mNo edit summary |
||
| Line 18: | Line 18: | ||
*Talk to [[Apururu]] in [[Windurst Woods]] Manustery for a cutscene. | *Talk to [[Apururu]] in [[Windurst Woods]] Manustery for a cutscene. | ||
**You will obtain the {{ | **You will obtain the {{KeyItem}}[[Manustery Ring]]. | ||
*Talk to the following NPCs, in any order, to receive the {{ | *Talk to the following NPCs, in any order, to receive the {{KeyItem}}[[Rhinostery Ring]], {{KeyItem}}[[Aurastery Ring]], and {{KeyItem}}[[Optistery Ring]]. | ||
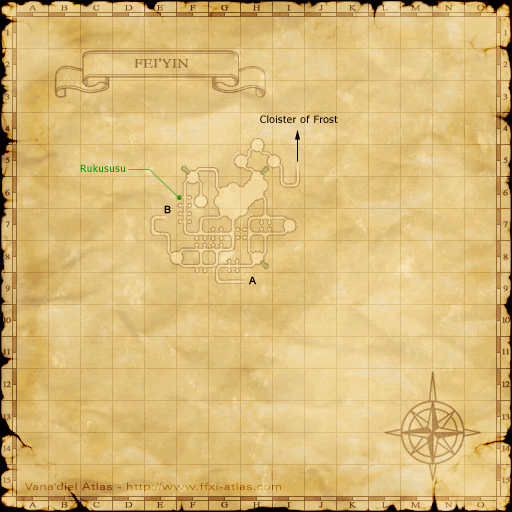
**[[Rukususu]] in [[Fei'Yin]] at ({{Location Tooltip|area=Fei'Yin|map=Map 2|pos=F-6}}) on Map #2. | **[[Rukususu]] in [[Fei'Yin]] at ({{Location Tooltip|area=Fei'Yin|map=Map 2|pos=F-6}}) on Map #2. | ||
***Click the Cermet Door for a cutscene with her. | ***Click the Cermet Door for a cutscene with her. | ||
| Line 39: | Line 39: | ||
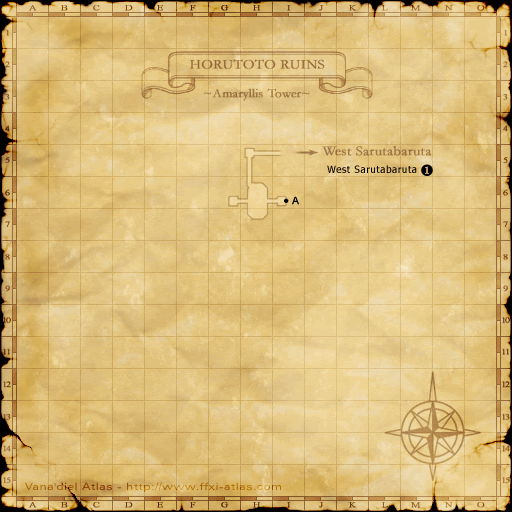
*Find the Cracked Wall at ({{Location Tooltip|area=Outer Horutoto Ruins|map=Amaryllis Tower 2|pos=G-8}}) on the second map. Touch it and pop [[Queen of Coins (Monster)|Queen of Coins]] (RDM) and [[Queen of Swords (Monster)|Queen of Swords]] (PLD). | *Find the Cracked Wall at ({{Location Tooltip|area=Outer Horutoto Ruins|map=Amaryllis Tower 2|pos=G-8}}) on the second map. Touch it and pop [[Queen of Coins (Monster)|Queen of Coins]] (RDM) and [[Queen of Swords (Monster)|Queen of Swords]] (PLD). | ||
*Click the Cracked Wall again once their bodies vanish for a cutscene and to obtain the {{ | *Click the Cracked Wall again once their bodies vanish for a cutscene and to obtain the {{KeyItem}}[[Orastery Ring]]. | ||
*Return to [[Apururu]] for a cutscene. | *Return to [[Apururu]] for a cutscene. | ||
*Talk to [[Shantotto]] in [[Windurst Walls]] at ({{Location Tooltip|area=Windurst Walls|pos=K-7}}) for a cutscene and to obtain the {{ | *Talk to [[Shantotto]] in [[Windurst Walls]] at ({{Location Tooltip|area=Windurst Walls|pos=K-7}}) for a cutscene and to obtain the {{KeyItem}}[[Glove of Perpetual Twilight]]. | ||
**You may need to speak to [[Shantotto]] multiple times for the correct cutscene. | **You may need to speak to [[Shantotto]] multiple times for the correct cutscene. | ||
| Line 53: | Line 53: | ||
*Return to [[Apururu]] for a cutscene that completes the mission. | *Return to [[Apururu]] for a cutscene that completes the mission. | ||
**('''Optional''') Return to [[Shantotto]] for dialogue regarding the {{ | **('''Optional''') Return to [[Shantotto]] for dialogue regarding the {{KeyItem}}[[Glove of Perpetual Twilight]]. | ||
**('''Optional''') Return to [[Tosuka-Porika]] to report about the Book of the Gods as promised. | **('''Optional''') Return to [[Tosuka-Porika]] to report about the Book of the Gods as promised. | ||
[[Category:Windurst Missions]] | [[Category:Windurst Missions]] | ||
Revision as of 21:31, 26 September 2023
| The Jester Who'd Be King | |
|---|---|
| Series | Rise of the Zilart Missions |
| Starting NPC | Any Windurst Gate Guard |
| Title | None |
| Repeatable | No |
| Description | The time for the Dark Dungeon jailbreak is at hand! At the request of the Manustery, you are to collect the ministry rings from all five ministers. |
| Rewards | |
| |
| ← Previous Mission | Next Mission → |
|---|---|
| Vain | Doll of the Dead |
Walkthrough
- Trade crystals to the Conquest NPC to unlock the mission then accept it from the Gate Guard.
- Talk to Apururu in Windurst Woods Manustery for a cutscene.
- You will obtain the
 Manustery Ring.
- You will obtain the
- Talk to the following NPCs, in any order, to receive the
 Rhinostery Ring,
  Aurastery Ring, and
  Optistery Ring.
- Rukususu in Fei'Yin at (F-6) on Map #2.
- Click the Cermet Door for a cutscene with her.
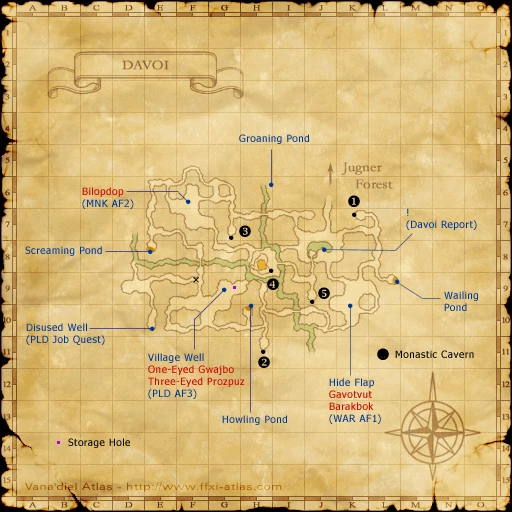
- Sedal-Godjal in Davoi (J-8). He can only be reached by going through Monastic Cavern. Enter Monastic Cavern from entrance 2 at (H-11) in Davoi.
- Tosuka-Porika in Windurst Waters Optistery.
- The Optistery is in the northern half of Windurst Waters.
- Tosuka-Porika is in the eastern of the two Optistery buildings.
- Rukususu in Fei'Yin at (F-6) on Map #2.
- Return to Apururu for dialogue regarding the final ring.
- Talk to Kupipi in Heavens Tower for a cutscene.
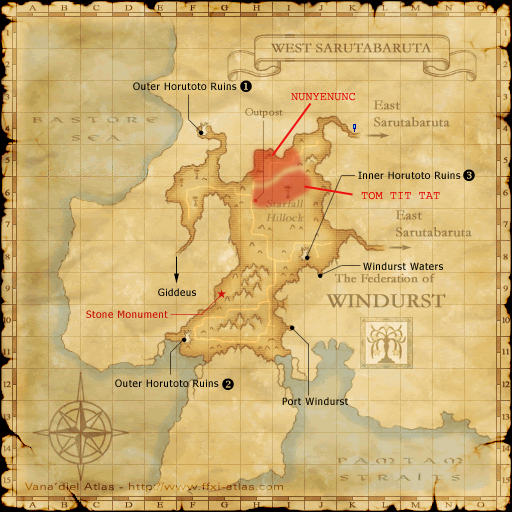
- Go to the tower in West Sarutabaruta (F-4) and enter Outer Horutoto Ruins.
- Warping to the outpost for West Sarutabaruta is the best option.
- Go through the Cracked Wall at (I-6).
- Find the Cracked Wall at (G-8) on the second map. Touch it and pop Queen of Coins (RDM) and Queen of Swords (PLD).
- Click the Cracked Wall again once their bodies vanish for a cutscene and to obtain the
 Orastery Ring.
- Return to Apururu for a cutscene.
- Talk to Shantotto in Windurst Walls at (K-7) for a cutscene and to obtain the
 Glove of Perpetual Twilight.
- You may need to speak to Shantotto multiple times for the correct cutscene.
- Return to Apururu for a cutscene.
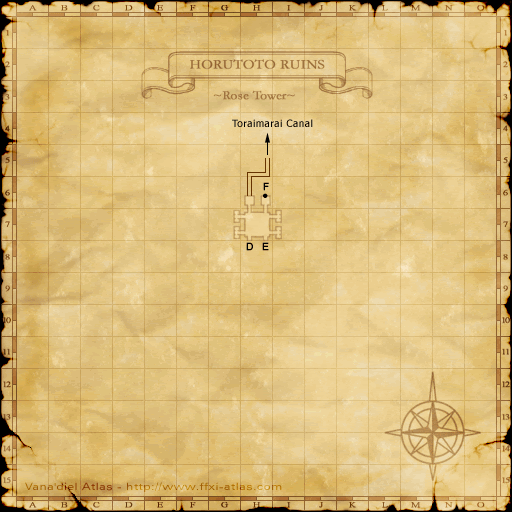
- Go to Inner Horutoto Ruins and examine the Gate of Darkness at (I-7) in the Rose Tower for a cutscene.
- Travel though Toraimarai Canal using the Priming Gate in Windurst Walls (H-3).
- You need to pass through the Three Mage Gate if you do not enter via the Toraimarai Canal.
- Return to Apururu for a cutscene that completes the mission.
- (Optional) Return to Shantotto for dialogue regarding the
 Glove of Perpetual Twilight.
 - (Optional) Return to Tosuka-Porika to report about the Book of the Gods as promised.
- (Optional) Return to Shantotto for dialogue regarding the
