Fill In: Difference between revisions
From HorizonXI Wiki
Made the directions much clearer. |
|||
| Line 14: | Line 14: | ||
}} | }} | ||
==Walkthrough== | ==Walkthrough== | ||
*Kill [[Tonberry Pursuer]] in [[Temple of Uggalepih]] and [[Tonberry Trailer]] in [[Den of Rancor]] for [[Flickering Lantern]] | *Kill [[Tonberry Pursuer]]'s in [[Temple of Uggalepih]] and [[Tonberry Trailer]]'s in [[Den of Rancor]] for a [[Flickering Lantern]]. | ||
*Once you have a [[Flickering Lantern]], | *Once you have a [[Flickering Lantern]], go to ({{Location Tooltip|area=Temple of Uggalepih|map=Map 3|pos=G-8}}) on map 3. Trade the [[Flickering Lantern]] to the [[???]] to spawn and kill [[Sozu Rogberry]] for a [[Broken charm bracelet]]. | ||
* | *Head to {{Location|Windurst Woods|J-3}} and trade the [[Broken charm bracelet]] to [[Nanaa Mihgo]] to start the quest. | ||
*Gather | ** Having the 4 items needed when you start the quest will save a trip. | ||
*Gather a [[Four-Leaf Mandragora Bud]], [[Lucky Egg]], [[Sand Charm]] and a [[Wild Rabbit Tail]]. Head back to {{Location|Windurst Woods|J-3}} and trade all 4 items to [[Nanaa Mihgo]]. | |||
*You will get the text telling you "I'll leave the necklace for you at my hideout deep in the Horutoto Rrruins." | *You will get the text telling you "I'll leave the necklace for you at my hideout deep in the Horutoto Rrruins." | ||
*Head | *Head to the [[:Image:InnerHorutotoRuins1.png|Lily Tower]] entrance of [[Inner Horutoto Ruins]] at ({{Location Tooltip|area=East Sarutabaruta|pos=J-7}}) in [[East Sarutabaruta]]. | ||
**Go to ({{Location Tooltip|area=Inner Horutoto Ruins|map=Lily Tower|pos=G-8}}) and enter the cracked wall on the North side of the room. | |||
**On the new map head to the '''Mahogany Door''' at ({{Location Tooltip|area=Inner Horutoto Ruins|map=Beetle's Burrow|pos=G-8}}). | |||
**Click the '''Mahogany Door''' to enter. Click the ??? on the table for your [[Nanaa's Charm]]. | |||
==Video== | ==Video== | ||
Revision as of 15:37, 26 January 2024
 This is a Horizon quest.
| Fill In | |
|---|---|
| Starting NPC | Nanaa Mihgo - Windurst Woods (J-3) |
| Required Fame | None |
| Items Needed | Broken charm bracelet, Four-Leaf Mandragora Bud, Lucky Egg, Sand Charm, Wild Rabbit Tail |
| Additional Requirements | Windurst Reputation ? |
| Title | None |
| Repeatable | No |
| Rewards | |
| Nanaa's Charm | |
Walkthrough
- Kill Tonberry Pursuer's in Temple of Uggalepih and Tonberry Trailer's in Den of Rancor for a Flickering Lantern.
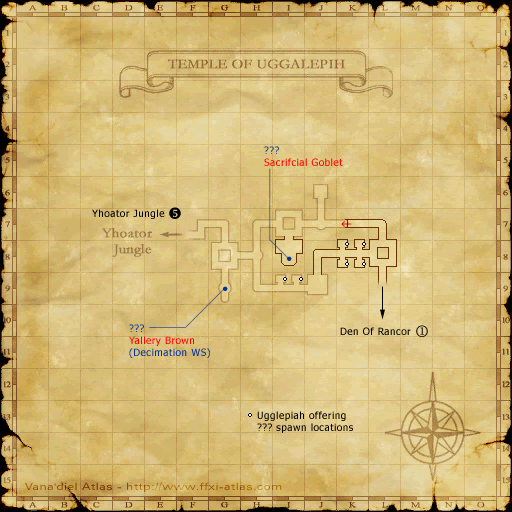
- Once you have a Flickering Lantern, go to (G-8) on map 3. Trade the Flickering Lantern to the ??? to spawn and kill Sozu Rogberry for a Broken charm bracelet.
- Head to Windurst Woods (J-3) and trade the Broken charm bracelet to Nanaa Mihgo to start the quest.
- Having the 4 items needed when you start the quest will save a trip.
- Gather a Four-Leaf Mandragora Bud, Lucky Egg, Sand Charm and a Wild Rabbit Tail. Head back to Windurst Woods (J-3) and trade all 4 items to Nanaa Mihgo.
- You will get the text telling you "I'll leave the necklace for you at my hideout deep in the Horutoto Rrruins."
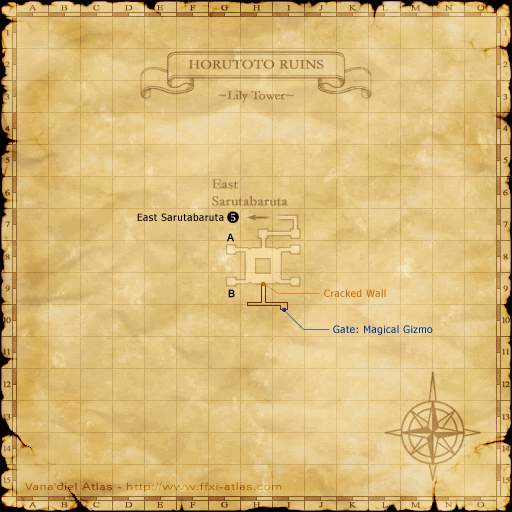
- Head to the Lily Tower entrance of Inner Horutoto Ruins at (J-7) in East Sarutabaruta.
- Go to (G-8) and enter the cracked wall on the North side of the room.
- On the new map head to the Mahogany Door at (G-8).
- Click the Mahogany Door to enter. Click the ??? on the table for your Nanaa's Charm.


