Promathia Mission 2-5
From HorizonXI Wiki
| Ancient Vows | |
|---|---|
| Series | Chains of Promathia Missions |
| Start | After An Eternal Melody |
| Level Restriction: | Level 40 |
| Items Needed | 2 Giant Scales |
| Title | Tavnazian Traveler |
| Repeatable | No |
| HAAP | 4 points |
| Description | Follow Prishe to Cape Riverne on the Misareaux Coast. It is rumored a wyrm nests there... |
| Rewards | |
| 1000 Experience Points Mog Wardrobe 2: 2 Slots | |
| ← Previous Mission | Next Mission → |
|---|---|
| An Eternal Melody | Call of the Wyrmking |
Preparations
- Assemble a party of six in level 40 gear.
- It is recommended to bring the following:
- Two Giant Scales for your party or alliance. (These can be farmed on the way to the BC.)
- Yellow Liquid for your kiters and tanks. (See below.)
- Jack-o'-Lantern: for kiters (enhances Evasion).
- Hi-Potions: for melees, tanks and kiters.
- Juice or Yagudo Drinks: for mages.
- Hi-Ethers(you can use these but they leave a nasty recast time on spells), Ethers or Mulsum: for mages.
- Echo Drops: for mages. (Useful in Riverne if silenced on the way to the BC.)
- Prism Powder (since bombs in area aggro magic)
Walkthrough
- Head for the Dilapidated Gate in Misareaux Coast at (F-7).
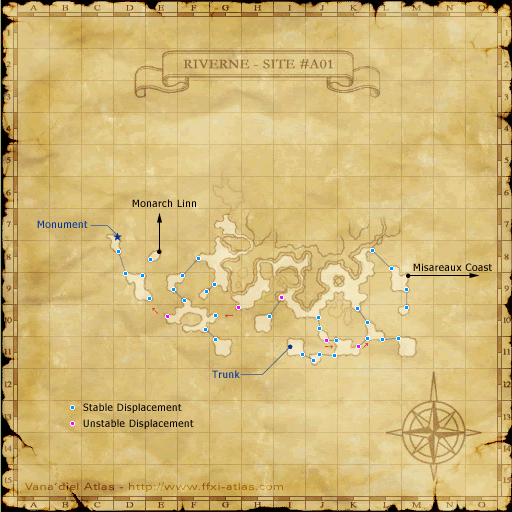
- After receiving the cutscene at the gate, you will pass through. Run straight ahead to the end of the cliff and click on the Spatial Displacement. You will receive another cutscene and enter Riverne - Site #A01. This area has a Level 40 cap.
- Make your way ahead (North-West) toward (L-8), and click on the Spatial Displacement there.
- If you don't have two Giant Scales, they may be farmed in this area from Wyvern-type mobs named Firedrakes. More are found in the next area as well.
- Proceed to (G-10) and trade one Giant Scale to the Unstable Displacement to open it for travel. (Make sure your entire party or alliance gathers around the Displacement before the scale is used; it will only remain open for a limited period of time.) Enter the open Displacement before it closes again.
- In this area, cast Invisible or use Prism Powder to make your way past the Atomic Clusters—they are aggressive to magic, as well, so use extra caution.
- Head to the Unstable Displacement at (E-10). Trade your second Giant Scale to it and head through.
- The Cloud Hippogryphs in this area can make problems with their True Sight. Stay against the right side of the path to reach the next Spatial Displacement.
- Head straight forward in this area to reach another Spatial Displacement, you should see it immediately. Click on it to enter Monarch Linn.
- You will emerge in an uncapped waiting area (similar to the Spires in the Chapter 1 Promyvions). When healed and ready, trigger the Spatial Displacement in front of you. Select the battle "Ancient Vows". You will receive a cutscene, then zone into the Battlefield.
You may wish to retreat from the battlefield and reenter such that you can skip the cutscene and allow yourself maximum possible time for the fight. If you ever leave Monarch Linn without having successfully completed the battlefield, you will need to view the cutscene again upon reentry.This seems to not work as expected on Horizon.
Boss Battle for "Ancient Vows"
- This is a six-person BC fight with a Level 40 cap and a time limit of thirty minutes. You will be facing three Mammets-19 Epsilon. They once served the Zilart, and are capable of changing Jobs at will. They have about 3800 HP each. The Job being used (and the TP attacks it will use) can be identified from the weapon the Mammet has equipped:
- "Hand Form" (Initial form. No equipped weapon; seems to shoot from its sleeves. Moderate attack speed.)
- Transmogrification: Absorbs all physical damage and converts it into restored HP for ~30 seconds. Effect also applies to physical WS, and even abilities like Eagle Eye Shot. Extremely dangerous. Everyone should have a macro to call out when they see Transmogrification so people can halt their attacks as fast as possible.
- "Sword Form" (Warrior-type? Geared toward Weapon Skill-like attacks and TP-based AoE status abilities. Extremely fast attack speed; Utsusemi is hard to maintain against this form)
- "Staff Form" (Black Mage-type, casts AOE -ga magic; susceptible to physical attack. Slow attack speed. CAN BE SILENCED)
- Psychomancy: AoE Aspir, drains 80+ MP from everyone in range.
- Mind Wall: Gives the Mammet a special Magic Shield effect, causing it to absorb and regain HP from all offensive magic used against it for ~30 seconds. Astral Flow is unaffected, as are elemental Weapon Skills.
- "Polearm Form" (Dragoon-type, geared toward heavy physical attack; slow attack speed. Most kiters and tanks prefer this form to lock their Mammet into).
- Received a "Sleepga has no effect" message when Elemental Seal Sleepga was used.

- Yellow Liquid (dropped from the Mammets) will lock the targeted Mammet into its current form for thirty seconds, making it unable to change jobs. This is useful for both kiting and tanking. Kiters can start by locking their Mammets into Hand form, though it's bad for the Mammet you're actually fighting because of Transmogrification. It is possible to set someone as Quartermaster to allow any dropped Yellow Liquids to immediately go to one person in the party.
- No matter what strategy is in effect, your log window should be watched at all times for the use of Transmogrification. Physical attacks (including from pets) should cease immediately, and a weak attacker should "test" the effect's status at their discretion until damage is once again done, at which point it it safe to resume physical attack.


