Your Crystal Ball: Difference between revisions
From HorizonXI Wiki
(Created page with "Category:QuestsCategory:Jeuno Quests {{Quest |startnpc=Kurou-Morou - {{Location|Lower Jeuno|I-7}} |requirements= Jeuno Reputation 2 |items=Ahriman Lens<br>Divination Sphere |title=Fortune-teller in Training |repeatable=No |reward=Kurou-Morou begins fortune-telling |previous= |next=Never to Return | cutscenes = {{Quest/Cutscene|Your Crystal Ball|Geuhbe {{Location|Lower Jeuno|G-9}}}} }} == Walkthrough == *Kurou-Morou asks for a...") |
No edit summary |
||
| Line 13: | Line 13: | ||
}} | }} | ||
== Walkthrough == | == Walkthrough == | ||
*[[Kurou-Morou]] asks for a crystal ball. | *[[Kurou-Morou]] {{Location|Lower Jeuno|I-7}} asks for a crystal ball. | ||
*Obtain an [[Ahriman Lens]], which is dropped by [[:Category:Ahriman|Ahrimans]]. The lens is [[Exclusive]], and cannot be traded, purchased from the Auction House, or sent via [[Delivery Box]] to another player. | *Obtain an [[Ahriman Lens]], which is dropped by [[:Category:Ahriman|Ahrimans]]. The lens is [[Exclusive]], and cannot be traded, purchased from the Auction House, or sent via [[Delivery Box]] to another player. | ||
**The lens can, however, be sent to the [[Delivery Box]] of another character on the sender's own account. | **The lens can, however, be sent to the [[Delivery Box]] of another character on the sender's own account. | ||
*Once you have the lens, head to the [[Maze of Shakhrami]]. | *Once you have the lens, head to the [[Maze of Shakhrami]]. | ||
**''You do not have to trade the lens to [[Kurou-Morou]]. You can proceed to the Rockwell without issue.'' | **''You do not have to trade the lens to [[Kurou-Morou]] {{Location|Lower Jeuno|I-7}}. You can proceed to the Rockwell without issue.'' | ||
*Trade the [[Ahriman Lens]] to the [[Rockwell]], located at ({{Location Tooltip|tooltip = [[File:MazeofShakhrami1.png]]|area = Maze of Shakhrami|map = Map 1|pos = G-5}}) of the first map when entering from [[Tahrongi Canyon]]. | *Trade the [[Ahriman Lens]] to the [[Rockwell]], located at ({{Location Tooltip|tooltip = [[File:MazeofShakhrami1.png]]|area = Maze of Shakhrami|map = Map 1|pos = G-5}}) of the first map when entering from [[Tahrongi Canyon]]. | ||
**For those without a map, hug the left wall from the entrance until you reach the [[Attohwa Chasm]] zone. Turn east right before zoning into [[Attohwa Chasm]] to reach the Rockwell. | **For those without a map, hug the left wall from the entrance until you reach the [[Attohwa Chasm]] zone. Turn east right before zoning into [[Attohwa Chasm]] to reach the Rockwell. | ||
*Once you reach the Rockwell, trade the lens to it. | *Once you reach the [[Rockwell]], trade the lens to it. | ||
*You have to wait till the next real Earth day to receive your [[Divination Sphere]] by clicking on the Rockwell again. | *You have to wait till the next real Earth day to receive your [[Divination Sphere]] by clicking on the Rockwell again. | ||
**After an update, the wait was reduced to 1 earth minute. | **After an update, the wait was reduced to 1 earth minute. | ||
*Trade Kurou-Morou the Divination Sphere to complete the quest. | *Trade [[Kurou-Morou]] {{Location|Lower Jeuno|I-7}} the Divination Sphere to complete the quest. | ||
**If you have not completed [[Collect Tarut Cards]], then you will receive a cutscene with [[Chululu]]. | **If you have not completed [[Collect Tarut Cards]], then you will receive a cutscene with [[Chululu]]. | ||
Revision as of 12:16, 8 June 2023
| Your Crystal Ball | |
|---|---|
| Starting NPC | Kurou-Morou - Lower Jeuno (I-7) |
| Required Fame | None |
| Items Needed | Ahriman Lens Divination Sphere |
| Additional Requirements | Jeuno Reputation 2 |
| Title | Fortune-teller in Training |
| Repeatable | No |
| Rewards | |
| Kurou-Morou begins fortune-telling | |
| ← Previous Quest | Next Quest → |
|---|---|
| None | Never to Return |
Walkthrough
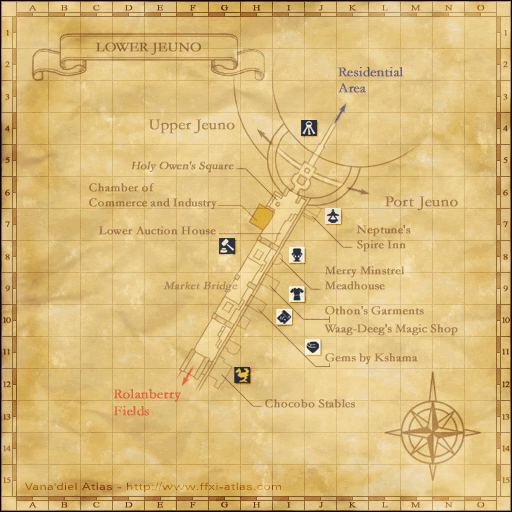
- Kurou-Morou Lower Jeuno (I-7) asks for a crystal ball.
- Obtain an Ahriman Lens, which is dropped by Ahrimans. The lens is Exclusive, and cannot be traded, purchased from the Auction House, or sent via Delivery Box to another player.
- The lens can, however, be sent to the Delivery Box of another character on the sender's own account.
- Once you have the lens, head to the Maze of Shakhrami.
- You do not have to trade the lens to Kurou-Morou Lower Jeuno (I-7). You can proceed to the Rockwell without issue.
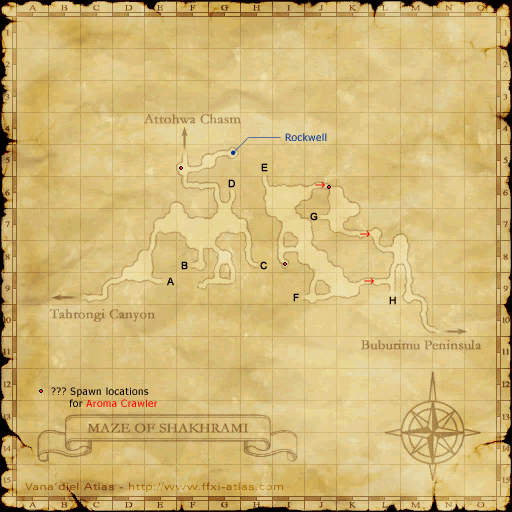
- Trade the Ahriman Lens to the Rockwell, located at (G-5) of the first map when entering from Tahrongi Canyon.
- For those without a map, hug the left wall from the entrance until you reach the Attohwa Chasm zone. Turn east right before zoning into Attohwa Chasm to reach the Rockwell.
- Once you reach the Rockwell, trade the lens to it.
- You have to wait till the next real Earth day to receive your Divination Sphere by clicking on the Rockwell again.
- After an update, the wait was reduced to 1 earth minute.
- Trade Kurou-Morou Lower Jeuno (I-7) the Divination Sphere to complete the quest.
- If you have not completed Collect Tarut Cards, then you will receive a cutscene with Chululu.


