Update 1.2.2 is here! Tier 2 HENMs, Horizon Adventuring Assistance Program and much more!
Class Reunion: Difference between revisions
From HorizonXI Wiki
No edit summary |
m (→Walkthrough) |
||
| (7 intermediate revisions by 4 users not shown) | |||
| Line 1: | Line 1: | ||
{{Quest | {{Quest Header | ||
| | | Quest Name = Class Reunion | ||
| | | Expansion = | ||
| | | Start = Carbuncle | ||
| | | Start Location = [[Windurst Walls]] ({{Location Tooltip | ||
| | | text = G-4 | ||
| | | area = Windurst Walls | ||
| | | pos = G-4 | ||
| | | highlight background = transparent | ||
| marker pos x = 12 | |||
| marker pos y = -20 | |||
| marker size = 35 | |||
| marker opacity = 0.4 | |||
| marker background = #5555ff | |||
}}) | |||
| Description = Using the gemstones you received from [[Carbuncle]], you must jog the memory of Professor [[Koru-Moru]] and get his help in reuniting the advanced class from several generations back. | |||
| Fame = | |||
| Fame Level= | |||
| Level = 50 | |||
| Requirements = Level 50 [[SMN]] | |||
| Items Needed = [[Astragalos]] x4<br>[[Ice Pendulum]] | |||
| Repeatable = Yes, see [[Vingijard]] after AF is complete | |||
| HAAP=2 points | |||
| Title = | |||
| Rewards = [[Evoker's Spats]] | |||
| Previous= [[The Puppet Master]] | |||
| Next= [[Carbuncle Debacle]]<br>[[Borghertz's Calling Hands]] | |||
}} | }} | ||
==Walkthrough== | ==Walkthrough== | ||
*Go to the [[House of the Hero]] in [[Windurst Walls]] as a SMN and obtain [[Carbuncle's Tear]]. | *Go to the [[House of the Hero]] in [[Windurst Walls]] ({{Location Tooltip | ||
| text = G-4 | |||
| area = Windurst Walls | |||
| pos = G-4 | |||
| highlight background = transparent | |||
| marker pos x = 12 | |||
| marker pos y = -20 | |||
| marker size = 35 | |||
| marker opacity = 0.4 | |||
| marker background = #5555ff | |||
}}) as a SMN and obtain [[Carbuncle's Tear]]. | |||
**You must zone if you do this straight after your AF [[Weapon]] quest or any quest involving [[Carbuncle]]. | **You must zone if you do this straight after your AF [[Weapon]] quest or any quest involving [[Carbuncle]]. | ||
*'''From this point on, this quest can be completed on any job.''' | *'''From this point on, this quest can be completed on any job.''' | ||
*Talk to [[Koru-Moru]] in [[Windurst Walls]] (E-7) who asks you to bring him 4 [[Astragalos]]. | *Talk to [[Koru-Moru]] in [[Windurst Walls]] ({{Location Tooltip | ||
| text = E-7 | |||
| area = Windurst Walls | |||
| pos = E-7 | |||
| highlight background = transparent | |||
| marker pos x = 0 | |||
| marker pos y = 0 | |||
| marker size = 35 | |||
| marker opacity = 0.4 | |||
| marker background = #5555ff | |||
}}) who asks you to bring him 4 [[Astragalos]]. | |||
**These can be bought from the AH under [[Ammunition]] or the Boneworkers' Guild (Windurst) in [[Windurst Woods]], if any have been sold to the Guild. | **These can be bought from the AH under [[Ammunition]] or the Boneworkers' Guild (Windurst) in [[Windurst Woods]], if any have been sold to the Guild. | ||
**If you already have the [[Astragalos]] x4 on hand, just trade them to [[Koru-Moru]]. | **If you already have the [[Astragalos]] x4 on hand, just trade them to [[Koru-Moru]]. | ||
*Talk to [[Fuepepe]] located at the [[Aurastery]], [[Windurst Waters]] North (L-6). | *Talk to [[Fuepepe]] located at the [[Aurastery]], [[Windurst Waters]] North ({{Location Tooltip | ||
| text = L-6 | |||
| area = Windurst Waters | |||
| map = North | |||
| pos = L-6 | |||
| highlight background = transparent | |||
| marker pos x = -12 | |||
| marker pos y = 5 | |||
| marker size = 35 | |||
| marker opacity = 0.4 | |||
| marker background = #5555ff | |||
}}). | |||
**This is the ministry due north of the [[Windurst Waters]] [[Mog House]]. It's easiest just to run from [[Koru-Moru's Manor]] to there. | **This is the ministry due north of the [[Windurst Waters]] [[Mog House]]. It's easiest just to run from [[Koru-Moru's Manor]] to there. | ||
*Talk to [[Furakku-Norakku]] at the [[Optistery]], [[Windurst Waters]] North (G-8). | *Talk to [[Furakku-Norakku]] at the [[Optistery]], [[Windurst Waters]] North ({{Location Tooltip | ||
*Talk to [[Shantotto]] at her home in [[Windurst Walls]] (K-7). She mentions that [[Sunny-Pabonny]] left for [[San d'Oria]] and to seek him out there. | | text = G-8 | ||
| area = Windurst Waters | |||
| map = North | |||
| pos = G-8 | |||
| highlight background = transparent | |||
| marker pos x = 0 | |||
| marker pos y = -10 | |||
| marker size = 35 | |||
| marker opacity = 0.4 | |||
| marker background = #5555ff | |||
}}). | |||
*Talk to [[Shantotto]] at her home in [[Windurst Walls]] ({{Location Tooltip | |||
| text = K-7 | |||
| area = Windurst Walls | |||
| pos = K-7 | |||
| highlight background = transparent | |||
| marker pos x = 0 | |||
| marker pos y = 10 | |||
| marker size = 35 | |||
| marker opacity = 0.4 | |||
| marker background = #5555ff | |||
}}). She mentions that [[Sunny-Pabonny]] left for [[San d'Oria]] and to seek him out there. | |||
**If you have high enough level and [[staff skill]] ''(230+)'', [[Shantotto]] may give you the cutscene for [[Blood and Glory]]. You must talk to her again to receive the correct dialogue. | **If you have high enough level and [[staff skill]] ''(230+)'', [[Shantotto]] may give you the cutscene for [[Blood and Glory]]. You must talk to her again to receive the correct dialogue. | ||
**If you have a [[Windurst Trust permit|Windurst Trust Permit]], you may need to speak to [[Shantotto]] again to receive the correct dialogue. | <!--**If you have a [[Windurst Trust permit|Windurst Trust Permit]], you may need to speak to [[Shantotto]] again to receive the correct dialogue. | ||
***If you have a [[Windurst Trust permit|Windurst Trust Permit]] and [[Blood and Glory]] active, you must speak to Shantotto several times to receive the correct dialogue. | ***If you have a [[Windurst Trust permit|Windurst Trust Permit]] and [[Blood and Glory]] active, you must speak to Shantotto several times to receive the correct dialogue.-->{{afterera}} | ||
*Talk to [[Gulmama]] located in [[Northern San d'Oria]] at (E-7) who will give you the [[Ice Pendulum]]. | *Talk to [[Gulmama]] located in [[Northern San d'Oria]] at ({{Location Tooltip | ||
| text = E-7 | |||
| area = Northern San d'Oria | |||
| pos = E-7 | |||
| highlight background = transparent | |||
| marker pos x = 0 | |||
| marker pos y = 0 | |||
| marker size = 35 | |||
| marker opacity = 0.4 | |||
| marker background = #5555ff | |||
}}) who will give you the [[Ice Pendulum]]. | |||
**This is the [[Tarutaru]] you pass on the way into the Watchtower. | **This is the [[Tarutaru]] you pass on the way into the Watchtower. | ||
**This the also the [[Tarutaru]] who gives the {{KeyItem}}[[Tuning fork of ice]] for [[Shiva Prime]] fight. | **This the also the [[Tarutaru]] who gives the {{KeyItem}}[[Tuning fork of ice]] for [[Shiva Prime]] fight. | ||
*Go to [[Fei'Yin]] and go to the [[Cloister of Frost]] at (I-5). | *Go to [[Fei'Yin]] and go to the [[Cloister of Frost]] at ({{Location Tooltip | ||
| text = I-5 | |||
| area = Fei'Yin | |||
| pos = I-5 | |||
| map = Map 2 | |||
| highlight background = transparent | |||
| marker pos x = 10 | |||
| marker pos y = 0 | |||
| marker size = 35 | |||
| marker opacity = 0.4 | |||
| marker background = #5555ff | |||
}}). | |||
**NOTE: you do not have to do this fight as [[Summoner]]. | **NOTE: you do not have to do this fight as [[Summoner]]. | ||
**[[Fei'Yin]] is outside [[Cloister of Frost]]. | **[[Fei'Yin]] is outside [[Cloister of Frost]]. | ||
**The exit from this fight is on the first floor about (K-6). | **The exit from this fight is on the first floor about ({{Location Tooltip | ||
| text = K-6 | |||
| area = Fei'Yin | |||
| pos = K-6 | |||
| map = Map 1 | |||
| highlight background = transparent | |||
| marker pos x = -15 | |||
| marker pos y = 15 | |||
| marker size = 35 | |||
| marker opacity = 0.4 | |||
| marker background = #5555ff | |||
}}). | |||
*Once inside, trade the [[Ice Pendulum]] to the Protocrystal and enter the battlefield after a short cutscene. | *Once inside, trade the [[Ice Pendulum]] to the Protocrystal and enter the battlefield after a short cutscene. | ||
** | **Buffs '''do''' wear upon entering. | ||
*Here you will engage 6 [[Dryad]]s, [[Sapling]] type monsters. | *Here you will engage 6 [[Dryad]]s, [[Sapling]] type monsters. | ||
**They will automatically attack once you approach them at the top. | **They will automatically attack once you approach them at the top. | ||
**{{testimonials}} | **{{testimonials}} | ||
*Return to [[Windurst Walls]] and talk to [[Koru-Moru]] for your reward. | *Return to [[Windurst Walls]] ({{Location Tooltip | ||
| text = E-7 | |||
| area = Windurst Walls | |||
| pos = E-7 | |||
| highlight background = transparent | |||
| marker pos x = 0 | |||
| marker pos y = 0 | |||
| marker size = 35 | |||
| marker opacity = 0.4 | |||
| marker background = #5555ff | |||
}}) and talk to [[Koru-Moru]] for your reward. | |||
**If you chose not to talk to [[Fuepepe]] and [[Furakku-Norakku]] earlier, you will have to talk to them before [[Koru-Moru]] will give you your [[Evoker's Spats]]. | **If you chose not to talk to [[Fuepepe]] and [[Furakku-Norakku]] earlier, you will have to talk to them before [[Koru-Moru]] will give you your [[Evoker's Spats]]. | ||
**The [[Ice Pendulum]] can be safely tossed after you have completed the fight. | **The [[Ice Pendulum]] can be safely tossed after you have completed the fight. | ||
[[Category:Quests]] | [[Category:Quests]] | ||
[[Category:Windurst Quests]] | [[Category:Windurst Quests]] | ||
[[Category:Artifact Quests]] | [[Category:Artifact Quests]] | ||
Latest revision as of 17:22, 26 June 2024
| Class Reunion | |
|---|---|
| Starting NPC | Carbuncle, Windurst Walls (G-4) |
| Required Fame | None |
| Level Restriction: | Level 50 |
| Items Needed | Astragalos x4 Ice Pendulum |
| Additional Requirements | Level 50 SMN |
| Title | None |
| HAAP | 2 points |
| Repeatable | No |
| Description | Using the gemstones you received from Carbuncle, you must jog the memory of Professor Koru-Moru and get his help in reuniting the advanced class from several generations back. |
| Rewards | |
| Evoker's Spats | |
| ← Previous Quest | Next Quest → |
|---|---|
| The Puppet Master | Carbuncle Debacle Borghertz's Calling Hands |
Walkthrough
- Go to the House of the Hero in Windurst Walls (G-4) as a SMN and obtain Carbuncle's Tear.
- From this point on, this quest can be completed on any job.
- Talk to Koru-Moru in Windurst Walls (E-7) who asks you to bring him 4 Astragalos.
- These can be bought from the AH under Ammunition or the Boneworkers' Guild (Windurst) in Windurst Woods, if any have been sold to the Guild.
- If you already have the Astragalos x4 on hand, just trade them to Koru-Moru.
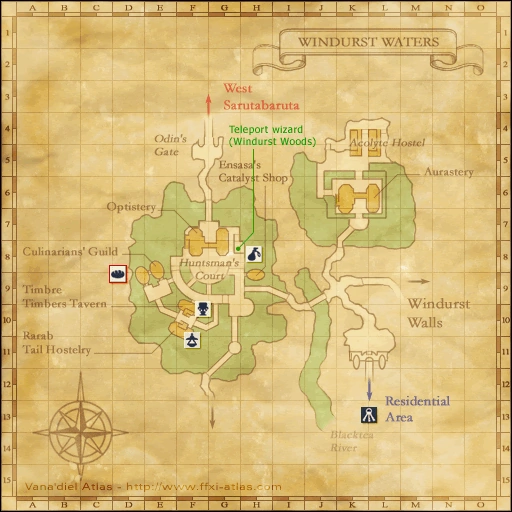
- Talk to Fuepepe located at the Aurastery, Windurst Waters North (L-6).
- This is the ministry due north of the Windurst Waters Mog House. It's easiest just to run from Koru-Moru's Manor to there.
- Talk to Furakku-Norakku at the Optistery, Windurst Waters North (G-8).
- Talk to Shantotto at her home in Windurst Walls (K-7). She mentions that Sunny-Pabonny left for San d'Oria and to seek him out there.
- If you have high enough level and staff skill (230+), Shantotto may give you the cutscene for Blood and Glory. You must talk to her again to receive the correct dialogue.
- Talk to Gulmama located in Northern San d'Oria at (E-7) who will give you the Ice Pendulum.
- This is the Tarutaru you pass on the way into the Watchtower.
- This the also the Tarutaru who gives the
 Tuning fork of ice for Shiva Prime fight.
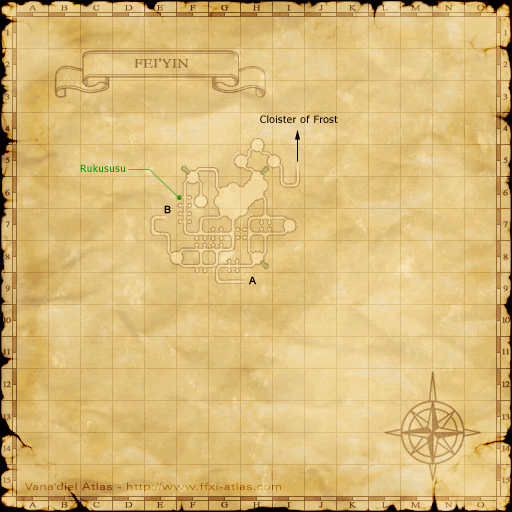
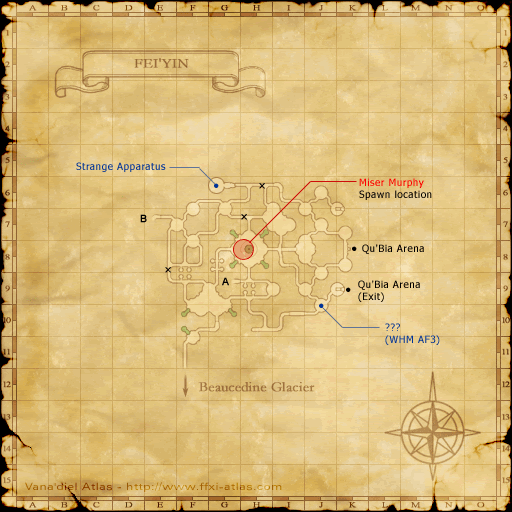
- Go to Fei'Yin and go to the Cloister of Frost at (I-5).
- NOTE: you do not have to do this fight as Summoner.
- Fei'Yin is outside Cloister of Frost.
- The exit from this fight is on the first floor about (K-6).
- Once inside, trade the Ice Pendulum to the Protocrystal and enter the battlefield after a short cutscene.
- Buffs do wear upon entering.
- Here you will engage 6 Dryads, Sapling type monsters.
- They will automatically attack once you approach them at the top.
- (see testimonials)
- Return to Windurst Walls (E-7) and talk to Koru-Moru for your reward.
- If you chose not to talk to Fuepepe and Furakku-Norakku earlier, you will have to talk to them before Koru-Moru will give you your Evoker's Spats.
- The Ice Pendulum can be safely tossed after you have completed the fight.


