Update 1.2.2 is here! Tier 2 HENMs, Horizon Adventuring Assistance Program and much more!
Bastok Mission 7-1: Difference between revisions
From HorizonXI Wiki
(Created page with "{{Mission Header |Mission Name=The Final Image |Expansion=Rise of the Zilart |Start=Any Bastok Gate Guard |Description=You are to investigate the Zilart ruins of Ro'Maeve. Chief Engineer Cid has more details. |Level= |Repeatable=No |Previous=Bastok Mission 6-2{{!}}The Pirate's Cove |Next=Bastok Mission 7-2{{!}}On My Way |Title= |Reward=Rank Points |Image= }} ==Walkthrough== *Speak to a Gate Guard to accept the mission. **Trade 5 Crystals to a guard to unlock it...") Tag: visualeditor-wikitext |
No edit summary |
||
| (3 intermediate revisions by 3 users not shown) | |||
| Line 1: | Line 1: | ||
{{Mission Header | {{Mission Header | ||
|Mission Name=The Final Image | |Mission Name=The Final Image | ||
|Expansion= | |Expansion=bastok | ||
|Start=Any Bastok Gate Guard | |Start=Any Bastok Gate Guard | ||
|Description=You are to investigate the Zilart ruins of [[Ro'Maeve]]. Chief Engineer | |Description=You are to investigate the Zilart ruins of [[Ro'Maeve]]. [[Cid|Chief Engineer Cid]] has more details. | ||
|Level= | |Level= | ||
|Repeatable=No | |Repeatable=No | ||
| Line 9: | Line 9: | ||
|Next=Bastok Mission 7-2{{!}}On My Way | |Next=Bastok Mission 7-2{{!}}On My Way | ||
|Title= | |Title= | ||
| | |Rewards=Rank Points | ||
|Image= | |Image= | ||
}} | }} | ||
==Walkthrough== | ==Walkthrough== | ||
*Trade 20~22 [[Crystal|Crystals]] to a gate guard to unlock this mission. | |||
*Speak to a Gate Guard to accept the mission. | *Speak to a Gate Guard to accept the mission. | ||
*Speak to [[Cid]] for a cutscene. | *Speak to [[Cid]] for a cutscene. | ||
**You will be instructed to go to [[Ro'Maeve]]. Special caution is to be used in Ro'Maeve, as everything there will aggro magic. Most aggro sound, and there is some sight aggro as well. | **You will be instructed to go to [[Ro'Maeve]]. Special caution is to be used in Ro'Maeve, as everything there will aggro magic. Most aggro sound, and there is some sight aggro as well. | ||
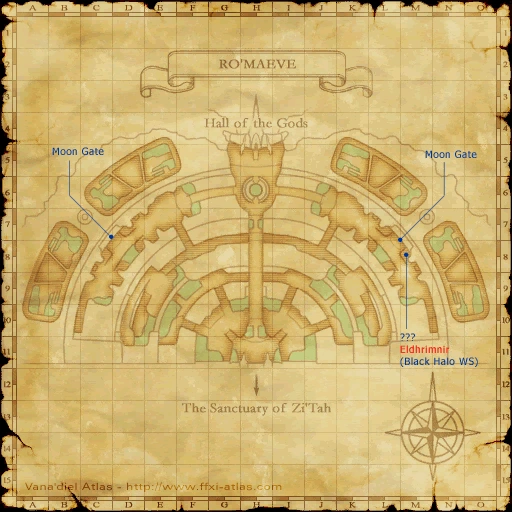
*You are looking for a '''???''', which can spawn in the following locations: | *You are looking for a '''???''', which can spawn in the following locations: | ||
**({{Location Tooltip|area=Ro'Maeve|pos=D-10}}), ({{Location Tooltip|area=Ro'Maeve|pos=E-9}}), ({{Location Tooltip|area=Ro'Maeve|pos=E-10}}), ({{Location Tooltip|area=Ro'Maeve|pos=G-9}}), ({{Location Tooltip|area=Ro'Maeve|pos=I-8}}), ({{Location Tooltip|area=Ro'Maeve|pos=K-10}}), ({{Location Tooltip|area=Ro'Maeve|pos=K-11}}), ({{Location Tooltip|area=Ro'Maeve|pos=L-10}}) or ({{Location Tooltip|area=Ro'Maeve|pos=L-7}}). | |||
**The '''???''' will move approximately every 15 minutes, and can occur during the NM fight ahead. | |||
*Check the '''???''' to spawn two Golem NMs named [[Mokkurkalfi]]. Despite Golems being sight aggro, you CAN sneak pull these. However they are not overly difficult. The biggest concern is time, and you'll probably not have much time to clear the area before hand, as the '''???''' can move without realizing it. | *Check the '''???''' to spawn two Golem NMs named [[Mokkurkalfi]]. Despite Golems being sight aggro, you CAN sneak pull these. However they are not overly difficult. The biggest concern is time, and you'll probably not have much time to clear the area before hand, as the '''???''' can move without realizing it. | ||
**The '''???''' may have moved during the fight, and if so, you'll have to look for it. | **The '''???''' may have moved during the fight, and if so, you'll have to look for it. | ||
**Should you die in the process, you WILL be required to fight the NMs again. Zoning has the same effect. | **Should you die in the process, you WILL be required to fight the NMs again. Zoning has the same effect. | ||
*Check the '''???''' again to receive the [[Reinforced | |||
*Check the '''???''' again to receive the {{KeyItem}}[[Reinforced Cermet]] | |||
*Return to Cid for another cutscene. | *Return to Cid for another cutscene. | ||
[[Category:Missions]] | [[Category:Missions]] | ||
[[Category:Bastok Missions]] | [[Category:Bastok Missions]] | ||
Latest revision as of 22:20, 27 June 2024
| The Final Image | |
|---|---|
| Series | Bastok Missions |
| Starting NPC | Any Bastok Gate Guard |
| Title | None |
| Repeatable | No |
| Description | You are to investigate the Zilart ruins of Ro'Maeve. Chief Engineer Cid has more details. |
| Rewards | |
| Rank Points | |
| ← Previous Mission | Next Mission → |
|---|---|
| The Pirate's Cove | On My Way |
Walkthrough
- Trade 20~22 Crystals to a gate guard to unlock this mission.
- Speak to a Gate Guard to accept the mission.
- Speak to Cid for a cutscene.
- You will be instructed to go to Ro'Maeve. Special caution is to be used in Ro'Maeve, as everything there will aggro magic. Most aggro sound, and there is some sight aggro as well.
- You are looking for a ???, which can spawn in the following locations:
- Check the ??? to spawn two Golem NMs named Mokkurkalfi. Despite Golems being sight aggro, you CAN sneak pull these. However they are not overly difficult. The biggest concern is time, and you'll probably not have much time to clear the area before hand, as the ??? can move without realizing it.
- The ??? may have moved during the fight, and if so, you'll have to look for it.
- Should you die in the process, you WILL be required to fight the NMs again. Zoning has the same effect.
- Check the ??? again to receive the
 Reinforced Cermet
 - Return to Cid for another cutscene.


