Hitting the Marquisate: Difference between revisions
From HorizonXI Wiki
mNo edit summary |
|||
| (4 intermediate revisions by 2 users not shown) | |||
| Line 1: | Line 1: | ||
'''''This is the third [[Thief]] [[Artifact Armor]] quest - otherwise known as AF3.''''' | '''''This is the third [[Thief]] [[Artifact Armor]] quest - otherwise known as AF3.''''' | ||
{{Quest Header | {{Quest Header|nd | ||
| Quest Name = Hitting the Marquisate | | Quest Name = Hitting the Marquisate | ||
| Start = Nanaa Mihgo | | Start = Nanaa Mihgo | ||
| Line 19: | Line 19: | ||
=Walkthrough= | =Walkthrough= | ||
*Must zone prior to starting this quest if you just finished previous quest. | |||
*To begin the quest, speak to [[Nanaa Mihgo]] in {{Location|Windurst Woods|J-3}} and you will get a cut-scene. After you will receive a {{KeyItem}}[[Cat Burglar's Note]]. | *To begin the quest, speak to [[Nanaa Mihgo]] in {{Location|Windurst Woods|J-3}} and you will get a cut-scene. After you will receive a {{KeyItem}}[[Cat Burglar's Note]]. | ||
| Line 36: | Line 38: | ||
'''Note:''' You will need at least 4 people for this part, just to get by the [[Banishing Gate]]s. It is suggested to bring more, however, to help kill the mob you will have to fight. See [[Chandelier]] for information on beating the mob. | '''Note:''' You will need at least 4 people for this part, just to get by the [[Banishing Gate]]s. It is suggested to bring more, however, to help kill the mob you will have to fight. See [[Chandelier]] for information on beating the mob. | ||
*At this point you will be running around Garlaige and examining a number of [[???]] spots. Each [[???]] will direct you to another until you come to the final destination. Since your goal is to smoke a bomb out of the ceiling, you need to move your camera view so that it is pointing upwards in order to target the [[???]]'s. | *At this point you will be running around Garlaige and examining a number of [[???]] spots. Each [[???]] will direct you to another until you come to the final destination. Since your goal is to smoke a bomb out of the ceiling, you need to move your camera view so that it is pointing upwards in order to target the [[???]]'s as well as stand close enough underneath the point. | ||
*Once you enter Garlaige, head to the south-east corner near the first [[Banishing Gate]]. | *Once you enter Garlaige, head to the south-east corner near the first [[Banishing Gate]]. | ||
*Look around for a [[???]] at | ====??? Checks In Order==== | ||
:*Look around for a [[???]] at first dead end position {{Position|Garlaige Citadel|I-9|Map 1|exact pos x=7.5|exact pos y=15}}. Examine and choose 'yes.' | |||
*Head west a bit and look around at | :*Head west a bit and look around at second dead end position {{Position|Garlaige Citadel|H-9|Map 1|exact pos x=22.5|exact pos y=15|map link=Garlaige Citadel}} for another [[???]]. | ||
*Go through the first Banishing Gate | :*Go through the first Banishing Gate to second map. | ||
* | :*Head to the bottom left of the map, at the T-intersection go to the west side dead end at {{Position|Garlaige Citadel|F-9|Map 2|exact pos x=10.5|exact pos y=7}} for [[???]]. | ||
*Head to the north of this area for another ??? at {{ | :*Go across the hall of the T-intersection to the east for another [[???]] at {{Position|Garlaige Citadel|G-9|Map 2|exact pos x=3|exact pos y=7}} dead end. | ||
:*Go back the way you came to the open room that's just after the first Banishing Gate. Examine the [[???]] at the south Dead end at {{Position|Garlaige Citadel|G-9|Map 2|exact pos x=22|exact pos y=2}}. | |||
:*Head to the north of this area for another [[???]] at {{Position|Garlaige Citadel|G-7|Map 2|exact pos x=23.2|exact pos y=12}} dead end. | |||
===NM Fight=== | ===NM Fight=== | ||
*Head east to the [[???]] at {{ | *Head east to the final [[???]] at {{Position|Garlaige Citadel|I-6|Map 2|exact pos x=23.5|exact pos y=30}}. | ||
* | *This last [[???]] you'll examine will spawn a rough [[:category:Bombs|bomb]] named [[Chandelier]]. When this mob is spawned, if he is not claimed before he aggros, he will immediately [[Self-Destruct]]. | ||
::''Try to stand closer to the west side when examining as he tends to spawn facing the east wall so you have time to hit before he [[Self-Destruct]]s.'' | |||
For example he will [[Self-Destruct]]: | |||
:*If the mob spawns and sees the puller before he is claimed | |||
:*If the mob is spawned while a party member is casting magic | |||
:*If the claim attempt is made with magic | |||
Ways to prevent this include: | |||
:*Have the party back out of sight aggro range while the player popping the NM approaches alone. When the pop cutscene ends, the player should immediately run back to the party so as not to aggro the NM. From here he can be pulled safely with a ranged attack or other non-magic distance method. | |||
:*Have non-magic claim methods (i.e. [[Provoke]], [[Steal]], [[Chi Blast]]) ready to spam the instant the mob is popped so that it can be claimed before it aggros the puller. | |||
*You may want to build up [[TP]] on the [[:category:Skeletons|skeletons]] in this area before spawning the bomb. Make sure you bring people who can [[Stun]] him so that he doesn't [[Self-Destruct]]. | *You may want to build up [[TP]] on the [[:category:Skeletons|skeletons]] in this area before spawning the bomb. Make sure you bring people who can [[Stun]] him so that he doesn't [[Self-Destruct]]. | ||
| Line 68: | Line 76: | ||
*If the NM self-destructs, you need to wait 10 minutes before being able to make it pop again. | *If the NM self-destructs, you need to wait 10 minutes before being able to make it pop again. | ||
Have to wait 10min between pops if doing this for multiple thf's. | |||
*Once you have him beat, lot on the [[Chandelier Coal]] and make sure you have inventory space. | *Once you have him beat, lot on the [[Chandelier Coal]] and make sure you have inventory space. | ||
| Line 79: | Line 89: | ||
'''Note:''' Make sure to bring a [[Pickaxe]] for this part! | '''Note:''' Make sure to bring a [[Pickaxe]] for this part! | ||
*[[Nanaa Mihgo]] sends you off to [[Ordelle's Caves]] - enter from the cave in {{Location|La Theine Plateau|F-7}} (you have to go down into the valley/cliffs to get to the cave). | *[[Nanaa Mihgo]] sends you off to [[Ordelle's Caves]] - enter from the cave in {{Location|La Theine Plateau|F-7|exact pos x=27|exact pos y=13.5}} (you have to go down into the valley/cliffs to get to the cave). | ||
*Head east to ({{Location Tooltip|area=Ordelle's Caves|map=Map 2|pos=I-6}}) and move onto the next map, then down to ({{Location Tooltip|area=Ordelle's Caves|map=Map 1|pos=H-9}}) and head into the tunnel going up. | *Head east to ({{Location Tooltip|area=Ordelle's Caves|map=Map 2|pos=I-6}}) and move onto the next map, then down to ({{Location Tooltip|area=Ordelle's Caves|map=Map 1|pos=H-9}}) and head into the tunnel going up. | ||
*Follow this around to the hole at ({{Location Tooltip|area=Ordelle's Caves|map=Map 2|pos=H-12}}). Drop down this hole and head to the tunnel to the east ({{Location Tooltip|area=Ordelle's Caves|map=Map 1|pos=I-11}}) | *Follow this around to the hole at ({{Location Tooltip|area=Ordelle's Caves|map=Map 2|pos=H-12}}). Drop down this hole and head to the tunnel to the east ({{Location Tooltip|area=Ordelle's Caves|map=Map 1|pos=I-11}}) | ||
:*'''do not''' fall off the cliff. | |||
*Follow the stairs to the first intersection ({{Location Tooltip|area=Ordelle's Caves|map=Map 3|pos=I-6}}) - take a left (south) and keep going. Keep your eyes open for a tunnel to the right that heads west ({{Location Tooltip|area=Ordelle's Caves|map=Map 3|pos=H-9}}) and take it (you know you're on the right track if you see some [[Napalm]]s). | *Follow the stairs to the first intersection ({{Location Tooltip|area=Ordelle's Caves|map=Map 3|pos=I-6}}) - take a left (south) and keep going. Keep your eyes open for a tunnel to the right that heads west ({{Location Tooltip|area=Ordelle's Caves|map=Map 3|pos=H-9}}) and take it (you know you're on the right track if you see some [[Napalm]]s). | ||
*You'll zone back into [[La Theine Plateau]] in a valley. Keep going until you find a [[???]] at the south-west corner of | *You'll zone back into [[La Theine Plateau]] in a valley. Keep going until you find a [[???]] at the south-west corner of {{Position|La Theine Plateau|H-10|exact pos x=27.5|exact pos y=11}}. Trade your [[Pickaxe]] to the [[???]] and get a cut-scene and your [[Rogue's Poulaines]]. | ||
Latest revision as of 22:28, 20 June 2025
This is the third Thief Artifact Armor quest - otherwise known as AF3.
| Hitting the Marquisate | |
|---|---|
| Starting NPC | Nanaa Mihgo, Windurst Woods (J-3)
|
| Required Fame | None |
| Items Needed | Quake Grenade x 4 |
| Additional Requirements | Thief 50+ |
| Title | Paragon of Thief Excellence |
| Repeatable | Yes, after Memory reset |
| Description | Visit two of the eight active thieves gathered by the Tenshodo, and confirm the signatures of the people who originally wrote the documents in the "letter from the Tenshodo." |
| Rewards | |
| Rogue's Poulaines | |
| ← Previous Quest | Next Quest → |
|---|---|
| As Thick as Thieves | None |
Walkthrough
- Must zone prior to starting this quest if you just finished previous quest.
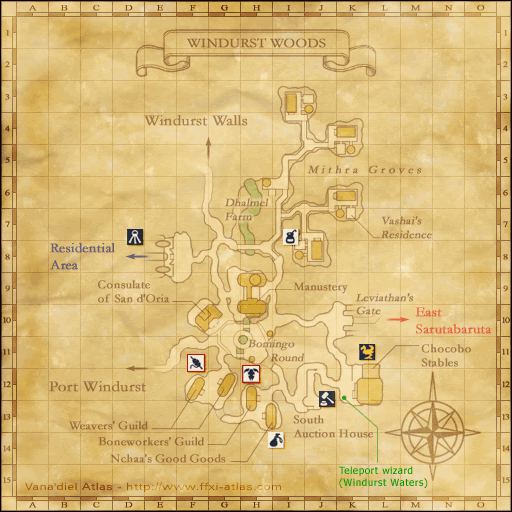
- To begin the quest, speak to Nanaa Mihgo in Windurst Woods (J-3) and you will get a cut-scene. After you will receive a
 Cat Burglar's Note.
- You can do the following two sections in either order, returning here once both are completed.
- You no longer need to be on Thief past this point.
First Letter
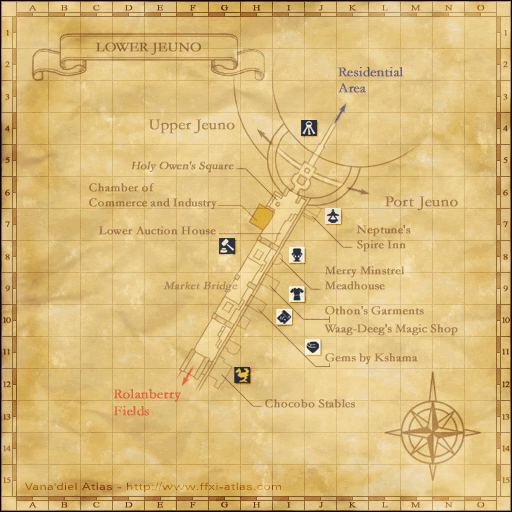
- Go to Lower Jeuno (G-10) and speak to Yatniel (he's a bit south of 'Gems by Kshama').
- After he finishes cursing at you, trade him 4 Quake Grenades.
Second Letter
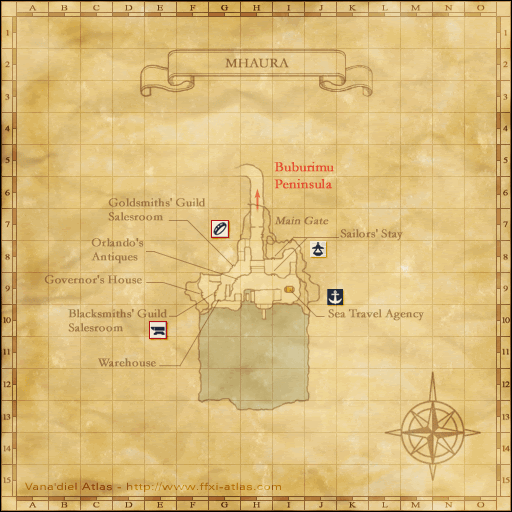
- Go to Mhaura (H-8) and speak to Hagain who is located in one of the upstairs rooms in the Sailor's Stay. He will give you a
 Bomb Incense to smoke out a bomb named Chandelier in Garlaige Citadel.
Garlaige Citadel
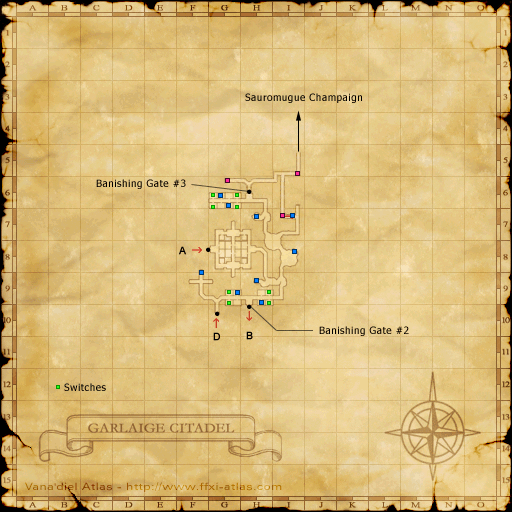
Note: You will need at least 4 people for this part, just to get by the Banishing Gates. It is suggested to bring more, however, to help kill the mob you will have to fight. See Chandelier for information on beating the mob.
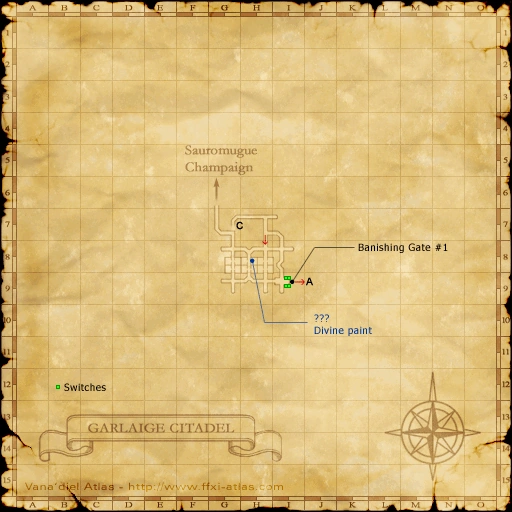
- At this point you will be running around Garlaige and examining a number of ??? spots. Each ??? will direct you to another until you come to the final destination. Since your goal is to smoke a bomb out of the ceiling, you need to move your camera view so that it is pointing upwards in order to target the ???'s as well as stand close enough underneath the point.
- Once you enter Garlaige, head to the south-east corner near the first Banishing Gate.
??? Checks In Order
- Go through the first Banishing Gate to second map.
NM Fight
- This last ??? you'll examine will spawn a rough bomb named Chandelier. When this mob is spawned, if he is not claimed before he aggros, he will immediately Self-Destruct.
- Try to stand closer to the west side when examining as he tends to spawn facing the east wall so you have time to hit before he Self-Destructs.
For example he will Self-Destruct:
- If the mob spawns and sees the puller before he is claimed
- If the mob is spawned while a party member is casting magic
- If the claim attempt is made with magic
Ways to prevent this include:
- Have the party back out of sight aggro range while the player popping the NM approaches alone. When the pop cutscene ends, the player should immediately run back to the party so as not to aggro the NM. From here he can be pulled safely with a ranged attack or other non-magic distance method.
- Have non-magic claim methods (i.e. Provoke, Steal, Chi Blast) ready to spam the instant the mob is popped so that it can be claimed before it aggros the puller.
- You may want to build up TP on the skeletons in this area before spawning the bomb. Make sure you bring people who can Stun him so that he doesn't Self-Destruct.
- Even if he uses Self-Destruct when near death, you may still obtain the item.
- If the NM self-destructs, you need to wait 10 minutes before being able to make it pop again.
Have to wait 10min between pops if doing this for multiple thf's.
- Once you have him beat, lot on the Chandelier Coal and make sure you have inventory space.
Finishing Up
- Go back to Mhaura and trade the Chandelier Coal to Hagain.
- Head to Windurst Woods and talk to Nanaa Mihgo again for some more information. There was no letter on the papers you delivered originally, it was blank.
Ordelle's Caves
Note: Make sure to bring a Pickaxe for this part!
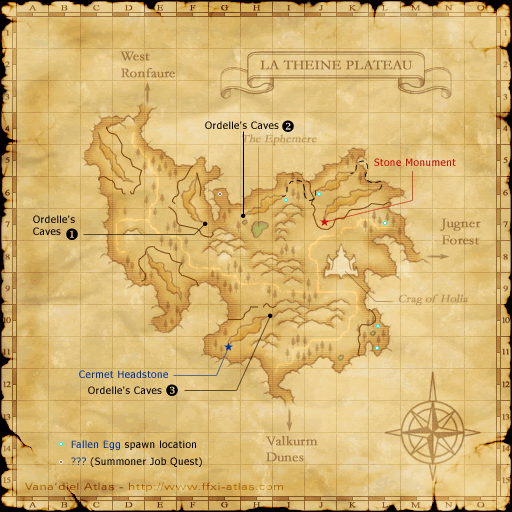
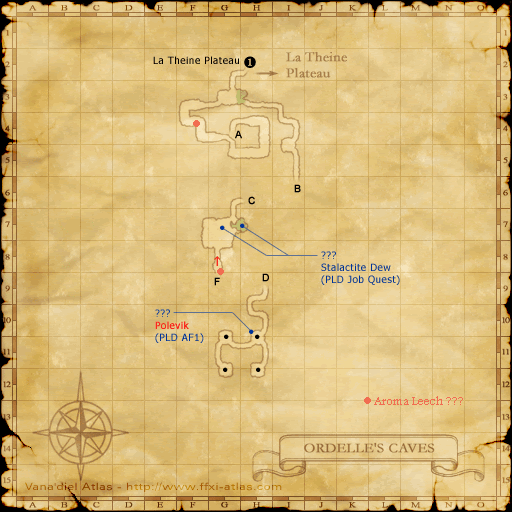
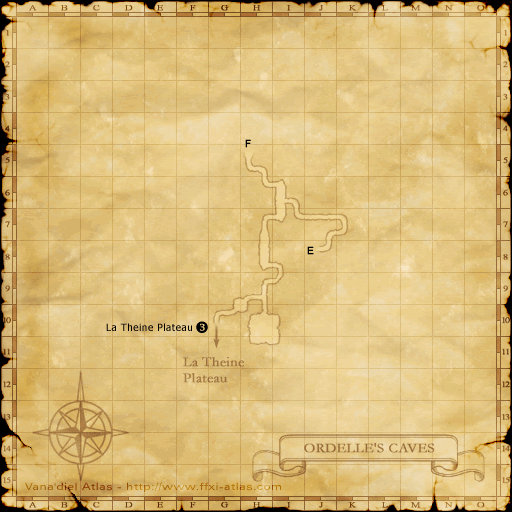
- Nanaa Mihgo sends you off to Ordelle's Caves - enter from the cave in La Theine Plateau (F-7) (you have to go down into the valley/cliffs to get to the cave).
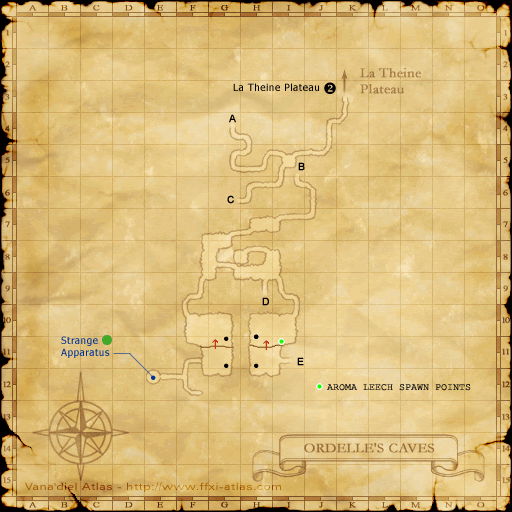
- Head east to (I-6) and move onto the next map, then down to (H-9) and head into the tunnel going up.
- Follow this around to the hole at (H-12). Drop down this hole and head to the tunnel to the east (I-11)
- do not fall off the cliff.
- Follow the stairs to the first intersection (I-6) - take a left (south) and keep going. Keep your eyes open for a tunnel to the right that heads west (H-9) and take it (you know you're on the right track if you see some Napalms).
- You'll zone back into La Theine Plateau in a valley. Keep going until you find a ??? at the south-west corner of (H-10). Trade your Pickaxe to the ??? and get a cut-scene and your Rogue's Poulaines.

