NW Apollyon: Difference between revisions
From HorizonXI Wiki
m fine tuning the table layout |
→Drop Chart: converted (retail) probabilites to checkboxes |
||
| Line 73: | Line 73: | ||
|- | |- | ||
! class="subheader" | [[Ancient Brass]] ([[Monk|MNK]]) | ! class="subheader" | [[Ancient Brass]] ([[Monk|MNK]]) | ||
|{{ | | {{x}} | ||
|{{ | | ({{check}}) | ||
|{{ | | {{check}} | ||
|{{ | | {{x}} | ||
|{{ | | {{x}} | ||
|- | |- | ||
! class="subheader" | [[Argyro Rivet]] ([[Warrior|WAR]]) | ! class="subheader" | [[Argyro Rivet]] ([[Warrior|WAR]]) | ||
|{{ | | {{check}} | ||
|{{ | | {{x}} | ||
|{{ | | {{x}} | ||
|{{ | | ({{check}}) | ||
|{{ | | {{x}} | ||
|- | |- | ||
! class="subheader" | [[Astral Leather]] ([[Summoner|SMN]]) | ! class="subheader" | [[Astral Leather]] ([[Summoner|SMN]]) | ||
|{{ | | ({{check}}) | ||
|{{ | | {{x}} | ||
|{{ | | {{x}} | ||
|{{ | | {{x}} | ||
|{{ | | {{check}} | ||
|- | |- | ||
! class="subheader" | [[Benedict Yarn]] ([[White Mage|WHM]]) | ! class="subheader" | [[Benedict Yarn]] ([[White Mage|WHM]]) | ||
|{{ | | {{x}} | ||
|{{ | | {{check}} | ||
|{{ | | ({{check}}) | ||
|{{ | | {{x}} | ||
|{{ | | {{x}} | ||
|- | |- | ||
! class="subheader" | [[Black Rivet]] ([[Dark Knight|DRK]]) | ! class="subheader" | [[Black Rivet]] ([[Dark Knight|DRK]]) | ||
|{{ | | ({{check}}) | ||
|{{ | | {{x}} | ||
|{{ | | {{x}} | ||
|{{ | | {{x}} | ||
|{{ | | {{check}} | ||
|- | |- | ||
! class="subheader" | [[Blue Rivet]] ([[Dragoon|DRG]]) | ! class="subheader" | [[Blue Rivet]] ([[Dragoon|DRG]]) | ||
|{{ | | {{x}} | ||
|{{ | | ({{check}}) | ||
|{{ | | {{check}} | ||
|{{ | | {{x}} | ||
|{{ | | {{x}} | ||
|- | |- | ||
! class="subheader" | [[Brown Doeskin]] ([[Bard|BRD]]) | ! class="subheader" | [[Brown Doeskin]] ([[Bard|BRD]]) | ||
|{{ | | {{check}} | ||
|{{ | | {{x}} | ||
|{{ | | ({{check}}) | ||
|{{ | | {{x}} | ||
|{{ | | {{x}} | ||
|- class="toau" | |- class="toau" | ||
! class="subheader" | [[Canvas Toile]] ([[Corsair|COR]]) | ! class="subheader" | [[Canvas Toile]] ([[Corsair|COR]]) | ||
|{{ | | {{x}} | ||
|{{ | | {{check}} | ||
|{{ | | ({{check}}) | ||
|{{ | | {{x}} | ||
|{{ | | {{x}} | ||
|- | |- | ||
! class="subheader" | [[Cardinal Cloth]] ([[Red Mage|RDM]]) | ! class="subheader" | [[Cardinal Cloth]] ([[Red Mage|RDM]]) | ||
|{{ | | {{x}} | ||
|{{ | | {{x}} | ||
|{{ | | {{x}} | ||
|{{ | | {{check}} | ||
|{{ | | {{x}} | ||
|- | |- | ||
! class="subheader" | [[Charcoal Cotton]] ([[Ranger|RNG]]) | ! class="subheader" | [[Charcoal Cotton]] ([[Ranger|RNG]]) | ||
|{{ | | {{x}} | ||
|{{ | | {{x}} | ||
|{{ | | {{check}} | ||
|{{ | | ({{check}}) | ||
|{{ | | {{x}} | ||
|- class="toau" | |- class="toau" | ||
! class="subheader" | [[Corduroy Cloth]] ([[Puppetmaster|PUP]]) | ! class="subheader" | [[Corduroy Cloth]] ([[Puppetmaster|PUP]]) | ||
|{{ | | {{x}} | ||
|{{ | | {{x}} | ||
|{{ | | {{check}} | ||
|{{ | | {{x}} | ||
|{{ | | {{x}} | ||
|- | |- | ||
! class="subheader" | [[Diabolic Yarn]] ([[Black Mage|BLM]]) | ! class="subheader" | [[Diabolic Yarn]] ([[Black Mage|BLM]]) | ||
|{{ | | ({{check}}) | ||
|{{ | | {{check}} | ||
|{{ | | {{x}} | ||
|{{ | | {{x}} | ||
|{{ | | {{x}} | ||
|- | |- | ||
! class="subheader" | [[Ebony Lacquer]] ([[Ninja|NIN]]) | ! class="subheader" | [[Ebony Lacquer]] ([[Ninja|NIN]]) | ||
|{{ | | {{x}} | ||
|{{ | | {{check}} | ||
|{{ | | {{x}} | ||
|{{ | | ({{check}}) | ||
|{{ | | {{x}} | ||
|- class="wotg" | |- class="wotg" | ||
! class="subheader" | [[Electrum Stud]] ([[Scholar|SCH]]) | ! class="subheader" | [[Electrum Stud]] ([[Scholar|SCH]]) | ||
|{{ | | {{x}} | ||
|{{ | | ({{check}}) | ||
|{{ | | {{x}} | ||
|{{ | | {{check}} | ||
|{{ | | {{x}} | ||
|- | |- | ||
! class="subheader" | [[Fetid Lanolin]] ([[Beastmaster|BST]]) | ! class="subheader" | [[Fetid Lanolin]] ([[Beastmaster|BST]]) | ||
|{{ | | {{x}} | ||
|{{ | | {{x}} | ||
|{{ | | {{x}} | ||
|{{ | | {{check}} | ||
|{{ | | {{x}} | ||
|- class="toau" | |- class="toau" | ||
! class="subheader" | [[Flameshun Cloth]] ([[Blue Mage|BLU]]) | ! class="subheader" | [[Flameshun Cloth]] ([[Blue Mage|BLU]]) | ||
|{{ | | {{check}} | ||
|{{ | | {{x}} | ||
|{{ | | {{x}} | ||
|{{ | | ({{check}}) | ||
|{{ | | {{x}} | ||
|- class="wotg" | |- class="wotg" | ||
! class="subheader" | [[Gold Stud]] ([[Dancer|DNC]]) | ! class="subheader" | [[Gold Stud]] ([[Dancer|DNC]]) | ||
|{{ | | ({{check}}) | ||
|{{ | | {{x}} | ||
|{{ | | {{x}} | ||
|{{ | | {{x}} | ||
|{{ | | {{check}} | ||
|- | |- | ||
! class="subheader" | [[Kurogane]] ([[Samurai|SAM]]) | ! class="subheader" | [[Kurogane]] ([[Samurai|SAM]]) | ||
|{{ | | {{x}} | ||
|{{ | | {{x}} | ||
|{{ | | {{x}} | ||
|{{ | | {{check}} | ||
|{{ | | {{x}} | ||
|- | |- | ||
! class="subheader" | [[Light Filament]] ([[Thief|THF]]) | ! class="subheader" | [[Light Filament]] ([[Thief|THF]]) | ||
|{{ | | {{check}} | ||
|{{ | | {{x}} | ||
|{{ | | ({{check}}) | ||
|{{ | | {{x}} | ||
|{{ | | {{x}} | ||
|- | |- | ||
! class="subheader" | [[White Rivet]] ([[Paladin|PLD]]) | ! class="subheader" | [[White Rivet]] ([[Paladin|PLD]]) | ||
|{{ | | {{x}} | ||
|{{ | | ({{check}}) | ||
|{{ | | {{x}} | ||
|{{ | | {{x}} | ||
|{{ | | {{check}} | ||
|- | |- | ||
! class="subheader-alt" | [[Adaman Ore]] | ! class="subheader-alt" | [[Adaman Ore]] | ||
| - | | - | ||
| - | | - | ||
|{{ | | ({{check}}) | ||
| - | | - | ||
| - | | - | ||
| Line 222: | Line 222: | ||
| - | | - | ||
| - | | - | ||
|{{ | | ({{check}}) | ||
| - | | - | ||
| - | | - | ||
| Line 229: | Line 229: | ||
| - | | - | ||
| - | | - | ||
|{{ | | ({{check}}) | ||
| - | | - | ||
| - | | - | ||
| Line 236: | Line 236: | ||
| - | | - | ||
| - | | - | ||
|{{ | | ({{check}}) | ||
| - | | - | ||
| - | | - | ||
| Line 243: | Line 243: | ||
| - | | - | ||
| - | | - | ||
|{{ | | ({{check}}) | ||
| - | | - | ||
| - | | - | ||
| Line 250: | Line 250: | ||
| - | | - | ||
| - | | - | ||
|{{ | | ({{check}}) | ||
| - | | - | ||
| - | | - | ||
| Line 257: | Line 257: | ||
| - | | - | ||
| - | | - | ||
|{{ | | ({{check}}) | ||
| - | | - | ||
| - | | - | ||
| Line 264: | Line 264: | ||
| - | | - | ||
| - | | - | ||
|{{ | | ({{check}}) | ||
| - | | - | ||
| - | | - | ||
| Line 273: | Line 273: | ||
| - | | - | ||
| - | | - | ||
|{{ | | ({{check}}) | ||
|- | |- | ||
! class="subheader" | [[Magenta Chip]] | ! class="subheader" | [[Magenta Chip]] | ||
| Line 282: | Line 282: | ||
|(100%) | |(100%) | ||
|} | |} | ||
{| | |||
| {{check}} - high probability | |||
| style="padding-left: 1em; padding-right: 1em;" | ({{check}}) - low probability | |||
| {{x}} - does not drop | |||
|} | |||
===First Floor=== | ===First Floor=== | ||
Revision as of 12:43, 26 August 2025
| NW Apollyon | |
|---|---|
| Zone | Apollyon |
| Entry Items | |
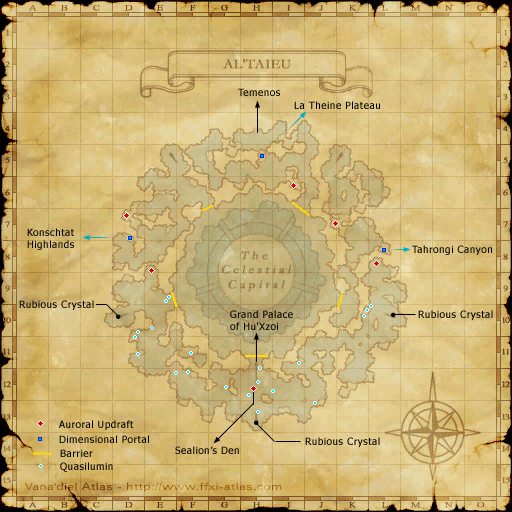
| Entrance | Al'Taieu (D-6) (via Dimensional Portal at the Crag of Dem) |
| Level | 75 |
| Members | 18 |
| Time | 30-90 minutes |
| Completion Reward | Magenta Chip |
| Notes | |
|---|---|
| Chests |
|
| Portal |
|
| Others |
|
- Can be cleared with a balanced group of 12 players at level 75.
- A manaburn group is very effective.
- A group of 2 Black Mages can win NW Apollyon with a good success rate. (The zone has even been soloed by Black Mages with exceptional gear and some luck with portals.)
Drop Chart
| Item (Job) | Floor 1 | Floor 2 | Floor 3 | Floor 4 | Floor 5 |
|---|---|---|---|---|---|
| Ancient Brass (MNK) | ( |
||||
| Argyro Rivet (WAR) | ( |
||||
| Astral Leather (SMN) | ( |
||||
| Benedict Yarn (WHM) | ( |
||||
| Black Rivet (DRK) | ( |
||||
| Blue Rivet (DRG) | ( |
||||
| Brown Doeskin (BRD) | ( |
||||
| Canvas Toile (COR) | ( |
||||
| Cardinal Cloth (RDM) | |||||
| Charcoal Cotton (RNG) | ( |
||||
| Corduroy Cloth (PUP) | |||||
| Diabolic Yarn (BLM) | ( |
||||
| Ebony Lacquer (NIN) | ( |
||||
| Electrum Stud (SCH) | ( |
||||
| Fetid Lanolin (BST) | |||||
| Flameshun Cloth (BLU) | ( |
||||
| Gold Stud (DNC) | ( |
||||
| Kurogane (SAM) | |||||
| Light Filament (THF) | ( |
||||
| White Rivet (PLD) | ( |
||||
| Adaman Ore | - | - | ( |
- | - |
| Rainbow Thread | - | - | ( |
- | - |
| Clot Plasma | - | - | ( |
- | - |
| Darksteel Ore | - | - | ( |
- | - |
| Darksteel Sheet | - | - | ( |
- | - |
| Light Steel | - | - | ( |
- | - |
| Oxblood | - | - | ( |
- | - |
| Shell Powder | - | - | ( |
- | - |
| Metal Chip | - | - | - | - | ( |
| Magenta Chip | - | - | - | - | (100%) |
| ( |
First Floor
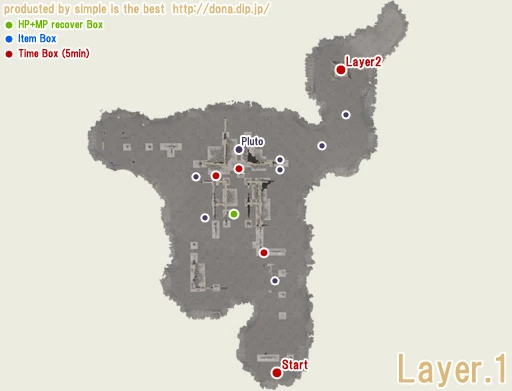
- Enemies: Bardha x7 (Ghosts)
- Drops Ancient Beastcoins (~25%, affected by Treasure Hunter)
- About 8250 HP.
- Susceptible to Sleep, Gravity and Bind.
- Large aggro range to low HP.
- Links with other Bardha.
- Can casts Tier III Ga spells
- Boss: Pluto (Doomed)
- Items chest has 2 Ancient Beastcoins and 0-1 AF+1 material (BLM, DRG, PLD, SAM, SCH, WAR, WHM, BLU). SAM seems like the most common drop this floor.
Second Floor
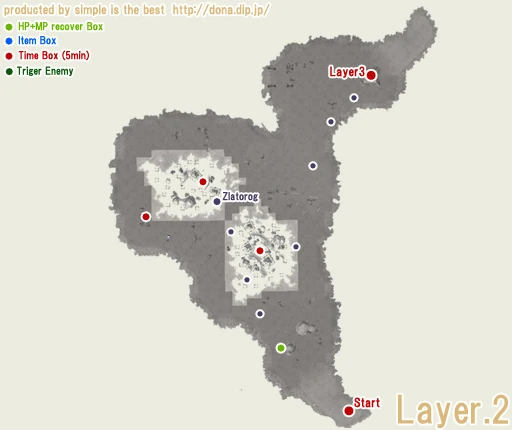
- Enemies: Mountain Buffalo x7 (Buffalo)
- Can drop Ancient Beastcoins (~33%, affected by Treasure Hunter)
- About 9000 HP.
- Immune to Lullaby/Light Shot.
- Susceptible to Sleep, Gravity and Bind.
- Links with other Mountain Buffalo.
- Unlike normal Buffaloes, these cannot be Aspired.
- Boss: Zlatorog (Ram)
- Will use Mighty Strikes multiple times.
- Immune to Lullaby and Light Shot.
- Susceptible to Sleep, Gravity and Bind.
- Items chest has 2 Ancient Beastcoins and 0-1 AF+1 material (BRD, DRK, NIN, RNG, SMN, WHM, COR).
Third Floor
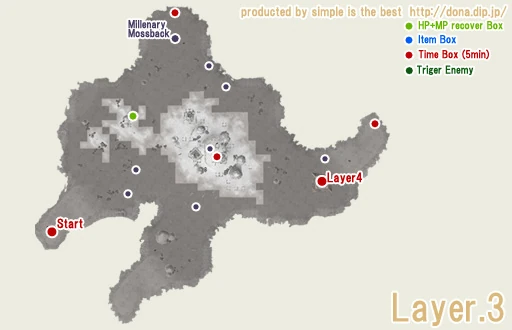
- Enemies: Apollyon Scavenger x7 (Bugards)
- Can drop Ancient Beastcoins (~50%, affected by Treasure Hunter)
- About 4750 HP.
- Susceptible to Sleep, Gravity and Bind.
- Immune to Lullaby/Light Shot.
- Links with other Apollyon Scavenger.
- Boss: Millenary Mossback (Adamantoises)
- Items chest has an AF+1 material (BST, MNK, PLD, RDM, THF, PUP), and 0-2 crafting items (Adaman Ore, Clot Plasma, Darksteel Sheet, Darksteel Ore, Oxblood, Light Steel, Rainbow Thread, Shell Powder) and approx 5 coins (not all the time).
Fourth Floor
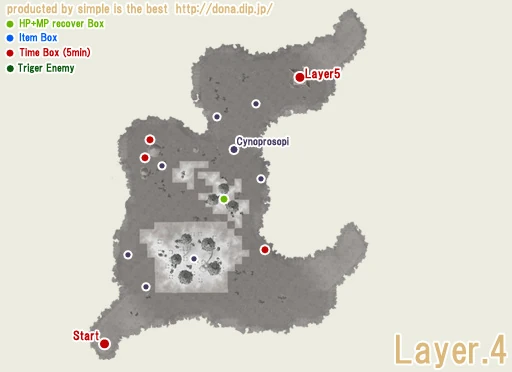
- Enemies: Gorynich x5 (Wyverns)
- Drops 2 Ancient Beastcoins.
- About 5000 HP.
- Resistant to Lullaby.
- Susceptible to Sleep, Gravity and Bind.
- Very strong against Fire based attacks and magic.
- Boss: Cynoprosopi (Wyrm)
- Weaker version of Fafnir (About 15,000 HP), standing on his forefeet is recommended.
- Horrid Roar dispels one effect.
- Dragon Breath and Hurricane Wing do under 300 damage.
- Very high defense. Takes full damage from Thunder. As a fire based mob, it is very resistant to Blizzard. Aero works fine.
- If you fight near the Restore chest, you can open it mid-fight if you run into trouble.
- Very difficult unless you kill all the Wyverns first. Run along the west edge to avoid premature aggro.
- Killable by 1 BLM casting Gravity, kiting and nuking him. Gravity lands easily without Elemental Seal.
- Susceptible to Elemental Seal Sleep, Gravity and Bind.
- Items chest has 7-9 Ancient Beastcoins and 0-1 AF+1 materials (BLM, BRD, BST, DRG, DRK, MNK, NIN, RDM, RNG, SAM, SMN, WHM, BLU, COR, PUP, DNC).
Fifth Floor
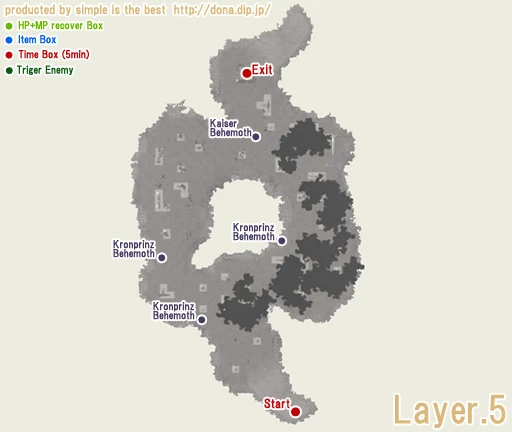
- Enemies: Kronprinz Behemoth x3 (Behemoths)
- Has alliance hate. Will target everybody until they're dead.
- Links with other Kronprinz Behemoth and Kaiser Behemoth.
- Drops 5-6 Ancient Beastcoins.
- Immune to Stun.
- Resistant to Bind and Sleep.
- Susceptible to Gravity.
- About 7000 HP.
- Boss: Kaiser Behemoth (Behemoth)
- Has alliance hate. Will target everybody until they're dead.
- Weaker version of King Behemoth (About 15,000 HP).
- He does not have additional effect: Stun on his melee attacks.
- Meteor does just under 1000 damage to everyone in a huge area. The target should run out of range so his casting fails.
- Meteor takes 5 seconds to cast, so it should be possible for melees to run out of range as long as they aren't stunned from Thunderbolt.
- Kick Out does up to 900 damage; only used if someone by his tail gets hate.
- Immune to Gravity, Stun and Sleep.
- Nearly all elements are good on the Kaiser Behemoth, however resistance builds up as multiple spells are cast on him.
- The usual strategy is to kite Kaiser around the center, pausing out of range when he tries to cast Meteor.
- Don't get too far ahead, or he won't ever try to cast Meteor and you won't be able to do any damage. Let him get to about 20' away when kiting, then run to more than 30' away when he starts to cast.
- Melee DD just chase him and hit him while he tries to cast Meteor. Try to hit him from the sides to avoid Kick Out.
- Melee damage and accuracy on him is very, very poor. Weapon Skill damage isn't too bad.
- BLMs chase him and nuke from a distance when he starts casting Meteor, then run away if he turns.
- If he's too far, you can also run the other way and nuke him. Depending on subjob, start casting just as he approaches.
- Two/more BLMs can kill Kaiser pretty easily. Have team A and team B setup. Team A only runs clockwise around the lake and team B only runs counter-clockwise around lake. Each BLM will start the nuke when in 21' range and will land before he leaves casting range. Rest MP should be ok in kiteing area since the BLM being chased should never stop running. It is possable to Cast a nuke and rest till he comes back around if you did not draw hate. With 2 blms should take 20 mins to kill with 3~4 can take 15. More BLMs can cause problems if to many BLMs cast at the same time.
- A BLM can solo Kaiser with the proper gear and tactics.
- You can check his current target with "/target <stnpc>; /assist <t>; /wait 1; /p Target: <t>" or "/assist <bt>;wait 1;/p <t> (Run Away)
- The final chest has 5 Ancient Beastcoins, 2-3 AF+1 materials (BLM, BRD, BST, DNC, DRG, DRK, MNK, NIN, PLD, RDM, RNG, SAM, SMN, THF, WAR, WHM, BLU, COR, PUP, SCH), the Magenta Chip, and a chance of a Metal Chip.
