
Windurst Mission 2-1: Difference between revisions
From HorizonXI Wiki
46.69.207.65 (talk | contribs) Added a description of how to find the 14 Fossil Rocks that are available on Horizon Tag: visualeditor |
No edit summary Tag: visualeditor |
||
| Line 24: | Line 24: | ||
**(Optional) Nanaa's cronies nearby have additional dialogue. | **(Optional) Nanaa's cronies nearby have additional dialogue. | ||
===Maze of Shakrami=== | ===Maze of Shakrami=== | ||
*Now make your way to the [[Maze of Shakhrami]], which is in at (K-5) in the northeast corner of [[Tahrongi Canyon]]. | *Now make your way to the [[Maze of Shakhrami]], which is in at (K-5) in the northeast corner of [[Tahrongi Canyon]]. | ||
* | * | ||
*EDIT: There are fourteen Fossil Rocks in all in all. Once inside Maze of Shakhrami from Tahrongi Canyon follow these instructions using [https://static.wikia.nocookie.net/ffxi/images/4/41/MazeofShakhrami1.png/revision/latest?cb=20060823140034 Map1] and [https://static.wikia.nocookie.net/ffxi/images/4/48/MazeofShakhrami2.png/revision/latest?cb=20070726082232 Map2] to follow along. | *EDIT: There are fourteen Fossil Rocks in all in all. Once inside Maze of Shakhrami from Tahrongi Canyon follow these instructions using [https://static.wikia.nocookie.net/ffxi/images/4/41/MazeofShakhrami1.png/revision/latest?cb=20060823140034 Map1] and [https://static.wikia.nocookie.net/ffxi/images/4/48/MazeofShakhrami2.png/revision/latest?cb=20070726082232 Map2] to follow along. | ||
**On Map 1 enter D to change to Map 2. | **On Map 1 enter D to change to Map 2. | ||
| Line 35: | Line 34: | ||
***There are a total of six Fossil Rocks G-7 to H-7 & G-8 to H-8 | ***There are a total of six Fossil Rocks G-7 to H-7 & G-8 to H-8 | ||
***There are a total of two Fossil Rocks inside I-8 | ***There are a total of two Fossil Rocks inside I-8 | ||
*Check each rock until you receive the [[Lapis coral]]. | *Check each rock until you receive the [[Lapis coral]]. | ||
* | * | ||
*Make your way back to [[Nanaa Mihgo]], who will give you the [[Hideout key]]. | *Make your way back to [[Nanaa Mihgo]], who will give you the [[Hideout key]]. | ||
**(Optional) Nanaa's cronies have new additional dialogue. | **(Optional) Nanaa's cronies have new additional dialogue. | ||
| Line 45: | Line 41: | ||
*Head to [[Inner Horutoto Ruins]] entering from the tower at (J-7) in [[East Sarutabaruta]]. | *Head to [[Inner Horutoto Ruins]] entering from the tower at (J-7) in [[East Sarutabaruta]]. | ||
** The '''Inner Horutoto Ruins''' [[Survival Guide]] warp places you in the right tower if you have it unlocked already. | ** The '''Inner Horutoto Ruins''' [[Survival Guide]] warp places you in the right tower if you have it unlocked already. | ||
*Enter the room off of the main room. At (G-9), there is a cracked wall. Open it to proceed to Inner Horuoto Ruins Map 2. Now head for (G-8) again. There are a few ways to get there, but ultimately that is your destination | *Enter the room off of the main room. At (G-9), there is a cracked wall. Open it to proceed to Inner Horuoto Ruins Map 2. Now head for (G-8) again. There are a few ways to get there, but ultimately that is your destination | ||
*** Without Sneak and Invisible: [[Beetle]]s and [[Bat]]s do not aggro here. there is a path to the door without [[Goblin]]s and [[Skeleton]]s, allowing you to pass safely | |||
*** Without Sneak and Invisible: [[Beetle]]s and [[Bat]]s do not aggro here. there is a path to the door without [[Goblin]]s and [[Skeleton]]s, allowing you to pass safely | |||
*Check the '''Mahogany Door''' for a cutscene. | *Check the '''Mahogany Door''' for a cutscene. | ||
**(Optional) Nanaa and her cronies back in Windurst Woods have new additional dialogue after this cutscene. | **(Optional) Nanaa and her cronies back in Windurst Woods have new additional dialogue after this cutscene. | ||
Revision as of 17:25, 31 December 2022
| Lost for Words | |
|---|---|
| Series | Missions |
| Starting NPC | Any Windurst Gate Guard |
| Title | None |
| Repeatable | No |
| Description | There are reports that the Cat Burglar has her paws on a "Book of the Gods," a restricted book that was lost twenty years ago. Assist the Optistery in investigating the reports, and attempt to retrieve the priceless, but dangerous, tome. |
| Rewards | |
| Rank Points | |
| ← Previous Mission | Next Mission → |
|---|---|
| The Price of Peace | A Testing Time |
Walkthrough
- Trading 3 crystals to the Conquest NPC (the one that gives Signet) unlocks this mission. Trading 12 will max out your rank points for Rank 2.
- Accept the mission from any gate guard.
- (Optional) As usual for Windurst missions, the gate guards and their adjacent NPCs will all have optional dialogue after accepting and at end of the mission.
- Head for the Optistery on the northern map of Windurst Waters (near Home Point #1). Speak to Tosuka-Porika at (G-8).
- (Optional) The other NPCs and Tosuka-Porika inside the same room have additional dialogue.
- Head to (J-3) in Windurst Woods and speak to Nanaa Mihgo. She will lend you her Lapis monocle.
- You may need to talk to her twice or more if you have a Windurst Trust permit and Aht Urhgan Lure of the Wildcat quests started
- (Optional) Nanaa's cronies nearby have additional dialogue.
Maze of Shakrami
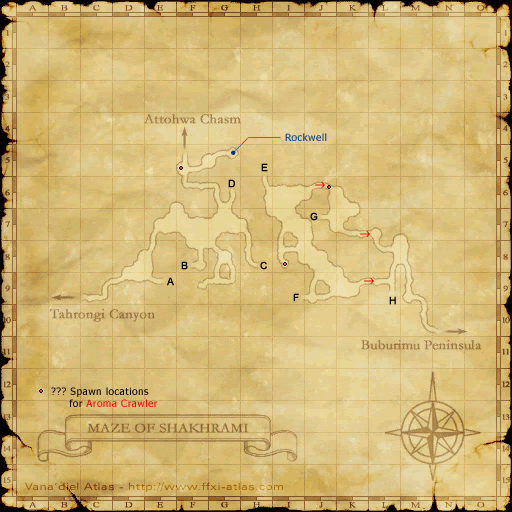
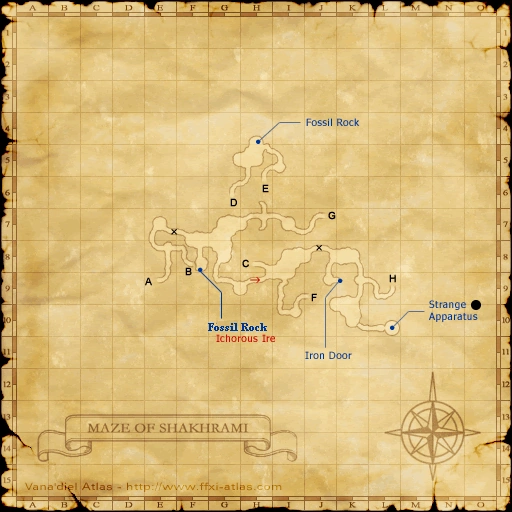
- Now make your way to the Maze of Shakhrami, which is in at (K-5) in the northeast corner of Tahrongi Canyon.
- EDIT: There are fourteen Fossil Rocks in all in all. Once inside Maze of Shakhrami from Tahrongi Canyon follow these instructions using Map1 and Map2 to follow along.
- On Map 1 enter D to change to Map 2.
- On Map 2 run from D to E checking for four Fossil Rocks on the way.
- On Map 1 again now run from E to G, there are no Fossil Rocks on the way.
- On Map 2 again run west from G. From here on Map 2 you can get to the following Fossil Rocks.
- There are a total of two Fossil Rocks inside I-7
- There are a total of six Fossil Rocks G-7 to H-7 & G-8 to H-8
- There are a total of two Fossil Rocks inside I-8
- Check each rock until you receive the Lapis coral.
- Make your way back to Nanaa Mihgo, who will give you the Hideout key.
- (Optional) Nanaa's cronies have new additional dialogue.
Inner Horutoto Ruins
- Head to Inner Horutoto Ruins entering from the tower at (J-7) in East Sarutabaruta.
- The Inner Horutoto Ruins Survival Guide warp places you in the right tower if you have it unlocked already.
- Enter the room off of the main room. At (G-9), there is a cracked wall. Open it to proceed to Inner Horuoto Ruins Map 2. Now head for (G-8) again. There are a few ways to get there, but ultimately that is your destination
- Check the Mahogany Door for a cutscene.
- (Optional) Nanaa and her cronies back in Windurst Woods have new additional dialogue after this cutscene.
Windurst
- Head to the House of the Hero at Windurst Walls (G-3). Check the door for a cutscene.
- Make your way back to Tosuka-Porika to complete the mission.
- (Optional) Some of the NPCs in the same room have new additional dialogue..