Promathia Mission 2-3: Difference between revisions
No edit summary Tag: visualeditor |
No edit summary |
||
| (9 intermediate revisions by 6 users not shown) | |||
| Line 1: | Line 1: | ||
{{Mission Header|nd | |||
{{Mission Header | |||
|Mission Name=Distant Beliefs | |Mission Name=Distant Beliefs | ||
|Expansion=Chains of Promathia | |Expansion=Chains of Promathia | ||
|Start= | |Start= | ||
|Description=You have volunteered to journey into the Phomiuna Aqueducts to defeat the minotaur. It appears that Nag'molada has set off ahead of you. | |Description=You have volunteered to journey into the Phomiuna Aqueducts to defeat the minotaur. It appears that Nag'molada has set off ahead of you. | ||
|Level=40 | |Level=40 | ||
| | |Items Needed=[[Bronze Key]] | ||
*[[Thief]] with a [[Skeleton Key]] will work as an alternative. | |||
|Repeatable=No | |Repeatable=No | ||
|Previous=The Lost City | |Previous=The Lost City | ||
| Line 13: | Line 13: | ||
|Reward= | |Reward= | ||
|Image= | |Image= | ||
}} | }}<!-- | ||
==Overview== | |||
This mission requires you to fight the [[Minotaur]], a [[NM]] in [[Phomiuna Aqueducts]] and then | |||
--> | |||
==Walkthrough== | ==Walkthrough== | ||
* Make your way to J- | *Enter [[Phomiuna Aqueducts]] from {{Location|Tavnazian Safehold|map=Basement|I-6}}. | ||
** Once one person in the alliance aggros the [[Minotaur]], the entire alliance, regardless of where they are on the map, will be [[Draw In|drawn in]] to | **'''Note:''' When first clicking the gate to [[Phomiuna Aqueducts]], you may get the message ''"The door is locked tight."''. Click a second time to enter. This seems to be a bug {{verification}}. | ||
*Make your way to {{Location|Phomiuna Aqueducts|map=Map 2|J-2}} to find the [[:Category:Tauri|Taurus]] [[NM]] [[Minotaur]]. | |||
**Once one person in the alliance aggros the [[Minotaur]], the entire alliance, regardless of where they are on the map, will be [[Draw In|drawn in]] to {{Position|Phomiuna Aqueducts|map=Map 2|J-2}} for the fight. | |||
** Make sure to move before it respawns; there is no cutscene. | ** Make sure to move before it respawns; there is no cutscene. The Minotaur is said to have a respawn time of ten Earth minutes. | ||
** After you kill the Minotaur, you may leave the Aqueducts at any time | ** After you kill the Minotaur, you may leave the Aqueducts at any time and resume with the rest of the mission at any time. | ||
* | *After you killed the [[Minotaur]], you need to pass through the locked ''Iron Door'' at {{Position|Phomiuna Aqueducts|map=Map 2|G-8}}. | ||
**Be careful not to drop off the ledge at {{Position|Phomiuna Aqueducts|map=Map 2|G-8}} or you will need to go around again. | |||
**The ''Iron Door'' can be opened with a [[Bronze Key]], which drops from [[:Category:Fomor|Fomor]] in [[Phomiuna Aqueducts]], or by a [[Thief]] using a [[Skeleton Key]]. | |||
** Be | ***'''Note:''' Positioning is important in order for the [[Skeleton Key]] to work and you must be right in front of the middle of the gate for it to take the key. | ||
** | *Continue on to the Wooden Ladder at {{Position|Phomiuna Aqueducts|map=Map 2|E-8}} for a cutscene, then climb up. | ||
*On the next map, take the north corridor. | |||
* Continue on to the Wooden Ladder at E-8 for a cutscene, then climb up. | |||
* On the next map, take the north corridor. | |||
** The southern room/path has no true exit, and cannot directly access the corridor at F-8. | ** The southern room/path has no true exit, and cannot directly access the corridor at F-8. | ||
** However, there is a one way hidden door in the room that can only be opened from the other side. | ** However, there is a one way hidden door in the room that can only be opened from the other side. | ||
| Line 44: | Line 44: | ||
**# On Windsday: Wind and Earth | **# On Windsday: Wind and Earth | ||
**# On Earthsday: Earth and Thunder | **# On Earthsday: Earth and Thunder | ||
**# On | **# On Lightningday: Thunder and Water | ||
**# On Watersday: Water and Fire | **# On Watersday: Water and Fire | ||
**# On Lightsday: Light and Dark | **# On Lightsday: Light and Dark | ||
| Line 59: | Line 59: | ||
'''Note''': It is highly recommended that players do not lock onto the Minotaur and taurus type mobs while fighting, and also switch damage to on screen only. This helps to quickly spot and avoid Mortal Ray by turning around. | '''Note''': It is highly recommended that players do not lock onto the Minotaur and taurus type mobs while fighting, and also switch damage to on screen only. This helps to quickly spot and avoid Mortal Ray by turning around. | ||
'''Note''' This mission is soloable by beastmaster - Godsgift soloed 9/20/2025 | |||
It is reccomended that you use sub whm for the fight but it is not entirely necessary. Look for a high level oil spill to charm and use your 2hr. when fighting minotaur put your slime on it and pull it to the corner of the room. let the slime solo it while you stand in the opposite corner. You will need to keep an eye out for mortal ray and use heel to move your slime out of the way. Be prepared to use reward x2. Also bringing antidotes if you are not /whm would be a wise decision. | |||
Latest revision as of 18:17, 14 September 2025
| Distant Beliefs | |
|---|---|
| Series | Chains of Promathia Missions |
| Start | After The Lost City |
| Level Restriction: | Level 40 |
| Items Needed | Bronze Key
|
| Title | None |
| Repeatable | No |
| Description | You have volunteered to journey into the Phomiuna Aqueducts to defeat the minotaur. It appears that Nag'molada has set off ahead of you. |
| Rewards | |
| None | |
| ← Previous Mission | Next Mission → |
|---|---|
| The Lost City | An Eternal Melody |
Walkthrough
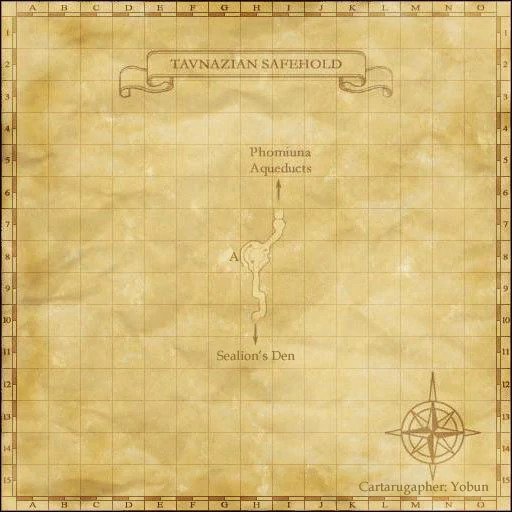
- Enter Phomiuna Aqueducts from Tavnazian Safehold, Basement (I-6).
- Note: When first clicking the gate to Phomiuna Aqueducts, you may get the message "The door is locked tight.". Click a second time to enter. This seems to be a bug
 .
.
- Note: When first clicking the gate to Phomiuna Aqueducts, you may get the message "The door is locked tight.". Click a second time to enter. This seems to be a bug
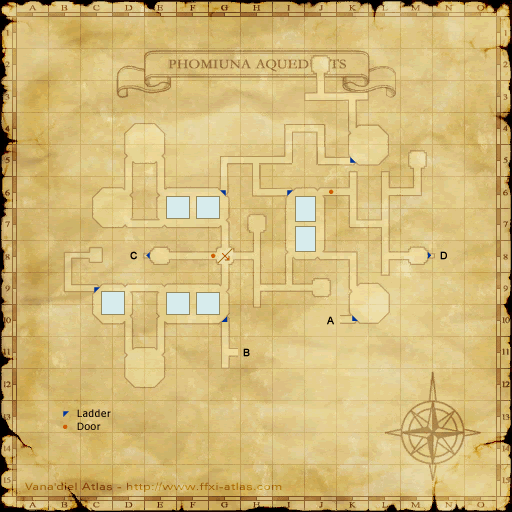
- Make your way to Phomiuna Aqueducts, Map 2 (J-2) to find the Taurus NM Minotaur.
- Once one person in the alliance aggros the Minotaur, the entire alliance, regardless of where they are on the map, will be drawn in to (J-2) for the fight.
- Make sure to move before it respawns; there is no cutscene. The Minotaur is said to have a respawn time of ten Earth minutes.
- After you kill the Minotaur, you may leave the Aqueducts at any time and resume with the rest of the mission at any time.
- After you killed the Minotaur, you need to pass through the locked Iron Door at (G-8).
- Be careful not to drop off the ledge at (G-8) or you will need to go around again.
- The Iron Door can be opened with a Bronze Key, which drops from Fomor in Phomiuna Aqueducts, or by a Thief using a Skeleton Key.
- Note: Positioning is important in order for the Skeleton Key to work and you must be right in front of the middle of the gate for it to take the key.
- Continue on to the Wooden Ladder at (E-8) for a cutscene, then climb up.
- On the next map, take the north corridor.
- The southern room/path has no true exit, and cannot directly access the corridor at F-8.
- However, there is a one way hidden door in the room that can only be opened from the other side.
- Make your way to the ??? in the south west corner of the room at F-7 (Bookshelf). The bottom room, F-9, is NOT the right room. Click the ??? to open a hidden door at the south wall.
- Make sure to click the correct ???. There is another one-way door in the east wall, which leads to a dead end. The only exit from this room is via a trapdoor in the floor, unless someone opens the door and lets you back out.
- WARNING*
- If you do this solo you will need to bring some type of Reraise (Earrings,Scrolls,ect). There are lots of Stegotaur's in your path and no way to get around them.
- Behind the southern door is a passage(F-8) where you must solve a puzzle.
- The puzzle varies based on the current Vana'diel day.
- Push the torches simultaneously that correspond to the following:
- To push the switches, have someone count down, and press theirs before giving the "Go" command. The second player should press theirs as soon as they see "Go"
- On Firesday: Fire and Ice
- On Icesday: Ice and Wind
- On Windsday: Wind and Earth
- On Earthsday: Earth and Thunder
- On Lightningday: Thunder and Water
- On Watersday: Water and Fire
- On Lightsday: Light and Dark
- On Darksday: Dark and Light
Side note: Most people assume this must be done with two people. Unfortunately, you may encounter bad luck and have party members disconnect, disband or possibly get KO'd without (Re)Raise. To do this solo, target the first Oil Lamp you need and hit enter, then run to the second, target and hit enter. If done fast enough the secret door will open.
- After completing the puzzle, go though the hidden door at the western wall. It can be opened from the other side by someone that has already passed through.
- Go to the second Ornate Door and receive the final cutscene.
- Go back to Tavnazian Safehold and talk to Justinius (J-6 on the upper floor).
Note: Fomors do not become true sound when your Fomor hate is at it's maximum. Though, they do not aggro at all when your Fomor hate is at it's minimum. To lower your Fomor hate, kill beastman in Lufaise Meadows or Misaraux Coast. You must kill two beastman for every one fomor you killed to lower hate.
Note: This missions is known soloable by THF, though with much difficulty and large gil loss.
Note: It is highly recommended that players do not lock onto the Minotaur and taurus type mobs while fighting, and also switch damage to on screen only. This helps to quickly spot and avoid Mortal Ray by turning around.
Note This mission is soloable by beastmaster - Godsgift soloed 9/20/2025
It is reccomended that you use sub whm for the fight but it is not entirely necessary. Look for a high level oil spill to charm and use your 2hr. when fighting minotaur put your slime on it and pull it to the corner of the room. let the slime solo it while you stand in the opposite corner. You will need to keep an eye out for mortal ray and use heel to move your slime out of the way. Be prepared to use reward x2. Also bringing antidotes if you are not /whm would be a wise decision.


