Category:Regional Merchants: Difference between revisions
m (Aramachus moved page Regional Merchant to Category:Regional Merchants: perfect overview page for the category page) |
m (removed rowspan in test table as it isnt necessary in this layout) |
||
| (20 intermediate revisions by 3 users not shown) | |||
| Line 1: | Line 1: | ||
[[Category:NPCs]] | |||
'''There are three regional merchants for each region, with one merchant located in each of the competing nations:''' [[Bastok]], [[San d'Oria]], and [[Windurst]]. These merchants only have goods to sell when their nation controls the importing region, as shown by the [[Vana'diel|Region Map]]. For example, if [[San d'Oria]] controls the region of [[Aragoneu]], [[Antonian]] in [[San d'Oria]] will be the only regional merchant for [[Aragoneu]] to have goods for sale that week. If the [[Beastmen]] control a region, that region's goods will not be available at any of the three merchants until a city gains control. | '''There are three regional merchants for each region, with one merchant located in each of the competing nations:''' [[Bastok]], [[San d'Oria]], and [[Windurst]]. These merchants only have goods to sell when their nation controls the importing region, as shown by the [[Vana'diel|Region Map]]. For example, if [[San d'Oria]] controls the region of [[Aragoneu]], [[Antonian]] in [[San d'Oria]] will be the only regional merchant for [[Aragoneu]] to have goods for sale that week. If the [[Beastmen]] control a region, that region's goods will not be available at any of the three merchants until a city gains control. | ||
<br><br> | <br><br> | ||
| Line 8: | Line 8: | ||
'''Many of the goods sold by regional merchants are also sold elsewhere.''' As a general rule, the lowest price for an item sold by an NPC is from a regional merchant if the character purchasing the item has high fame in the city where the regional merchant is located. | '''Many of the goods sold by regional merchants are also sold elsewhere.''' As a general rule, the lowest price for an item sold by an NPC is from a regional merchant if the character purchasing the item has high fame in the city where the regional merchant is located. | ||
<br><br> | <br><br> | ||
The regional merchants added with the Chains of Promathia expansion are a bit different from the rest. The merchants representing the region of [[Tavnazian Archipelago]] only sell items to characters who have advanced through the missions of that expansion; a character must be at chapter 4 or above in the Promathia missions to buy goods from them. The regional merchants for [[Movalpolos]] sell to anyone, but also within the dungeon of [[Oldton Movalpolos]] is the | The regional merchants added with the Chains of Promathia expansion are a bit different from the rest. The merchants representing the region of [[Tavnazian Archipelago]] only sell items to characters who have advanced through the missions of that expansion; a character must be at chapter 4 or above in the Promathia missions to buy goods from them. The regional merchants for [[Movalpolos]] sell to anyone, but also within the dungeon of [[Oldton Movalpolos]] is the [[Outpost Merchant]] [[Bartabaq]], who sells some of the same goods as the regional merchants for [[Movalpolos]], but will only sell to characters that are from the nation which controls the [[Movalpolos]] region that week. | ||
====Test Section==== | |||
{| | |||
{| class="horizon-table npc-table table-xl" | |||
! width=15% | Region | |||
! width="25%" | Goods | |||
! width="20%" | Bastok Merchant | |||
! width="20%" | San d'Oria Merchant | |||
! width="20%" | Windurst Merchant | |||
|- | |- | ||
| [[Elshimo Uplands]] | |||
| | | | ||
{| class="inserted-table" | |||
| {{#section::Category:Elshimo_Uplands/Regional_Goods|goods}} | |||
|} | |||
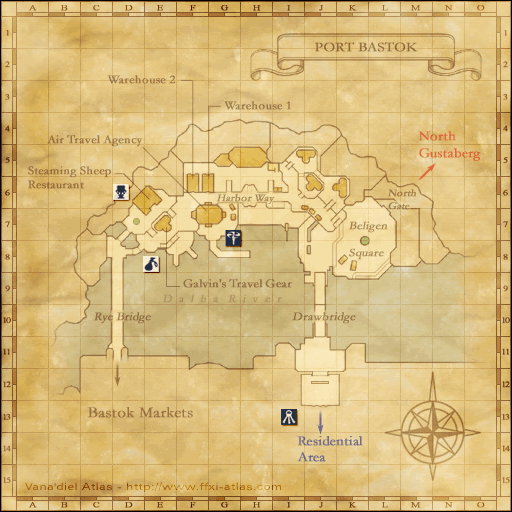
|[[Dhen Tevryukoh]]<br>{{Location|Port Bastok|I-6}} | |||
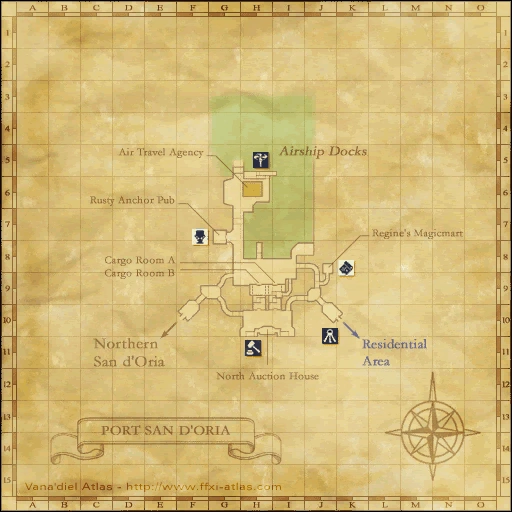
|[[Bonmaurieut]]<br>{{Location|Port San d'Oria|H-9}} | |||
|[[Sattsuh Ahkanpari]]<br>{{Location|Port Windurst|M-4}} | |||
|} | |||
| | ====Merchants per Region==== | ||
{| class="horizon-table npc-table" border="0" cellpadding="4" cellspacing="3" width="100%" | |||
| | !width="15%" | Region | ||
!width="25%" | Goods | |||
!width="20%" | Bastok Merchant | |||
!width="20%" | San d'Oria Merchant | |||
!width="20%" | Windurst Merchant | |||
|- <!--If changes need to be made to these merchants, edit the Category:Regional Merchants/Aragoneu page.--> | |||
| [[Aragoneu]] | |||
| {{#section:Aragoneu/Regional Merchants|table}} | |||
|- <!--If changes need to be made to these merchants, edit the Derfland/Regional Merchant page.--> | |||
| [[Derfland]] | |||
| {{#section:Derfland/Regional Merchants|table}} | |||
|- <!--If changes need to be made to these merchants, edit the Elshimo Lowlands/Regional Merchant page.--> | |||
| [[Elshimo Lowlands]] | |||
| {{#section:Elshimo Lowlands/Regional Merchants|table}} | |||
|- | |||
| | |||
| | |||
| | |||
|- | |- | ||
|[[Fauregandi]] | |||
| | |||
*[[Beaugreens]] 90 - 110 | *[[Beaugreens]] 90 - 110 | ||
*[[Faerie Apple]] 39 - 48 | *[[Faerie Apple]] 39 - 48 | ||
*[[Maple Log]] 55 - 66 | *[[Maple Log]] 55 - 66 | ||
|[[Rodellieux]]<br>{{Location|Bastok Mines|H-7}} | |||
|[[Vichuel]]<br>{{Location|Northern San d'Oria|F-4}} | |||
|[[Sheia Pohrichamaha]]<br>{{Location|Port Windurst|B-4}} | |||
|- | |- | ||
|[[Gustaberg]] | |||
| | |||
*[[Sulfur]] 703 - 795 | *[[Sulfur]] 703 - 795 | ||
*[[Popoto]] 43 - 49 | *[[Popoto]] 43 - 49 | ||
*[[Rye Flour]] 36 - 41 | *[[Rye Flour]] 36 - 41 | ||
*[[Eggplant]] 40 - 45 | *[[Eggplant]] 40 - 45 | ||
|[[Evelyn]]<br>{{Location|Port Bastok|J-7}} | |||
|[[Apairemant]]<br>{{Location|Southern San d'Oria|K-8}} | |||
|[[Nya Labiccio]]<br>{{Location|Windurst Woods|H-10}} | |||
|- | |- | ||
|[[Kolshushu]] | |||
| | |||
*[[Mhaura Garlic]] 73 - 83 | *[[Mhaura Garlic]] 73 - 83 | ||
*[[Yagudo Cherry]] 40 - 45 | *[[Yagudo Cherry]] 40 - 45 | ||
| Line 89: | Line 74: | ||
*[[Buburimu Grape]] 184 - 208 | *[[Buburimu Grape]] 184 - 208 | ||
*[[Casablanca]] 1656 - 1872 | *[[Casablanca]] 1656 - 1872 | ||
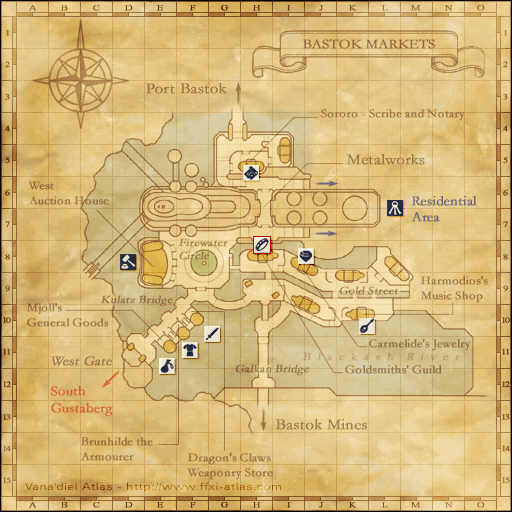
|[[Yafafa]]<br>{{Location|Bastok Markets|I-5}} | |||
|[[Fiva]]<br>{{Location|Port San d'Oria|G-6}} | |||
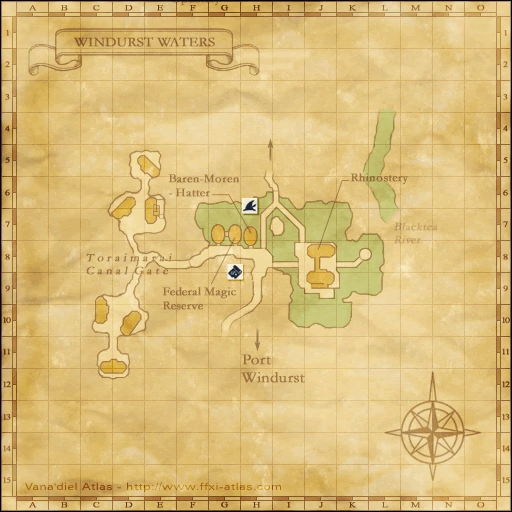
|[[Ahyeekih]]<br>{{Location|Windurst Waters|map=North|H-10}} | |||
|- | |- | ||
|[[Kuzotz]] | |||
| | |||
*[[Cactuar Needle]] 855 - 967 | *[[Cactuar Needle]] 855 - 967 | ||
*[[Thundermelon]] 299 - 338 | *[[Thundermelon]] 299 - 338 | ||
*[[Watermelon]] 184 - 208 | *[[Watermelon]] 184 - 208 | ||
|[[Vattian]]<br>{{Location|Port Bastok|G-6}} | |||
|[[Patolle]]<br>{{Location|Port San d'Oria|G-9}} | |||
|[[Nhobi Zalkia]]<br>{{Location|Windurst Woods|G-8}} | |||
|- | |- | ||
|[[Li'Telor]] | |||
| | |||
*[[Bay Leaves]] 119 - 135 | *[[Bay Leaves]] 119 - 135 | ||
*[[Holy Water]] 6440 - 7280 | *[[Holy Water]] 6440 - 7280 | ||
|[[Galdeo]]<br>{{Location|Bastok Mines|E-6}} | |||
|[[Attarena]]<br>{{Location|Northern San d'Oria|M-9}} | |||
|[[Otete]]<br>{{Location|Windurst Waters|map=South|J-8}} | |||
|- | |- | ||
|[[Movalpolos]] | |||
| | |||
*[[Movalpolos Water]] 736 - 832 | *[[Movalpolos Water]] 736 - 832 | ||
*[[Copper Ore]] 11 - 14 | *[[Copper Ore]] 11 - 14 | ||
| Line 117: | Line 102: | ||
*[[Coral Fungus]] 694 - 785 | *[[Coral Fungus]] 694 - 785 | ||
*[[Kopparnickel]] 6500 - 7800 | *[[Kopparnickel]] 6500 - 7800 | ||
|[[Bagnobrok]]<br>{{Location|Port Bastok|I-6}} | |||
|[[Vendavoq]]<br>{{Location|Port San d'Oria|H-9}} | |||
|[[Prestapiq]]<br>{{Location|Windurst Waters|map=North|G-7}} | |||
|- | |- | ||
|[[Norvallen]] | |||
| | |||
*[[Arrowwood Log]] 18 - 20 | *[[Arrowwood Log]] 18 - 20 | ||
*[[Crying Mustard]] 25 - 29 | *[[Crying Mustard]] 25 - 29 | ||
*[[Blue Peas]] 25 - 29 | *[[Blue Peas]] 25 - 29 | ||
*[[Ash Log]] 88 - 99 | *[[Ash Log]] 88 - 99 | ||
|[[Mille]]<br>{{Location|Bastok Mines|G-6}} | |||
|[[Machielle]]<br>{{Location|Southern San d'Oria|G-9}} | |||
|[[Posso Ruhbini]]<br>{{Location|Port Windurst|D-7}} | |||
|- | |- | ||
|[[Qufim]] | |||
| | |||
*[[Magic Pot Shard]] 4121 - 4659 | *[[Magic Pot Shard]] 4121 - 4659 | ||
|[[Takiyah]]<br>{{Location|Metalworks|I-8}} | |||
|[[Eugballion]]<br>{{Location|Northern San d'Oria|H-8}} | |||
|[[Millerovieunet]]<br>{{Location|Windurst Woods|J-12}} | |||
|- | |- | ||
|[[Ronfaure]] | |||
| | |||
*[[San d'Orian Carrot]] 29 - 33 | *[[San d'Orian Carrot]] 29 - 33 | ||
*[[San d'Orian Grape]] 69 - 79 | *[[San d'Orian Grape]] 69 - 79 | ||
*[[Chestnut]] 110 - 124 | *[[Chestnut]] 110 - 124 | ||
*[[San d'Oria Flour]] 55 - 62 | *[[San d'Oria Flour]] 55 - 62 | ||
|[[Faustin]]<br>{{Location|Bastok Mines|J-9}} | |||
|[[Corua]]<br>{{Location|Southern San d'Oria|G-9}} | |||
|[[Jourille]]<br>{{Location|Windurst Waters|map=North|J-9}} | |||
|- | |- | ||
|[[Sarutabaruta]] | |||
| | |||
*[[Rarab Tail]] 22 - 24 | *[[Rarab Tail]] 22 - 24 | ||
*[[Lauan Log]] 33 - 37 | *[[Lauan Log]] 33 - 37 | ||
| Line 155: | Line 140: | ||
*[[Saruta Orange]] 29 - 33 | *[[Saruta Orange]] 29 - 33 | ||
*[[Windurstian Tea Leaves]] 18 - 20 | *[[Windurstian Tea Leaves]] 18 - 20 | ||
|[[Somn-Paemn]]<br>{{Location|Bastok Markets|H-9}} | |||
|[[Milva]]<br>{{Location|Port San d'Oria|H-7}} | |||
|[[Baehu-Faehu]]<br>{{Location|Windurst Waters|map=North|G-5}} | |||
|- | |- | ||
|[[Tavnazian Archipelago]] | |||
| | |||
*[[Apple Mint]] 290 - 316 | *[[Apple Mint]] 290 - 316 | ||
*[[Ground Wasabi]] 1945 - 2387 | *[[Ground Wasabi]] 1945 - 2387 | ||
*[[Lufaise Fly]] 99 - 108 | *[[Lufaise Fly]] 99 - 108 | ||
*[[Misareaux Parsley]] 233-283 | *[[Misareaux Parsley]] 233-283 | ||
|[[Emaliveulaux]]<br>{{Location|Bastok Mines|G-6}}<br>Only available to those with [[CoP]] Ch. 4 or higher. | |||
|[[Deguerendars]]<br>{{Location|Port San d'Oria|G-8}}<br>Only available to those with [[CoP]] Ch. 4 or higher. | |||
|[[Alizabe]]<br>{{Location|Port Windurst|D-6}}<br>Only available to those with [[CoP]] Ch. 4 or higher. | |||
|- | |- | ||
|[[Valdeaunia]] | |||
| | |||
*[[Frost Turnip]] 29 - 33 | *[[Frost Turnip]] 29 - 33 | ||
*[[Sage]] 170 - 192 | *[[Sage]] 170 - 192 | ||
|[[Tibelda]]<br>{{Location|Bastok Mines|G-6}} | |||
|[[Palguevion]]<br>{{Location|Port San d'Oria|G-8}} | |||
|[[Zoreen]]<br>{{Location|Port Windurst|M-7}} | |||
|- | |- | ||
|[[Vollbow]] | |||
| | |||
*[[Rock Salt]] 14 - 16 | *[[Rock Salt]] 14 - 16 | ||
*[[Fish Scales]] 88 - 99 | *[[Fish Scales]] 88 - 99 | ||
*[[Chamomile]] 119 - 135 | *[[Chamomile]] 119 - 135 | ||
*[[Sweet William]] 1656 - 1872 | *[[Sweet William]] 1656 - 1872 | ||
|[[Aulavia]]<br>{{Location|Bastok Mines|G-7}} | |||
|[[Millechuca]]<br>{{Location|Northern San d'Oria|L-9}} | |||
|[[Lebondur]]<br>{{Location|Port Windurst|F-6}} | |||
|- | |- | ||
|[[Zulkheim]] | |||
| | |||
*[[Giant Sheep Meat]] 44 - 49 | *[[Giant Sheep Meat]] 44 - 49 | ||
*[[Dried Marjoram]] 44 - 49 | *[[Dried Marjoram]] 44 - 49 | ||
| Line 196: | Line 181: | ||
*[[La Theine Cabbage]] 22 - 24 | *[[La Theine Cabbage]] 22 - 24 | ||
*[[Selbina Milk]] 55 - 62 | *[[Selbina Milk]] 55 - 62 | ||
|[[Rosswald]]<br>{{Location|Port Bastok|J-7}} | |||
|[[Phamelise]]<br>{{Location|Southern San d'Oria|K-9}} | |||
|[[Bin Stejihna]]<br>{{Location|Windurst Woods|G-8}} | |||
|} | |} | ||
[http://ffxi.somepage.com/regional-merchants.php Source 1] | [http://ffxi.somepage.com/regional-merchants.php Source 1] | ||
[http://chelestra.com/merchant.html Source 2] | [http://chelestra.com/merchant.html Source 2] | ||
Latest revision as of 17:36, 30 October 2023
There are three regional merchants for each region, with one merchant located in each of the competing nations: Bastok, San d'Oria, and Windurst. These merchants only have goods to sell when their nation controls the importing region, as shown by the Region Map. For example, if San d'Oria controls the region of Aragoneu, Antonian in San d'Oria will be the only regional merchant for Aragoneu to have goods for sale that week. If the Beastmen control a region, that region's goods will not be available at any of the three merchants until a city gains control.
Your fame will affect the pricing of these vendors - the higher your fame, the lower the price.
To check which regions a city controls, check the Region Info (by going to the menu and selecting Region Info or typing /rmap ). The regions are represented by the icon of the city that owns it. If it is controlled by Beastmen then it is represented by a blue dot.
Many of the goods sold by regional merchants are also sold elsewhere. As a general rule, the lowest price for an item sold by an NPC is from a regional merchant if the character purchasing the item has high fame in the city where the regional merchant is located.
The regional merchants added with the Chains of Promathia expansion are a bit different from the rest. The merchants representing the region of Tavnazian Archipelago only sell items to characters who have advanced through the missions of that expansion; a character must be at chapter 4 or above in the Promathia missions to buy goods from them. The regional merchants for Movalpolos sell to anyone, but also within the dungeon of Oldton Movalpolos is the Outpost Merchant Bartabaq, who sells some of the same goods as the regional merchants for Movalpolos, but will only sell to characters that are from the nation which controls the Movalpolos region that week.
Test Section
| Region | Goods | Bastok Merchant | San d'Oria Merchant | Windurst Merchant | ||||||||
|---|---|---|---|---|---|---|---|---|---|---|---|---|
| Elshimo Uplands |
|
Dhen Tevryukoh Port Bastok (I-6) |
Bonmaurieut Port San d'Oria (H-9) |
Sattsuh Ahkanpari Port Windurst (M-4) |
Merchants per Region
Pages in category "Regional Merchants"
The following 54 pages are in this category, out of 54 total.
