Promathia Mission 3-3: Difference between revisions
From HorizonXI Wiki
(Created page with "{{Mission Header |Mission Name=Road Forks |Expansion=Chains of Promathia |Start= |Description=To capture the mysterious boy, you must first locate the fourth mothercrystal. To do this, you have been ordered to travel to the nations of Bastok, Windurst, and San d'Oria to learn of the Multinational Expedition that was held nearly thirty years ago. |Level=70+ (solo) |Repeatable= |Previous=Vessel Without a Captain |Next=Tending Aged Wounds |Title= |Reward= |Image= }} ==Walk...") Tag: visualeditor-wikitext |
No edit summary |
||
| (7 intermediate revisions by 2 users not shown) | |||
| Line 1: | Line 1: | ||
{{Mission Header | {{Mission Header | ||
|Mission Name=Road Forks | |Mission Name=Road Forks | ||
| Line 21: | Line 22: | ||
;Vicissitudes (3-3A1) | ;Vicissitudes (3-3A1) | ||
*Enter [[Northern San d'Oria]] to start this leg of the mission. You will receive a cutscene as soon as you zone in. | *Enter [[Northern San d'Oria]] to start this leg of the mission. You will receive a cutscene as soon as you zone in. | ||
*Talk to [[Arnau]], the priest giving sermons in the Cathedral's main hall. | *Talk to [[Arnau]] [[Northern San d'Oria]]({{Location Tooltip | ||
*Talk to [[Chasalvige]] in the Manuscript Room (off to the the left side as you enter the Cathedral; Chasalvige is on the dais in front of you as you enter the room.). | | area = Northern San d'Oria | ||
| pos = M-6 | |||
}}), the priest giving sermons in the Cathedral's main hall. | |||
*Talk to [[Chasalvige]] [[Northern San d'Oria]] ({{Location Tooltip | |||
| area = Northern San d'Oria | |||
| pos = L-6 | |||
}}) in the Manuscript Room (off to the the left side as you enter the Cathedral; Chasalvige is on the dais in front of you as you enter the room.). | |||
;Descendents of a Line Lost (3-3A2) | ;Descendents of a Line Lost (3-3A2) | ||
*Go to [[Carpenters' Landing]] via the | *Go to [[Carpenters' Landing]] via the entrance in [[Jugner Forest]] at ({{Location Tooltip | ||
| area = Jugner Forest | |||
| pos = E-6 | |||
}}). Look for a NPC called [[Guilloud]] located at ({{Location Tooltip | |||
| area = Carpenters' Landing | |||
| pos = H-10 | |||
}}) beside a boulder. Talking to him will spawn a [[:category:Morbols|Morbol]] [[NM]] named [[Overgrown Ivy]]. | |||
:*Overgrown Ivy can use the two-hour ability [[Hundred Fists]]. | :*Overgrown Ivy can use the two-hour ability [[Hundred Fists]]. | ||
:* Those at the general base level for this mission (level 40 or so) may wish to consider partying (perhaps even forming an [[Alliance]]) or bringing higher-level help for fighting this NM. | :* Those at the general base level for this mission (level 40 or so) may wish to consider partying (perhaps even forming an [[Alliance]]) or bringing higher-level help for fighting this NM. | ||
;Louverance (3-3A3) | ;Louverance (3-3A3) | ||
*After defeating [[Overgrown Ivy]], talk to [[Guilloud]] again. (If you zone before speaking to Guilloud, then you will have to fight the NM again.) Then head to [[Southern San d'Oria]] and speak to [[Hinaree]] on the second floor of the manor at (B-6). | *After defeating [[Overgrown Ivy]], talk to [[Guilloud]] again. (If you zone before speaking to Guilloud, then you will have to fight the NM again.) Then head to [[Southern San d'Oria]] and speak to [[Hinaree]] on the second floor of the manor at ({{Location Tooltip | ||
| area = Southern San d'Oria | |||
| pos = B-6 | |||
}}). | |||
This ends the [[San d'Oria]]n leg. | This ends the [[San d'Oria]]n leg. | ||
==== 3-3B: Windurst Route: "Memories of a Maiden" ==== | ==== 3-3B: Windurst Route: "Memories of a Maiden" ==== | ||
;Comedy of Errors (Act I)(3-3B1) | ;Comedy of Errors (Act I)(3-3B1) | ||
*Enter | *Enter {{Location Tooltip | ||
*Head to [[Rhinostery]]'s right-hand room (J-9) and talk to [[Ohbiru-Dohbiru]]. | | area = Windurst Waters | ||
*Next, go to [[Windurst Walls]] and talk to [[Yoran-Oran]] at his house (E-5). You may need to speak to him a few times before you get the cutscene. | | map = South | ||
*Go back to [[Windurst Waters]] | }} to start this leg of the mission. You will receive a cutscene upon zoning in. | ||
*Head to [[Rhinostery]]'s right-hand room located at [[Windurst Waters|Windurst Waters South]] ({{Location Tooltip | |||
| area = Windurst Waters | |||
| map = South | |||
| pos = J-9 | |||
}}) and talk to [[Ohbiru-Dohbiru]]. | |||
*Next, go to [[Windurst Walls]] and talk to [[Yoran-Oran]] at his house ({{Location Tooltip | |||
| area = Windurst Walls | |||
| pos = E-5 | |||
}}). You may need to speak to him a few times before you get the cutscene. | |||
*Go back to [[Windurst Waters|Windurst Waters North]] and head for the Timbers Tavern located at ({{Location Tooltip | |||
| area = Windurst Waters | |||
| map = North | |||
| pos = F-10 | |||
}}) and talk to [[Kyume-Romeh]]. | |||
;Comedy of Errors (Act II)(3-3B2) | ;Comedy of Errors (Act II)(3-3B2) | ||
*Go to the house of [[Honoi-Gomoi]] from the back entrance | *Go to the house of [[Honoi-Gomoi]] from the back entrance in [[Windurst Waters|Windurst Waters South]] located at ({{Location Tooltip | ||
*Return to [[Windurst Walls]] and speak to [[Yoran-Oran]] again to learn the method for repairing the mirror. | | area = Windurst Waters | ||
*Enter [[Attohwa Chasm]] through the [[Maze of Shakhrami]]. | | map = South | ||
:*While on this part of the mission, consider obtaining a [[Flaxen Pouch]] from Jakaka at (G-10), near the zone entrance. Trading this to the "Cradle of Rebirth" that you will visit later on will give you an item tradeable back to Jakaka for a [[Key Item]] that will grant access to the BC area [[Boneyard Gully]]. You do not need this for access later in the Promathia missions. Access will be granted because of the Promathia Missions. | | pos = E-7 | ||
*Head to the East section, then work your way to (K-8) and find a target called "Loose Sand." Checking the target will spawn an [[Antlion]]-type [[NM]] named [[Lioumere]]. | }}). Talk to him to receive the [[Key Item]] [[Cracked Mimeo Mirror]]. | ||
*Return to [[Windurst Walls]] ({{Location Tooltip | |||
| area = Windurst Walls | |||
| pos = E-5 | |||
}}) and speak to [[Yoran-Oran]] again to learn the method for repairing the mirror. | |||
*Enter [[Attohwa Chasm]] through the [[Maze of Shakhrami]] ({{Location Tooltip | |||
| area = Maze of Shakhrami | |||
| map = Map 1 | |||
| pos = F-4 | |||
}}). | |||
:*While on this part of the mission, consider obtaining a [[Flaxen Pouch]] from Jakaka at ({{Location Tooltip | |||
| area = Attohwa Chasm | |||
| pos = G-10 | |||
}}), near the zone entrance. Trading this to the "Cradle of Rebirth" that you will visit later on will give you an item tradeable back to Jakaka for a [[Key Item]] that will grant access to the BC area [[Boneyard Gully]]. You do not need this for access later in the Promathia missions. Access will be granted because of the Promathia Missions. | |||
*Head to the East section, then work your way to ({{Location Tooltip | |||
| area = Attohwa Chasm | |||
| pos = K-8 | |||
}}) and find a target called "Loose Sand." Checking the target will spawn an [[Antlion]]-type [[NM]] named [[Lioumere]]. | |||
:*A tank is recommended to spawn the NM with, as the Lioumere will use Pit Ambush on the spawning member as it appears. [[Sneak]]ing the tank to avoid initial aggro will not work in this instance. | :*A tank is recommended to spawn the NM with, as the Lioumere will use Pit Ambush on the spawning member as it appears. [[Sneak]]ing the tank to avoid initial aggro will not work in this instance. | ||
:*The Lioumere will "lose" all hate and return to its [[Spawn Point]] after it uses a special ability. If the Lioumere is allowed to return to its [[Spawn Point]], it will recover ''all'' HP. The antlion is susceptible to [[Bind]], [[Gravity]], and [[Sleep]]. | :*The Lioumere will "lose" all hate and return to its [[Spawn Point]] after it uses a special ability. If the Lioumere is allowed to return to its [[Spawn Point]], it will recover ''all'' HP. The antlion is susceptible to [[Bind]], [[Gravity]], and [[Sleep]]. | ||
| Line 51: | Line 98: | ||
::*By pulling back and to the left, you can force Lioumere through a small gap in the rocks and turn him around to ensure you can get a hit in as he tries to move through you. It is also an excellent idea if you're a melee job to use your Adventuring Fellow, as they can attack Lioumere when he's moving and interrupt him, since you can't. | ::*By pulling back and to the left, you can force Lioumere through a small gap in the rocks and turn him around to ensure you can get a hit in as he tries to move through you. It is also an excellent idea if you're a melee job to use your Adventuring Fellow, as they can attack Lioumere when he's moving and interrupt him, since you can't. | ||
*Upon defeating the Lioumere, check the Loose Sand again to get the Key Item [[Mimeo Jewel]]. | *Upon defeating the Lioumere, check the Loose Sand again to get the Key Item [[Mimeo Jewel]]. | ||
*Next, you'll need to climb the convoluted mountain [[Parradamo Tor]]. From obtaining your Jewel, you will have 30 minutes (Earth time) to reach the "Cradle of Rebirth" target on the Tor's summit before the Jewel breaks. | *Next, you'll need to climb the convoluted mountain [[Parradamo Tor]] [[https://www.youtube.com/watch?v=mBhzbWFAccA&ab_channel=Brixy| here is a guide to walk up it from Lioumeres spawn]]. From obtaining your Jewel, you will have 30 minutes (Earth time) to reach the "Cradle of Rebirth" target on the Tor's summit before the Jewel breaks. | ||
*You will be warned at various intervals of the Jewel's status. If you can't get to the top in time (you will receive a message that the Jewel has "grown completely dark and shattered"), you'll have to return to the Loose Sand, obtain a new Mimeo Jewel, without having to fight the NM again, and try to climb again. | *You will be warned at various intervals of the Jewel's status. If you can't get to the top in time (you will receive a message that the Jewel has "grown completely dark and shattered"), you'll have to return to the Loose Sand, obtain a new Mimeo Jewel, without having to fight the NM again, and try to climb again. | ||
:*You will lose the Mimeo Jewel if you disconnect or log off. | :*You will lose the Mimeo Jewel if you disconnect or log off. | ||
| Line 68: | Line 115: | ||
:*[[Third Mimeo Feather]] | :*[[Third Mimeo Feather]] | ||
;Exit Stage Left (3-3B3) | ;Exit Stage Left (3-3B3) | ||
*Return to [[ | *Return to [[Yoran-Oran]] and talk to him at [[Windurst Walls]] ({{Location Tooltip | ||
*Go to [[Port Windurst]] and talk to [[Yujuju]] (M-6): You may need to speak with her twice. | | area = Windurst Walls | ||
*Go to | | pos = E-5 | ||
*Return to [[Windurst Walls]] and talk to [[Yoran-Oran]] again | }}). | ||
*Go to [[Port Windurst]] and talk to [[Yujuju]] at ({{Location Tooltip | |||
| area = Port Windurst | |||
| pos = M-6 | |||
}}): You may need to speak with her twice. | |||
*Go to [[Windurst Waters|Windurst Waters North]] ({{Location Tooltip | |||
| area = Windurst Waters | |||
| map = North | |||
| pos = G-8 | |||
}}) and talk to [[Tosuka-Porika]], inside the [[Optistery]]. | |||
*Return to [[Windurst Walls]] and talk to [[Yoran-Oran]] ({{Location Tooltip | |||
| area = Windurst Walls | |||
| pos = E-5 | |||
}}) again | |||
The Windurstian leg of the mission is now complete. | The Windurstian leg of the mission is now complete. | ||
| Line 79: | Line 139: | ||
[[category:Missions]] | [[category:Missions]] | ||
[[Category:Chains of Promathia Missions]] | [[Category:Chains of Promathia Missions]] | ||
__NOTOC__ | |||
Latest revision as of 02:15, 12 February 2024
| Road Forks | |
|---|---|
| Series | Chains of Promathia Missions |
| Start | |
| Level Restriction: | Level 70+ (solo) |
| Title | None |
| Repeatable | No |
| Description | To capture the mysterious boy, you must first locate the fourth mothercrystal. To do this, you have been ordered to travel to the nations of Bastok, Windurst, and San d'Oria to learn of the Multinational Expedition that was held nearly thirty years ago. |
| Rewards | |
| None | |
| ← Previous Mission | Next Mission → |
|---|---|
| Vessel Without a Captain | Tending Aged Wounds |
Walkthrough
- This is a long mission, with a lot of legwork and two uncapped NM fights.
- This mission is divided into 2 parts - San d'Oria route and Windurst route. Route details are given below. You can complete the routes in either order, and you can even do them both at the same time.
3-3A: San d'Oria Route: "Emerald Waters"
- Vicissitudes (3-3A1)
- Enter Northern San d'Oria to start this leg of the mission. You will receive a cutscene as soon as you zone in.
- Talk to Arnau Northern San d'Oria(M-6), the priest giving sermons in the Cathedral's main hall.
- Talk to Chasalvige Northern San d'Oria (L-6) in the Manuscript Room (off to the the left side as you enter the Cathedral; Chasalvige is on the dais in front of you as you enter the room.).
- Descendents of a Line Lost (3-3A2)
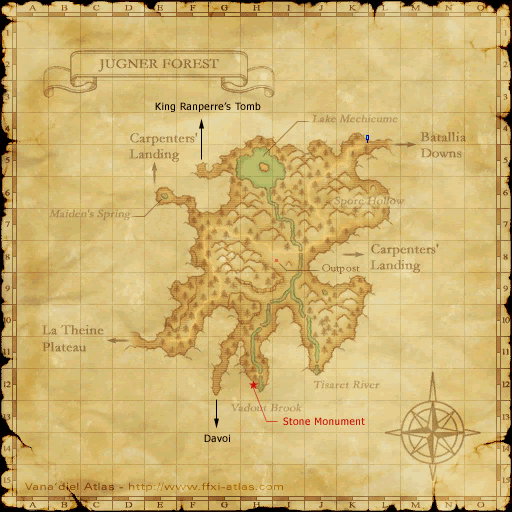
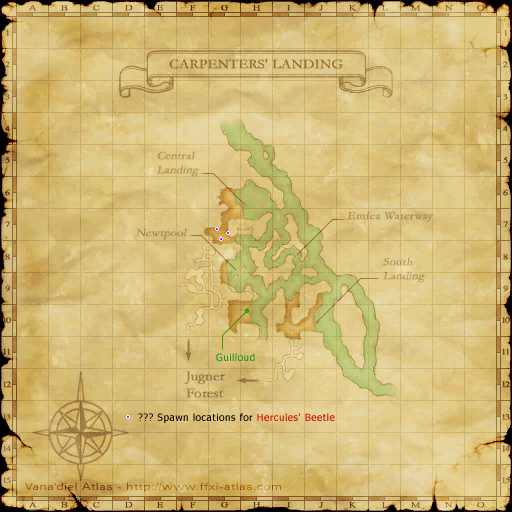
- Go to Carpenters' Landing via the entrance in Jugner Forest at (E-6). Look for a NPC called Guilloud located at (H-10) beside a boulder. Talking to him will spawn a Morbol NM named Overgrown Ivy.
- Overgrown Ivy can use the two-hour ability Hundred Fists.
- Those at the general base level for this mission (level 40 or so) may wish to consider partying (perhaps even forming an Alliance) or bringing higher-level help for fighting this NM.
- Louverance (3-3A3)
- After defeating Overgrown Ivy, talk to Guilloud again. (If you zone before speaking to Guilloud, then you will have to fight the NM again.) Then head to Southern San d'Oria and speak to Hinaree on the second floor of the manor at (B-6).
This ends the San d'Orian leg.
3-3B: Windurst Route: "Memories of a Maiden"
- Comedy of Errors (Act I)(3-3B1)
- Enter Windurst Waters, South to start this leg of the mission. You will receive a cutscene upon zoning in.
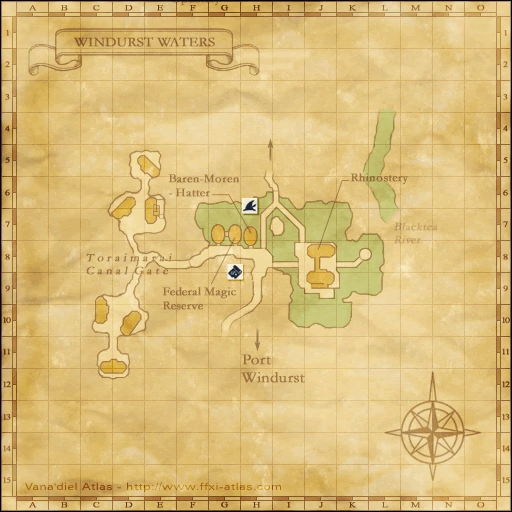
- Head to Rhinostery's right-hand room located at Windurst Waters South (J-9) and talk to Ohbiru-Dohbiru.
- Next, go to Windurst Walls and talk to Yoran-Oran at his house (E-5). You may need to speak to him a few times before you get the cutscene.
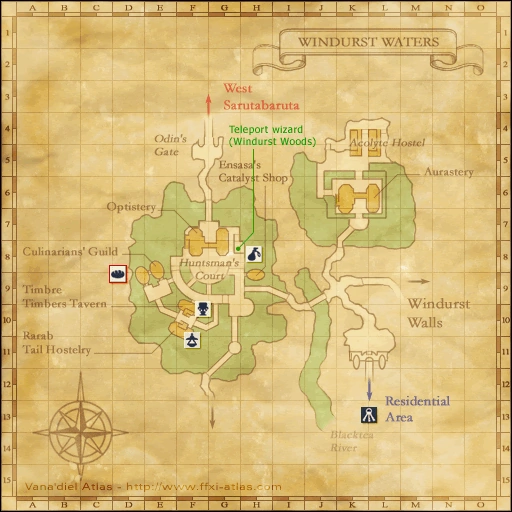
- Go back to Windurst Waters North and head for the Timbers Tavern located at (F-10) and talk to Kyume-Romeh.
- Comedy of Errors (Act II)(3-3B2)
- Go to the house of Honoi-Gomoi from the back entrance in Windurst Waters South located at (E-7). Talk to him to receive the Key Item Cracked Mimeo Mirror.
- Return to Windurst Walls (E-5) and speak to Yoran-Oran again to learn the method for repairing the mirror.
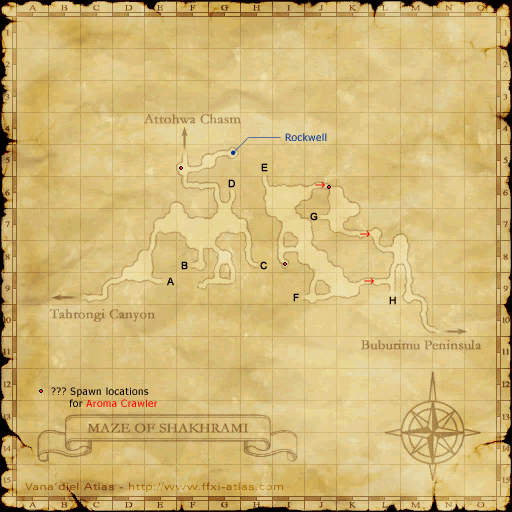
- Enter Attohwa Chasm through the Maze of Shakhrami (F-4).
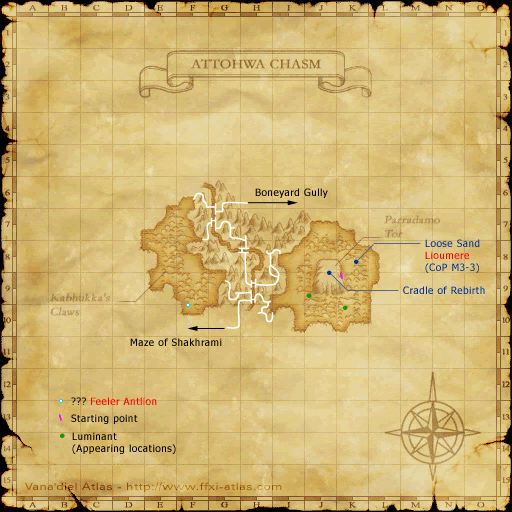
- While on this part of the mission, consider obtaining a Flaxen Pouch from Jakaka at (G-10), near the zone entrance. Trading this to the "Cradle of Rebirth" that you will visit later on will give you an item tradeable back to Jakaka for a Key Item that will grant access to the BC area Boneyard Gully. You do not need this for access later in the Promathia missions. Access will be granted because of the Promathia Missions.
- Head to the East section, then work your way to (K-8) and find a target called "Loose Sand." Checking the target will spawn an Antlion-type NM named Lioumere.
- A tank is recommended to spawn the NM with, as the Lioumere will use Pit Ambush on the spawning member as it appears. Sneaking the tank to avoid initial aggro will not work in this instance.
- The Lioumere will "lose" all hate and return to its Spawn Point after it uses a special ability. If the Lioumere is allowed to return to its Spawn Point, it will recover all HP. The antlion is susceptible to Bind, Gravity, and Sleep.
- The Lioumere can be very easily Stunned, using the spell (and all other known methods, most likely). Stun can be used to buy time for Provoke, making the two a potent combination.
- Spell-voking usually doesn't work, as the Lioumere returns to the spawn point at a rate of movement that places it out of range before most useful magic can be cast.
- Flash is ineffective.
- Pulling the Lioumere as far from the spawn as possible can be known to buy some hate-returning time. (It would be good for a party to ensure that the area they're pulling to is clear of mobs before luring the Lioumere there, however. The Lioumere can link with other antlions.)
- By pulling back and to the left, you can force Lioumere through a small gap in the rocks and turn him around to ensure you can get a hit in as he tries to move through you. It is also an excellent idea if you're a melee job to use your Adventuring Fellow, as they can attack Lioumere when he's moving and interrupt him, since you can't.
- Upon defeating the Lioumere, check the Loose Sand again to get the Key Item Mimeo Jewel.
- Next, you'll need to climb the convoluted mountain Parradamo Tor [here is a guide to walk up it from Lioumeres spawn]. From obtaining your Jewel, you will have 30 minutes (Earth time) to reach the "Cradle of Rebirth" target on the Tor's summit before the Jewel breaks.
- You will be warned at various intervals of the Jewel's status. If you can't get to the top in time (you will receive a message that the Jewel has "grown completely dark and shattered"), you'll have to return to the Loose Sand, obtain a new Mimeo Jewel, without having to fight the NM again, and try to climb again.
- You will lose the Mimeo Jewel if you disconnect or log off.
- On successive runs (unless there is a new member of your party between then and now who has not yet fought Lioumere), you will not need to fight the NM a second time to get a new Jewel.
- The starting point for the climb up is located somewhere around the southeast corner of the Tor near the Loose Sand. The path is very narrow with no natural barriers to keep you on the trail; one wrong step and you will fall off, or onto an earlier part of the path.
- Be very careful with your camera control while on the Tor. It's just as easy to fall off the Tor through a misaligned camera especially around corners as losing your way.
- It is advised to not auto-follow in this situation. This way, if one of your leading members makes a mistake and falls off the Tor (which can be more often than one would think), you will maintain your position on the path.
- While on the Tor, you will be out of aggro range of most (if not all) mobs. (If you're on a path close to the ground, however, you may wish to check mob positions, using Sneak and Invisible if necessary.
- Along the way, you will encounter vents of miasma that block your path, similar to the vents in the area surrounding the Tor itself. Unlike those, however, there are some on the Tor that stop venting for a moment, allowing you (very brief) access.
- To distinguish between a "permanent" or "temporary" vent, wait about one minute while pushing against the vent; if you do not pass through, the vent is permanent. If you encounter a "permanent" vent, it usually indicates that you need to continue by carefully falling off the side of the Tor, landing on a path below. Try to run at an angle with the wall so you keep rubbing against it. This prevents you from getting too far off the narrow path and falling. Be extra careful when crossing the bone bridges as one bad step can cause you to fall.
- The first two vents you will encounter on the proper path are "permanent."
- Try to work your way around the Tor in a counter-clockwise direction until you land on a path very close to the base. Stay on it; as soon as you find a ramp leading upward, climb it, then move clockwise as soon as you get off that ramp until you reach the summit.
- Check the target marked "Cradle of Rebirth" at a crack near the center of the summit. After a brief waiting period, you will obtain the following Key Items:
- Exit Stage Left (3-3B3)
- Return to Yoran-Oran and talk to him at Windurst Walls (E-5).
- Go to Port Windurst and talk to Yujuju at (M-6): You may need to speak with her twice.
- Go to Windurst Waters North (G-8) and talk to Tosuka-Porika, inside the Optistery.
- Return to Windurst Walls and talk to Yoran-Oran (E-5) again
The Windurstian leg of the mission is now complete.
Completing the Mission
- In order to complete the mission, talk to Cid in Bastok Metalworks.

