The Puppet Master: Difference between revisions
From HorizonXI Wiki
mNo edit summary |
(tool tips added) |
||
| Line 14: | Line 14: | ||
==Walkthrough== | ==Walkthrough== | ||
*Go to the [[House of the Hero]] in [[Windurst Walls]] (G-4) and speak to [[Carbuncle]] as a SMN. | *Go to the [[House of the Hero]] in [[Windurst Walls]] ({{Location Tooltip | ||
| text = G-4 | |||
| area = Windurst Walls | |||
| pos = G-4 | |||
| highlight background = transparent | |||
| marker pos x = 12 | |||
| marker pos y = -20 | |||
| marker size = 35 | |||
| marker opacity = 0.4 | |||
| marker background = #5555ff | |||
}}) and speak to [[Carbuncle]] as a SMN. | |||
*'''From this point on, this quest can be complete on any job.''' | *'''From this point on, this quest can be complete on any job.''' | ||
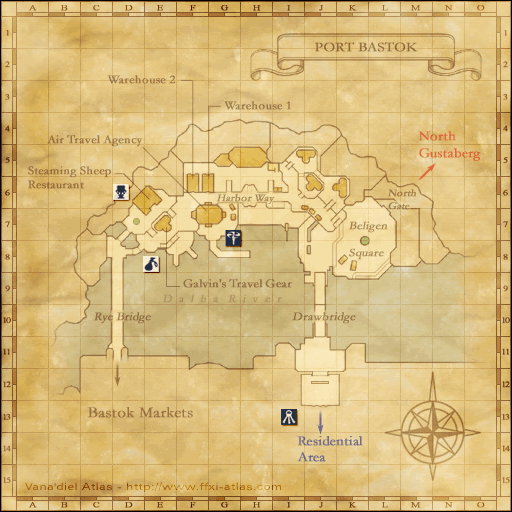
*Go to [[Port Bastok]] (I-8) and talk to [[Juroro]] for a cutscene. [[Ildy-Goldy]] hands you an [[Earth Pendulum]] and tells you to travel to the [[Quicksand Caves]] entrance in [[Eastern Altepa Desert]] (J-7). | *Go to [[Port Bastok]] ({{Location Tooltip | ||
| text = I-8 | |||
| area = Port Bastok | |||
| pos = I-8 | |||
| highlight background = transparent | |||
| marker pos x = 12 | |||
| marker pos y = -15 | |||
| marker size = 35 | |||
| marker opacity = 0.4 | |||
| marker background = #5555ff | |||
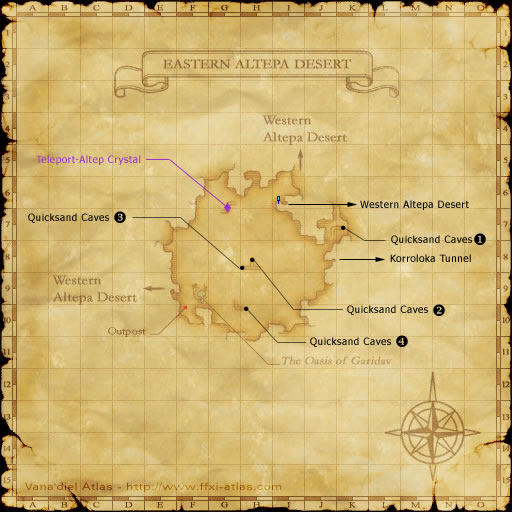
}}) and talk to [[Juroro]] for a cutscene, Juroro is the same NPC for titan. [[Ildy-Goldy]] hands you an [[Earth Pendulum]] and tells you to travel to the [[Quicksand Caves]] entrance in [[Eastern Altepa Desert]] ({{Location Tooltip | |||
| text = J-7 | |||
| area = Eastern Altepa Desert | |||
| pos = J-7 | |||
| highlight background = transparent | |||
| marker pos x = 15 | |||
| marker pos y = 0 | |||
| marker size = 35 | |||
| marker opacity = 0.4 | |||
| marker background = #5555ff | |||
}}). | |||
**The [[Tuning Fork|trial-sized tuning forks]] can be used to reduce travel time if you want to do the fight as SMN. | **The [[Tuning Fork|trial-sized tuning forks]] can be used to reduce travel time if you want to do the fight as SMN. | ||
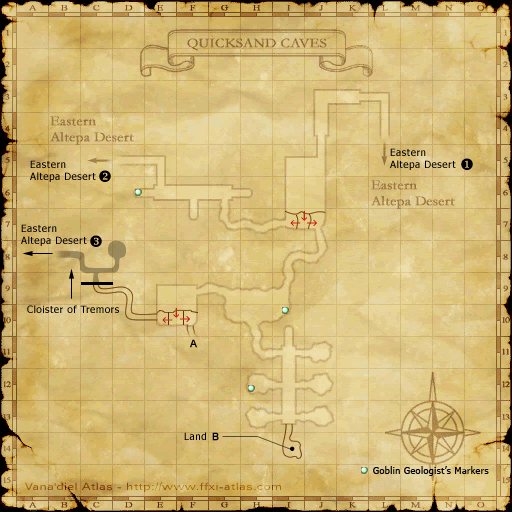
*Within [[Quicksand Caves]], make your way to the [[Cloister of Tremors]] (C-8 | *Within [[Quicksand Caves]], make your way to the [[Cloister of Tremors]] ({{Location Tooltip | ||
| text = C-8 Map 1 | |||
| area = Quicksand Caves | |||
| pos = C-8 | |||
| map = Map 1 | |||
| highlight background = transparent | |||
| marker pos x = 20 | |||
| marker pos y = -10 | |||
| marker size = 35 | |||
| marker opacity = 0.4 | |||
| marker background = #5555ff | |||
}}). and trade the [[Earth Pendulum]] to the Earth Protocrystal. Select The Puppet Master to start the battlefield. | |||
*This is an uncapped BCNM fight, buffs '''do''' wear. You have 30 minutes to kill [[Galgalim]] (a [[:category:Hecteyes|Hecteyes]] NM). | *This is an uncapped BCNM fight, buffs '''do''' wear. You have 30 minutes to kill [[Galgalim]] (a [[:category:Hecteyes|Hecteyes]] NM). | ||
| Line 28: | Line 69: | ||
:*Easily Soloed by SMN 50 | :*Easily Soloed by SMN 50 | ||
*After defeating [[Galgalim]], return to [[Port Bastok]] and speak with [[Juroro]] for another cutscene. | *After defeating [[Galgalim]], return to [[Port Bastok]] and speak with [[Juroro]] ({{Location Tooltip | ||
| text = I-8 | |||
| area = Port Bastok | |||
| pos = I-8 | |||
| highlight background = transparent | |||
| marker pos x = 12 | |||
| marker pos y = -15 | |||
| marker size = 35 | |||
| marker opacity = 0.4 | |||
| marker background = #5555ff | |||
}}). for another cutscene. | |||
**The [[Earth Pendulum]] can be tossed once you have completed the fight. | **The [[Earth Pendulum]] can be tossed once you have completed the fight. | ||
*Finally, return to [[Windurst Walls]] (E-7) and talk to [[Koru-Moru]] to complete the quest and receive your reward. | *Finally, return to [[Windurst Walls]] ({{Location Tooltip | ||
| text = E-7 | |||
| area = Windurst Walls | |||
| pos = E-7 | |||
| highlight background = transparent | |||
| marker pos x = 0 | |||
| marker pos y = 0 | |||
| marker size = 35 | |||
| marker opacity = 0.4 | |||
| marker background = #5555ff | |||
}}) and talk to [[Koru-Moru]] to complete the quest and receive your reward. | |||
**You may get dialogue relating to a different quest. You must speak to him again if he does not give you a cutscene. | **You may get dialogue relating to a different quest. You must speak to him again if he does not give you a cutscene. | ||
[[Category:Quests]][[Category:Windurst Quests]][[Category:Artifact Quests]] | [[Category:Quests]][[Category:Windurst Quests]][[Category:Artifact Quests]] | ||
Revision as of 12:37, 18 February 2024
| The Puppet Master | |
|---|---|
| Starting NPC | Carbuncle - Windurst Walls (G-4) |
| Required Fame | None |
| Items Needed | Earth Pendulum |
| Additional Requirements | Summoner 40+ |
| Title | None |
| Repeatable | Yes |
| Description | According to the words of Carbuncle, the thief that is stealing the avatars' energy from adventurers is currently in Bastok. You must travel to Bastok to confront the situation. |
| Rewards | |
| Kukulcan's Staff | |
| ← Previous Quest | Next Quest → |
|---|---|
| I Can Hear a Rainbow | Class Reunion |
Walkthrough
- Go to the House of the Hero in Windurst Walls (G-4) and speak to Carbuncle as a SMN.
- From this point on, this quest can be complete on any job.
- Go to Port Bastok (I-8) and talk to Juroro for a cutscene, Juroro is the same NPC for titan. Ildy-Goldy hands you an Earth Pendulum and tells you to travel to the Quicksand Caves entrance in Eastern Altepa Desert (J-7).
- The trial-sized tuning forks can be used to reduce travel time if you want to do the fight as SMN.
- Within Quicksand Caves, make your way to the Cloister of Tremors (C-8 Map 1). and trade the Earth Pendulum to the Earth Protocrystal. Select The Puppet Master to start the battlefield.
- This is an uncapped BCNM fight, buffs do wear. You have 30 minutes to kill Galgalim (a Hecteyes NM).
- After defeating Galgalim, return to Port Bastok and speak with Juroro (I-8). for another cutscene.
- The Earth Pendulum can be tossed once you have completed the fight.
- Finally, return to Windurst Walls (E-7) and talk to Koru-Moru to complete the quest and receive your reward.
- You may get dialogue relating to a different quest. You must speak to him again if he does not give you a cutscene.


