Promathia Mission 8-4: Difference between revisions
From HorizonXI Wiki
mNo edit summary |
(added haap points) |
||
| (3 intermediate revisions by 3 users not shown) | |||
| Line 8: | Line 8: | ||
|Level= | |Level= | ||
|Repeatable= | |Repeatable= | ||
|HAAP=2 points | |||
|Previous=When Angels Fall | |Previous=When Angels Fall | ||
|Next=Storms of Fate | |Next=Storms of Fate | ||
| Line 74: | Line 75: | ||
=== Final Cutscenes === | === Final Cutscenes === | ||
Wait until | '''Wait until JP midnight, to finish the following cutscenes for CoP. First, say farewell to some of your companions. You can visit them in any order.''' | ||
;Louverance: | ;Louverance: | ||
:*Head to [[Southern San d'Oria]] and talk to [[Hinaree]] in the Count's Manor ({{Location|Southern San d'Oria|B-6}}) for a cutscene. | :*Head to [[Southern San d'Oria]] and talk to [[Hinaree]] in the Count's Manor ({{Location Tooltip|area=Southern San d'Oria|pos=B-6}}) for a cutscene. | ||
:*Zone into [[Uleguerand Range]] for a cutscene. | :*Zone into [[Uleguerand Range]] for a cutscene. | ||
:*Head to [[Southern San d'Oria]] and approach the Count's Manor ({{Location|Southern San d'Oria|B-6}})for a cutscene. | :*Head to [[Southern San d'Oria]] and approach the Count's Manor ({{Location Tooltip|area=Southern San d'Oria|pos=B-6}}) for a cutscene. | ||
;Chebukkis: | ;Chebukkis: | ||
:*Head to [[Port Windurst]] and talk to [[Chipmy-Popmy]] at the Fishing Guild ({{Location|Port Windurst|C-8}}) for a cutscene. | :*Head to [[Port Windurst]] and talk to [[Chipmy-Popmy]] at the Fishing Guild ({{Location Tooltip|area=Port Windurst|pos=C-8}}) for a cutscene. | ||
:*Head to [[Bibiki Bay - Purgonorgo Isle]] and talk to [[??? Warmachine]] at ({{Location|Bibiki Bay - Purgonorgo Isle|H-11}}) for a cutscene. When it ends you will receive a | :*Head to [[Bibiki Bay - Purgonorgo Isle]] and talk to [[??? Warmachine]] at ({{Location Tooltip|area=Bibiki Bay - Purgonorgo Isle|pos=H-11}}) for a cutscene. When it ends you will receive a [[Colored Drop]] that appears to be random. | ||
;Shikarees: | ;Shikarees: | ||
:*Zone into [[Mhaura]] for a cutscene. | :*Zone into [[Mhaura]] for a cutscene. | ||
| Line 87: | Line 88: | ||
:*Zone into [[Oldton Movalpolos]] for a cutscene. | :*Zone into [[Oldton Movalpolos]] for a cutscene. | ||
;Tenzen: | ;Tenzen: | ||
:*Head to [[Metalworks]] and talk to [[Cid]] at ({{Location|Metalworks|H-8}}) for a cutscene. | :*Head to [[Metalworks]] and talk to [[Cid]] at ({{Location Tooltip|area=Metalworks|pos=H-8}}) for a cutscene. | ||
Once you've talked to all of them: | Once you've talked to all of them: | ||
*Head to [[Ru'Lude Gardens]] and approach the palace for a cutscene. | *Head to [[Ru'Lude Gardens]] and approach the palace for a cutscene. | ||
| Line 94: | Line 95: | ||
:*If you discard your CoP ring, you will be able to obtain one of the three rings again by revisiting the Marble Bridge. If the ring is discarded again, you must wait 27 real life days before you will be able to once again choose and obtain another ring. | :*If you discard your CoP ring, you will be able to obtain one of the three rings again by revisiting the Marble Bridge. If the ring is discarded again, you must wait 27 real life days before you will be able to once again choose and obtain another ring. | ||
*Head to [[Tavnazian Safehold]] and check the Walnut Door (K-7), (upper floor: north) for a cutscene. | *Head to [[Tavnazian Safehold]] and check the Walnut Door (K-7), (upper floor: north) for a cutscene. | ||
*Head to [[Lufaise Meadows]] and approach the Blueblade Fell ({{Location|Lufaise Meadows|J-6}}) for the final fullscreen cutscene. | *Head to [[Lufaise Meadows]] and approach the Blueblade Fell ({{Location Tooltip|area=Lufaise Meadows|pos=J-6}}) for the final fullscreen cutscene. | ||
:*Additional note: [[Distant Worlds]] will play during the final cutscene. Also, it may be a good idea if you have [[Fomor Hate|fomor hate]] to cast Sneak or use a Silent Oil prior to viewing the cutscene--a party of VT-to-75 fomor spawn at Blueblade Fell and can kill you when the cutscene ends. (Invisible will wear off as soon as you enter the cutscene, but Sneak will not. Casting Sneak before approaching the edge of Blueblade Fell will ensure your safety should you exit the cutscene during the night.) | :*Additional note: [[Distant Worlds]] will play during the final cutscene. Also, it may be a good idea if you have [[Fomor Hate|fomor hate]] to cast Sneak or use a Silent Oil prior to viewing the cutscene--a party of VT-to-75 fomor spawn at Blueblade Fell and can kill you when the cutscene ends. (Invisible will wear off as soon as you enter the cutscene, but Sneak will not. Casting Sneak before approaching the edge of Blueblade Fell will ensure your safety should you exit the cutscene during the night.) | ||
*After the cutscene, the title '''Banisher of Emptiness''' will be awarded and both the [[Storms of Fate]] and [[Requiem of Sin]] quests become available. | *After the cutscene, the title '''Banisher of Emptiness''' will be awarded and both the [[Storms of Fate]] and [[Requiem of Sin]] quests become available. | ||
Latest revision as of 10:02, 23 June 2024
Warning! The information on this page has not been verified to be 100% accurate for the Horizon server. Please remove this warning if it can be verified.
| Dawn | |
|---|---|
| Series | Chains of Promathia Missions |
| Start | Al'Taieu |
| Title | Banisher of Emptiness, Averter of the Apocalypse |
| Repeatable | No |
| HAAP | 2 points |
| Description | Revelations of truth accompany the awakening of Promathia. The world and its people stand in the twilight of the apocalypse. Dawn Goddess Altana, grant us victory! |
| Rewards | |
| Rajas Ring or Sattva Ring or Tamas Ring, Mog Wardrobe 2: 5 Slots 2000 Experience points (once per day, upon completing the BC) | |
| ← Previous Mission | Next Mission → |
|---|---|
| When Angels Fall | Storms of Fate |
Walkthrough
- Zone into Al'Taieu for a cutscene.
- Return to The Garden of Ru'Hmet and pass through the Cermet Portal to get to the main garden elevator. Choose to descend from the first floor and zone into the Empyreal Paradox. Check the Transcendental Radiance for a cutscene and then check it again to enter the battleground.
- All buffs and TP are removed upon entering the fight.
- You will now face Promathia himself. The time limit for the battle is 30 minutes.
- Prishe and Selh'teus will appear to help. They will generally take care of themselves, but Prishe can be healed if she draws aggro. If she's KO'd, you can cast Raise on her and she will go back to fighting with full HP and no weakness. Selh'teus cannot be healed by players, but has several abilities he can use to heal himself. If Selh'teus is KO'd, the battle immediately ends and the party will be removed from the battlefield.
- In addition to this, if the entire party is KO'd at any point during the fight, they will be immediately removed from the battlefield. The game will not allow you the usual 3 minutes for someone to get back up like it typically does in other battlefields. Because of this, you cannot fully wipe and Reraise to recover if needed; one party member must always remain alive.
- Promathia has two forms. Once you beat the first form, you can rest before engaging the second form, though eventually Prishe gets tired of waiting and runs in.
- Promathia has low evasion.
- Upon defeating Promathia's second form, every living party member (including those doing it for the first time) will receive 2000 Experience Points or Limit Points.
First form
- Promathia's first form has about 8000 HP. It uses the following special attacks:
- Empty Salvation: AoE (range 25?) damage (~250) and Dispel 3 effects
- Pestilent Penance: Cone Attack damage (~400) and Plague
- Malevolent Blessing: Cone Attack damage (400-500) and Curse
- Infernal Deliverance: AoE (targeted?) damage and Stun, ignores Utsusemi
- Chains of (Apathy, Arrogance, Cowardice, Envy and Rage): No effect, due to the lights from the mothercrystals.
- Comet (Spell): Single-target magic damage (600-900). Can be absorbed by Utsusemi.
- Prishe fights along with you.
- She uses a Daedalus Wing when you start to fight.
- She uses the Auroral Uppercut Weapon Skill, which is rather weak (23 damage).
- She also casts Divine Magic nukes on Promathia and Cures herself and the party.
- Selh'teus fights along with you a bit too.
- His Luminous Lance attack does a bit of damage and stuns Promathia for about 25 seconds.
Second form
- Promathia's second form has about 12000 HP. It uses the following special attacks:
- Empty Salvation, Pestilent Penance, Malevolent Blessing, Infernal Deliverance as above
- Seal of Quiescence: AoE Silence, lasts up to 75 seconds. It cannot be healed by things like Silena or Echo Drops, you must wait it out.
- Winds of Oblivion: AoE Amnesia (disable Job Abilities and Weapon Skills), lasts up to 75 seconds.
- Meteor (spell): AoE magic damage (300-600)
- He casts this once a minute; it takes 10 seconds to cast, which is plenty of time to run out of range.
- Bastion of Twilight: Magic Shield effect
- Wheel of Impregnability: Invincible effect
- You can tell which shield is up by looking at the big ring below Promathia. Red is physical, green is magic.
- Prishe continues to fight beside you.
- She eats Ambrosia when you start to fight.
- This time she uses Nullifying Dropkick, which breaks Promathia's shields.
- She continues to nuke Promathia and Cure herself and the party.
- After a while (4m15?), she uses a Carnal Incense and Hundred Fists.
- She can also use Benediction if she's in trouble.
- Selh'teus continues to fight against the second form.
- His Luminous Lance attack does a bit of damage and stuns Promathia for about 25 seconds.
- His Revelation attack just does damage(?).
- If he gets in trouble, he has Rejuvenation and Redemption moves that give HP, MP, and TP to him and any party members that may be near him.
- Strategy tips
-
- Kiting Promathia is a good way to avoid most of his damaging attacks.
- In particular, if you have hate when he starts casting Meteor, run away from him so that his casting fails, like with King Behemoth.
- This is the single most important thing for winning the BC.
- In particular, if you have hate when he starts casting Meteor, run away from him so that his casting fails, like with King Behemoth.
- Watch out for Prishe and she will watch out for you.
- Both of Promathia's forms can be Straight Tanked by a War/nin without Haste gear, using Luck and Skill.
- Kiting Promathia is a good way to avoid most of his damaging attacks.
Final Cutscenes
Wait until JP midnight, to finish the following cutscenes for CoP. First, say farewell to some of your companions. You can visit them in any order.
- Louverance
-
- Head to Southern San d'Oria and talk to Hinaree in the Count's Manor (B-6) for a cutscene.
- Zone into Uleguerand Range for a cutscene.
- Head to Southern San d'Oria and approach the Count's Manor (B-6) for a cutscene.
- Chebukkis
-
- Head to Port Windurst and talk to Chipmy-Popmy at the Fishing Guild (C-8) for a cutscene.
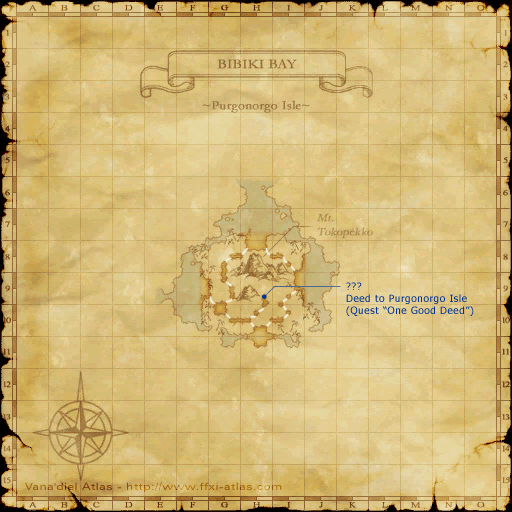
- Head to Bibiki Bay - Purgonorgo Isle and talk to ??? Warmachine at (H-11) for a cutscene. When it ends you will receive a Colored Drop that appears to be random.
- Shikarees
-
- Zone into Mhaura for a cutscene.
- Jabbos
-
- Zone into Oldton Movalpolos for a cutscene.
- Tenzen
-
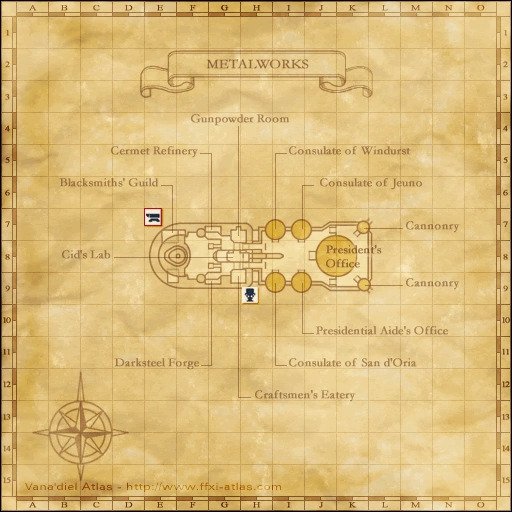
- Head to Metalworks and talk to Cid at (H-8) for a cutscene.
Once you've talked to all of them:
- Head to Ru'Lude Gardens and approach the palace for a cutscene.
- Head to Upper Jeuno and click on the Marble Bridge Eatery door for a cutscene.
- At this point you can click on the Marble Bridge door again to choose one of the three "CoP rings": Rajas Ring, Sattva Ring, or Tamas Ring. You can continue with the cutscenes without making your decision yet.
- If you discard your CoP ring, you will be able to obtain one of the three rings again by revisiting the Marble Bridge. If the ring is discarded again, you must wait 27 real life days before you will be able to once again choose and obtain another ring.
- Head to Tavnazian Safehold and check the Walnut Door (K-7), (upper floor: north) for a cutscene.
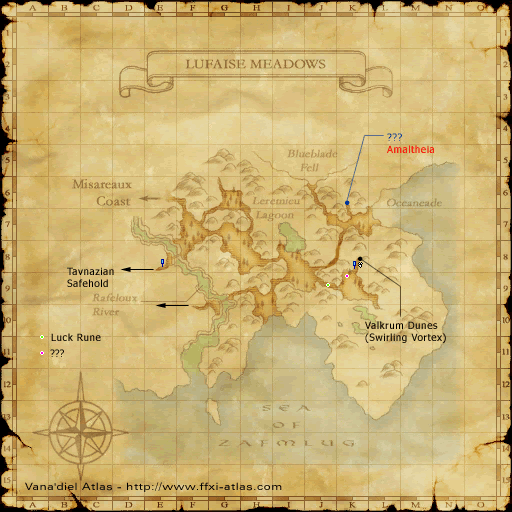
- Head to Lufaise Meadows and approach the Blueblade Fell (J-6) for the final fullscreen cutscene.
- Additional note: Distant Worlds will play during the final cutscene. Also, it may be a good idea if you have fomor hate to cast Sneak or use a Silent Oil prior to viewing the cutscene--a party of VT-to-75 fomor spawn at Blueblade Fell and can kill you when the cutscene ends. (Invisible will wear off as soon as you enter the cutscene, but Sneak will not. Casting Sneak before approaching the edge of Blueblade Fell will ensure your safety should you exit the cutscene during the night.)
- After the cutscene, the title Banisher of Emptiness will be awarded and both the Storms of Fate and Requiem of Sin quests become available.


