Temenos - Northern Tower: Difference between revisions
From HorizonXI Wiki
(Created page with "__NOTOC__ *Temenos - Northern Tower is a subsection of the Temenos zone in the Limbus region. *It is reached via the Teleport-Holla crag entrance to Al'Taieu. *{{KeyItem}}Cosmo-Cleanse and {{KeyItem}}White Card are required for entry. *All monsters in this area use their job's 2-hour ability. *'''You can only open one chest per level.''' The chests spawn in random places. There is no set spot for either chest, and all of them can load in any of the three...") |
(proper header, corrected table and cleaned up text. (loot boxes next, work in progress)) |
||
| (One intermediate revision by one other user not shown) | |||
| Line 1: | Line 1: | ||
__NOTOC__ | __NOTOC__ | ||
<div class="flex-container"> | |||
<div class="flex-container-item-2"> | |||
{| class="horizon-table battlefield-table-border limbus-color" | |||
! colspan="2" | [[Temenos - Northern Tower]] | |||
*'''You can only open one chest per | |- | ||
! class="subheader" valign=top width=20% | '''Zone''' | |||
| [[Temenos]] | |||
|- | |||
*The | ! class="subheader" valign=top | '''Entry Items''' | ||
*The | | {{KeyItem}}[[White Card]]<br/>{{KeyItem}}[[Cosmo-Cleanse]] | ||
*The | |- | ||
! class="subheader" valign=top | '''Entrance''' | |||
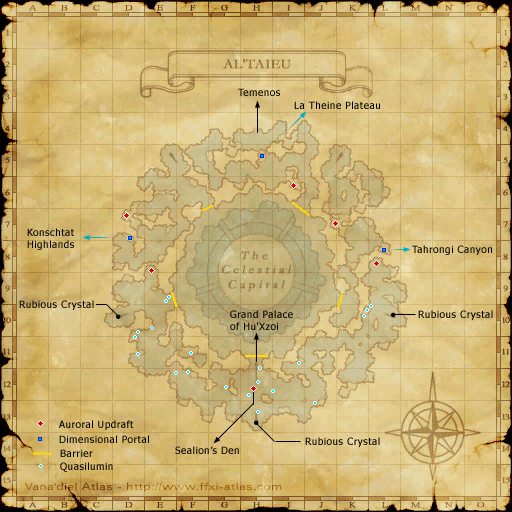
| {{Location|Al'Taieu|H-4}}<br/>(via [[Dimensional Portal]] at the [[Crag of Holla]]) | |||
|- | |||
! class="subheader" valign=top | '''Level''' | |||
| 75 | |||
< | |- | ||
! class="subheader" valign=top | '''Members''' | |||
| 18 | |||
{| class=" | |- | ||
!width= | ! class="subheader" valign=top | '''Time''' | ||
!width= | | 30-120 minutes | ||
!width= | |- | ||
!width= | ! class="subheader" valign=top | '''Completion Reward''' | ||
!width= | | [[Ivory Chip]] | ||
!width= | |} | ||
!width= | {| class="horizon-table battlefield-table-border limbus-color" | ||
!width= | ! colspan="2" | Notes | ||
|- | |||
! class="subheader" valign=top width=20% | '''Chests''' | |||
| | |||
*The mobs on each floor are divided into two groups (see detailed information for each floor below). Killing ''all'' mobs in the 'chest group' will spawn all three chests: '''You can only open one chest per floor.''' | |||
*The chests spawn in random places. There is no set spot for either chest, and all of them can load in any of the three positions. | |||
*The time chest (blue) gives an additional 15 minutes | |||
*The restore chest (brown with silver trim) refillst HP/MP and resets all cooldowns (including 2 hrs). | |||
*The item chest (brown with gold trim) yields 5-7 [[Ancient Beastcoin]]s and 0-2 [[:Category:Temenos Upgrade Items|Artifact Armor +1 Materials]]. | |||
|- | |||
! class="subheader" valign=top | '''Portal''' | |||
| | |||
*The portal to the next floor opens once when ''one'' of the mobs in the 'gate group' is killed. | |||
|- | |||
! class="subheader" valign=top | '''Others''' | |||
| | |||
*Mobs in this area can use the 2hr abilities of their jobs. | |||
|} | |||
</div> | |||
<div class="flex-container-item-2"> | |||
{| class="horizon-table limbus-color center-col-2 center-col-3 center-col-4 center-col-5 center-col-6 center-col-7 center-col-8" | |||
! colspan="8" | [[:Category:Temenos Upgrade Items|Artifact Armor +1 Materials]] | |||
|- | |||
! width=65% | Item (Job) | |||
! width=5% | [[{{PAGENAME}}#First Floor|Floor 1]] | |||
! width=5% | [[{{PAGENAME}}#Second Floor|Floor 2]] | |||
! width=5% | [[{{PAGENAME}}#Third Floor|Floor 3]] | |||
! width=5% | [[{{PAGENAME}}#Fourth Floor|Floor 4]] | |||
! width=5% | [[{{PAGENAME}}#Fifth Floor|Floor 5]] | |||
! width=5% | [[{{PAGENAME}}#Sixth Floor|Floor 6]] | |||
! width=5% | [[{{PAGENAME}}#Seventh Floor|Floor 7]] | |||
|- | |- | ||
! class="subheader" | [[Benedict Silk]] ([[White Mage|WHM]]) | |||
|{{ | | {{checkY}} | ||
|{{ | | {{X}} | ||
|{{ | | {{check}} | ||
|{{ | | {{X}} | ||
|{{ | | {{X}} | ||
|{{ | | {{X}} | ||
|{{ | | {{X}} | ||
|- class="wotg" | |- class="wotg" | ||
! class="subheader" | [[Brilliantine]] ([[Scholar|SCH]]) | |||
|{{ | | {{X}} | ||
|{{ | | {{checkY}} | ||
|{{ | | {{check}} | ||
|{{ | | {{X}} | ||
|{{ | | {{X}} | ||
|{{ | | {{X}} | ||
|{{ | | {{X}} | ||
|- | |- | ||
! class="subheader" | [[Cobalt Mythril Sheet|Cbl. Myth. Sheet]] ([[Dragoon|DRG]]) | |||
|{{ | | {{X}} | ||
|{{ | | {{X}} | ||
|{{ | | {{X}} | ||
|{{ | | {{X}} | ||
|{{ | | {{check}} | ||
|{{ | | {{checkY}} | ||
|{{ | | {{X}} | ||
|- | |- | ||
! class="subheader" | [[Chameleon Yarn]] ([[Ranger|RNG]]) | |||
|{{ | | {{X}} | ||
|{{ | | {{X}} | ||
|{{ | | {{check}} | ||
|{{ | | {{X}} | ||
|{{ | | {{X}} | ||
|{{ | | {{checkY}} | ||
|{{ | | {{X}} | ||
|- | |- | ||
! class="subheader" | [[Coiled Yarn]] ([[Bard|BRD]]) | |||
|{{ | | {{X}} | ||
|{{ | | {{X}} | ||
|{{ | | {{X}} | ||
|{{ | | {{X}} | ||
|{{ | | {{X}} | ||
|{{ | | {{check}} | ||
|{{ | | {{checkY}} | ||
|- | |- | ||
! class="subheader" | [[Dark Orichalcum]] ([[Dark Knight|DRK]]) | |||
|{{ | | {{X}} | ||
|{{ | | {{X}} | ||
|{{ | | {{X}} | ||
|{{ | | {{X}} | ||
|{{ | | {{X}} | ||
|{{ | | {{check}} | ||
|{{ | | {{checkY}} | ||
|- | |- | ||
! class="subheader" | [[Diabolic Silk]] ([[Black Mage|BLM]]) | |||
|{{ | | {{checkY}} | ||
|{{ | | {{X}} | ||
|{{ | | {{X}} | ||
|{{ | | {{check}} | ||
|{{ | | {{X}} | ||
|{{ | | {{X}} | ||
|{{ | | {{X}} | ||
|- | |- | ||
! class="subheader" | [[Ecarlate Cloth]] ([[Warrior|WAR]]) | |||
|{{ | | {{X}} | ||
|{{ | | {{checkY}} | ||
|{{ | | {{X}} | ||
|{{ | | {{X}} | ||
|{{ | | {{check}} | ||
|{{ | | {{X}} | ||
|{{ | | {{X}} | ||
|- class="wotg" | |- class="wotg" | ||
! class="subheader" | [[Filet Lace]] ([[Dancer|DNC]]) | |||
|{{ | | {{checkY}} | ||
|{{ | | {{X}} | ||
|{{ | | {{X}} | ||
|{{ | | {{X}} | ||
|{{ | | {{X}} | ||
|{{ | | {{check}} | ||
|{{ | | {{X}} | ||
|- | |- | ||
! class="subheader" | [[Glittering Yarn]] ([[Summoner|SMN]]) | |||
|{{ | | {{X}} | ||
|{{ | | {{checkY}} | ||
|{{ | | {{X}} | ||
|{{ | | {{check}} | ||
|{{ | | {{X}} | ||
|{{ | | {{X}} | ||
|{{ | | {{X}} | ||
|- class="toau" | |- class="toau" | ||
! class="subheader" | [[Luminian Thread]] ([[Blue Mage|BLU]]) | |||
|{{ | | {{X}} | ||
|{{ | | {{X}} | ||
|{{ | | {{X}} | ||
|{{ | | {{X}} | ||
|{{ | | {{check}} | ||
|{{ | | {{X}} | ||
|{{ | | {{checkY}} | ||
|- class="toau" | |- class="toau" | ||
! class="subheader" | [[Pantin Wire]] ([[Puppetmaster|PUP]]) | |||
|{{ | | {{X}} | ||
|{{ | | {{checkY}} | ||
|{{ | | {{X}} | ||
|{{ | | {{check}} | ||
|{{ | | {{X}} | ||
|{{ | | {{X}} | ||
|{{ | | {{X}} | ||
|- | |- | ||
! class="subheader" | [[Plaited Cord]] ([[Ninja|NIN]]) | |||
|{{ | | {{checkY}} | ||
|{{ | | {{X}} | ||
|{{ | | {{X}} | ||
|{{ | | {{X}} | ||
|{{ | | {{X}} | ||
|{{ | | {{X}} | ||
|{{ | | {{check}} | ||
|- | |- | ||
! class="subheader" | [[Ruby Silk Thread]] ([[Red Mage|RDM]]) | |||
|{{ | | {{X}} | ||
|{{ | | {{checkY}} | ||
|{{ | | {{X}} | ||
|{{ | | {{check}} | ||
|{{ | | {{X}} | ||
|{{ | | {{X}} | ||
|{{ | | {{X}} | ||
|- | |- | ||
! class="subheader" | [[Scarlet Odoshi]] ([[Samurai|SAM]]) | |||
|{{ | | {{X}} | ||
|{{ | | {{checkY}} | ||
|{{ | | {{X}} | ||
|{{ | | {{X}} | ||
|{{ | | {{X}} | ||
|{{ | | {{X}} | ||
|{{ | | {{check}} | ||
|- class="toau" | |- class="toau" | ||
! class="subheader" | [[Silkworm Thread]] ([[Corsair|COR]]) | |||
|{{ | | {{X}} | ||
|{{ | | {{X}} | ||
|{{ | | {{X}} | ||
|{{ | | {{X}} | ||
|{{ | | {{X}} | ||
|{{ | | {{checkY}} | ||
|{{ | | {{check}} | ||
|- | |- | ||
! class="subheader" | [[Smalt Leather]] ([[Beastmaster|BST]]) | |||
|{{ | | {{X}} | ||
|{{ | | {{checkY}} | ||
|{{ | | {{X}} | ||
|{{ | | {{X}} | ||
|{{ | | {{check}} | ||
|{{ | | {{X}} | ||
|{{ | | {{X}} | ||
|- | |- | ||
! class="subheader" | [[Snowy Cermet]] ([[Paladin|PLD]]) | |||
|{{ | | {{X}} | ||
|{{ | | {{checkY}} | ||
|{{ | | {{check}} | ||
|{{ | | {{X}} | ||
|{{ | | {{X}} | ||
|{{ | | {{X}} | ||
|{{ | | {{X}} | ||
|- | |- | ||
! class="subheader" | [[Supple Skin]] ([[Thief|THF]]) | |||
|{{ | | {{X}} | ||
|{{ | | {{X}} | ||
|{{ | | {{X}} | ||
|{{ | | {{X}} | ||
|{{ | | {{X}} | ||
|{{ | | {{check}} | ||
|{{ | | {{checkY}} | ||
|- | |- | ||
! class="subheader" | [[Utopian Gold Thread|Ut. Gold Thread]] ([[Monk|MNK]]) | |||
|{{ | | {{X}} | ||
|{{ | | {{X}} | ||
|{{ | | {{X}} | ||
|{{ | | {{X}} | ||
|{{ | | {{X}} | ||
|{{ | | {{checkY}} | ||
|{{ | | {{check}} | ||
| | |} | ||
| | {| | ||
| {{check}} - high probability | |||
| style="padding-left: 1em; padding-right: 1em;" | {{checkY}} - low probability | |||
| {{x}} - does not drop | |||
|{{ | |||
| | |||
| - | |||
| - | |||
|} | |} | ||
</div></div> | |||
<!-- | |||
*Temenos - Northern Tower is a subsection of the [[Temenos]] zone in the [[Limbus]] region. | |||
*It is reached via the Teleport-Holla crag entrance to Al'Taieu. | |||
*{{KeyItem}}[[Cosmo-Cleanse]] and {{KeyItem}}[[White Card]] are required for entry. | |||
*All monsters in this area use their job's 2-hour ability. | |||
*'''You can only open one chest per level.''' The chests spawn in random places. There is no set spot for either chest, and all of them can load in any of the three positions. | |||
* Most floors have 2 groups of mobs: | |||
**Killing any one of the first group unlocks the gate. | |||
**Killing all of the second group spawns all 3 chests. | |||
*The Time chest is blue, and gives an additional 15 minutes. (Not 5 minutes as indicated on the maps.) | |||
*The Item chest is brown with gold trim, and on the lower 6 levels all have 4-7 [[Ancient Beastcoin]]s and 0-2 [[:Category:Artifact Armor +1|AF+1]] items. | |||
*The Restore chest is brown with silver trim, and refills HP/MP and restores all timers. | |||
*It is possible to win with fewer Time chests if you skip some mobs and go straight for the chest dropper. | |||
<br> | |||
*Typical [[Ancient Beastcoin]] yield: 50 | |||
*Drops AF+1 materials for: BLM, DRG, DRK, MNK, NIN, PLD, RNG, SMN, THF, WAR, WHM<span class="toau">, BLU, COR</span><span class="wotg">, DNC, SCH</span>. | |||
*'''Reward for completion:''' [[Ivory Chip]] | |||
<br><br> | <br><br> | ||
--> | |||
==Walkthrough== | |||
===First Floor=== | ===First Floor=== | ||
[[Image:Temenos-N1.webp|right]] | [[Image:Temenos-N1.webp|right]] | ||
*Enemies: ([[:category:Moblins|Moblins]]) | *Enemies: ([[:category:Moblins|Moblins]]) | ||
**[[Moblin Dustman]] x4 ([[RDM]]) (moving) | **[[Moblin Dustman]] x4 ([[RDM]]) (moving) | ||
**[[Goblin Slaughterman]] x2 ([[WAR]]) ( | ***''Gate Group'': Kill ''one'' to open the portal. | ||
*** About 3/6 drop an [[Ancient Beastcoin]] | **[[Goblin Slaughterman]] x2 ([[WAR]]) (stationary) | ||
***''Chest Group'': Kill ''all'' to spawn the chests. | |||
*The chest dropper is one of the [[Goblin Slaughterman]] in the NW corner OR SE corner. | ** About 3/6 drop an [[Ancient Beastcoin]] | ||
<!--*The chest dropper is one of the [[Goblin Slaughterman]] in the NW corner OR SE corner.--> | |||
* With good timing, it is possible to run past the patrolling RDMs undetected. | * With good timing, it is possible to run past the patrolling RDMs undetected. | ||
* Defeating just the two Slaughtermen may not open the vortex. | <!--* Defeating just the two Slaughtermen may not open the vortex. --> | ||
*[[:Category:Artifact Armor +1|AF+1]] item: [[NIN]], [[THF]], [[MNK]], [[DRG]], [[WHM]]<span class="toau">, [[COR]]</span><span class="wotg">, [[SCH]]</span> | * The chests can spawn at either of the [[Goblin Slaughterman]] locations. | ||
<!--*[[:Category:Artifact Armor +1|AF+1]] item: [[NIN]], [[THF]], [[MNK]], [[DRG]], [[WHM]]<span class="toau">, [[COR]]</span><span class="wotg">, [[SCH]]</span>--> | |||
<br clear=all> | <br clear=all> | ||
===Second Floor=== | ===Second Floor=== | ||
[[Image:Temenos-N2.webp|right]] | [[Image:Temenos-N2.webp|right]] | ||
Enemies: (all [[:category:Gigas|Gigas]]) | *Enemies: (all [[:category:Gigas|Gigas]]) | ||
*[[Kari]] ([[MNK]]) (wandering around the outside, can be pulled without linking) | **[[Kari]] ([[MNK]]) (wandering around the outside, can be pulled without linking) | ||
*[[Beli]] ([[RNG]]) | ***''Gate Group'': Kill to open the portal. | ||
**[[Beli]] ([[RNG]]), [[Thrym]] ([[WAR]]), [[Skadi]] ([[BST]]) | |||
***''Chest Group'': Kill ''all'' to spawn the chests. | |||
** | ***[[Skadi]] may use [[Charm]], which lasts 3 minutes. | ||
* Beli, Thrym, and Skadi automatically together. They | ***[[Beli]], [[Thrym]], and [[Skadi]] automatically together. | ||
*Unlike normal | ***They are susceptible to [[Sleep]]. | ||
* About 3/4 drop an [[Ancient Beastcoin]]. | **Unlike normal [[:Category:Gigas|Gigas]], they also detect by sound. | ||
* The chests appear in the middle of the north room. You just need to kill the center 3 to pop the chests, but [[Kari]] opens the door. | **About 3/4 drop an [[Ancient Beastcoin]]. | ||
*[[:Category:Artifact Armor +1|AF+1]] item: [[MNK]], [[NIN]], [[RNG]], [[THF]], [[PLD]], [[WHM]], [[BLM]], [[SMN]], [[DRG]]<span class="toau">, [[BLU]]</span> | *The chests appear in the middle of the north room. <!--You just need to kill the center 3 to pop the chests, but [[Kari]] opens the door.--> | ||
<!--*[[:Category:Artifact Armor +1|AF+1]] item: [[MNK]], [[NIN]], [[RNG]], [[THF]], [[PLD]], [[WHM]], [[BLM]], [[SMN]], [[DRG]]<span class="toau">, [[BLU]]</span>--> | |||
<br clear=all> | <br clear=all> | ||
===Third Floor=== | ===Third Floor=== | ||
[[Image:Temenos-N3. | [[Image:Temenos-N3.webp|right]] | ||
Enemies: (all [[:category:Sahagin|Sahagin]]) | *Enemies: (all [[:category:Sahagin|Sahagin]]) | ||
*[[Telchines Monk]] x2 (wandering back and forth in the two rooms) | **[[Telchines Monk]] x2 (wandering back and forth in the two rooms)<br/>[[Telchines Dragoon]] (with [[Telchines's Wyvern]], wandering east-west) | ||
***''Gate Group'': Kill ''one'' to open the portal. | |||
**[[Telchines White Mage]] (NE)<br/>[[Telchines Bard]] (NW) | |||
**[[Telchines | ***''Chest Group'': Kill ''all'' to spawn the chests. | ||
**About 2/5 drop an [[Ancient Beastcoin]] | |||
*About 2/5 drop an [[Ancient Beastcoin]] | <!--* The [[Bard]] and/or the [[White Mage]] in the NW/NE corner drops the chests. | ||
* The [[Bard]] and/or the [[White Mage]] in the NW/NE corner drops the chests. | * First kill of the [[Monk]] / [[Dragoon]] group opens the door.--> | ||
* First kill of the [[Monk]] / [[Dragoon]] group opens the door. | <!--* 1-2 [[:Category:Artifact Armor +1|AF+1]] items: [[DRG]], [[MNK]], [[RNG]], [[WHM]], [[WAR]], [[THF]], [[BLM]], [[DRK]], [[SMN]]<span class="toau">, [[COR]]</span><span class="wotg">, [[DNC]]</span>--> | ||
* 1-2 [[:Category:Artifact Armor +1|AF+1]] items: [[DRG]], [[MNK]], [[RNG]], [[WHM]], [[WAR]], [[THF]], [[BLM]], [[DRK]], [[SMN]]<span class="toau">, [[COR]]</span><span class="wotg">, [[DNC]]</span> | *The chest location on the map may not be accurate - the location of each chest is random. | ||
* | |||
The chest location on the map may not be accurate - the location of each chest is random. | |||
<br clear=all> | <br clear=all> | ||
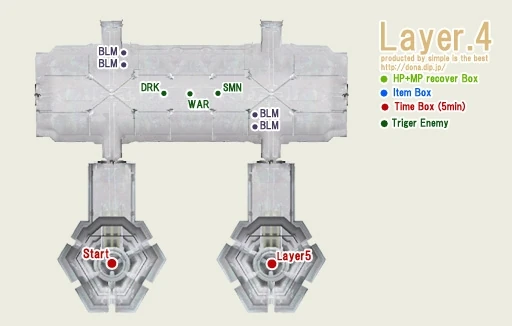
===Fourth Floor=== | ===Fourth Floor=== | ||
[[Image:Temenos-N4.webp|right]] | [[Image:Temenos-N4.webp|right]] | ||
Enemies: (all [[:category:Demons|Demons]]) | *Enemies: (all [[:category:Demons|Demons]]) | ||
*[[Kindred Black Mage]] x4 (2 groups of 2 running along the north and south sides of the room) | **[[Kindred Black Mage]] x4 (2 groups of 2 running along the north and south sides of the room) | ||
*[[Kindred Summoner]] | ***''Gate Group'': Kill ''one'' to open the portal. | ||
*** You can pull the BLMs without linking the DRK, WAR, and SMN. | |||
** | *[[Kindred Summoner]] (with [[Kindred's Elemental]]), [[Kindred Warrior]], [[Kindred Dark Knight]] | ||
*[[Kindred | ***''Chest Group'': Kill ''all'' to spawn the chests. | ||
*** You can not pull from the back to prevent linking, so [[Sleepga]] all mobs and kill the SMN last. | |||
***The [[Kindred Summoner]] can summon a 2nd avatar for [[Astral Flow]]. | |||
* About 4/7 drop an [[Ancient Beastcoin]] | * About 4/7 drop an [[Ancient Beastcoin]] | ||
* The three unique demons are lined up in the center of the room; DRK in front (west), then WAR, then SMN. | <!--* The three unique demons are lined up in the center of the room; DRK in front (west), then WAR, then SMN.--> | ||
* The chests appear in the middle of the room. | * The chests appear in the middle of the room. | ||
* You just need to kill the center 3 to pop the chests. | <!--* You just need to kill the center 3 to pop the chests. | ||
* One of the [[Black Mage]]s will open the door. | * One of the [[Black Mage]]s will open the door.--> | ||
*[[:Category:Artifact Armor +1|AF+1]] item: [[PLD]], [[WHM]], [[DRG]], [[THF]], [[SMN]], [[NIN]], [[BLM]], [[WAR]]<span class="toau">, [[BLU]], [[COR]]</span> | <!--*[[:Category:Artifact Armor +1|AF+1]] item: [[PLD]], [[WHM]], [[DRG]], [[THF]], [[SMN]], [[NIN]], [[BLM]], [[WAR]]<span class="toau">, [[BLU]], [[COR]]</span>--> | ||
<br clear=all> | <br clear=all> | ||
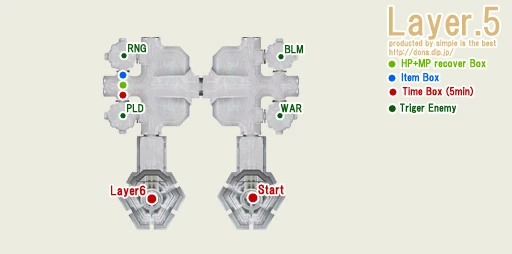
===Fifth Floor=== | ===Fifth Floor=== | ||
[[Image:Temenos-N5.webp|right]] | [[Image:Temenos-N5.webp|right]] | ||
Enemies: ([[:category:Antica|Antica]]) | *Enemies: ([[:category:Antica|Antica]]) | ||
*[[Praetorian Guard CCXX]] ([[WAR]]) (SE room) | **[[Praetorian Guard CCXX]] ([[WAR]]) (SE room)<br/>[[Praetorian Guard LXXIII]] ([[BLM]]) (NE room)<br/>[[Praetorian Guard CXLVIII]] ([[RNG]]) (NW room)<br/>[[Praetorian Guard CCCXI]] ([[PLD]]) (SW room) | ||
***''Gate Group'' and ''Chest Group'': Killing ''one'' opens the portal, killing ''all'' spawns the chests. | |||
***Bring [[Echo Drops]] for [[Jamming Wave]] (range 15). | |||
* Bring [[Echo Drops]] for Jamming Wave (range 15). | |||
* About 2/4 drop an [[Ancient Beastcoin]] | * About 2/4 drop an [[Ancient Beastcoin]] | ||
* The chests appear in the east-west door | * The chests appear in the east-west door. | ||
*[[:Category:Artifact Armor +1|AF+1]] item: [[NIN]], [[THF]], [[BLM]], [[DRG]], [[SMN]], [[PLD]], [[RNG]], [[MNK]]<span class="wotg">, [[SCH]], [[DNC]]</span> | <!--*[[:Category:Artifact Armor +1|AF+1]] item: [[NIN]], [[THF]], [[BLM]], [[DRG]], [[SMN]], [[PLD]], [[RNG]], [[MNK]]<span class="wotg">, [[SCH]], [[DNC]]</span>--> | ||
<br clear=all> | <br clear=all> | ||
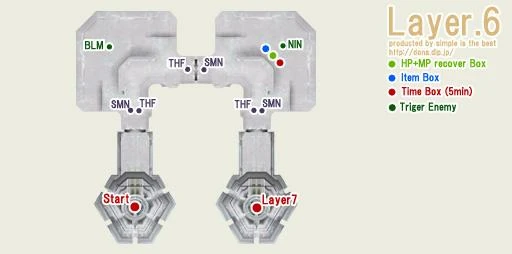
===Sixth Floor=== | ===Sixth Floor=== | ||
[[Image:Temenos-N6.webp|right]] | [[Image:Temenos-N6.webp|right]] | ||
Enemies: ([[:category:Tonberries|Tonberries]]) | *Enemies: ([[:category:Tonberries|Tonberries]]) | ||
*[[Cryptonberry Designator]] x3 ([[SMN]]) ( | **[[Cryptonberry Designator]] x3 ([[SMN]]) (with [[Tonberry's Elemental|Tonberry's Elemental (Light)]]) (wandering)<br/>[[Cryptonberry Abductor]] x3 ([[THF]]) (wandering) | ||
***''Gate Group'': Kill ''one'' to open the portal. | |||
**The avatar summoned for [[Astral Flow]] is random. | ***The avatar summoned by the [[Cryptonberry Designator]]s for [[Astral Flow]] is random. [[Stoneskin]] is your best bet, or not fighting the [[Cryptonberry Designator]]s at all. | ||
***There are two sets of SMN and THF in linked pairs near the doorways. A single THF and a single SMN walk alone between rooms. | |||
*There are two sets of SMN and THF in linked pairs near the doorways. A single THF and a single SMN walk alone between rooms. | <!--**Either the [[Cryptonberry Designator]] or [[Cryptonberry Abductor]] will open the portal. The lone THF is recommended.--> | ||
**Either the [[Cryptonberry Designator]] or [[Cryptonberry Abductor]] will open the portal. The lone THF is recommended. | *[[Cryptonberry Charmer]] ([[BLM]]) (NW)<br/>[[Cryptonberry Skulker]] ([[NIN]]) (NE) | ||
*[[Cryptonberry Charmer]] ([[BLM]]) (NW) | ***''Chest Group'': Kill ''all'' to spawn the chests. | ||
***The [[Cryptonberry Skulker]] uses [[Mijin Gakure]] ([[Distance|range]] 20'). | |||
** | |||
* About 7/8 drop an [[Ancient Beastcoin]] | * About 7/8 drop an [[Ancient Beastcoin]] | ||
* The [[Cryptonberry Skulker]] and/or the [[Cryptonberry Charmer]] in the NE corner drops the chests. | <!--* The [[Cryptonberry Skulker]] and/or the [[Cryptonberry Charmer]] in the NE corner drops the chests.--> | ||
* The easiest way to complete this floor is to run down the first ramp when the [[SMN]] + [[THF]] pair moves away and kill the [[Cryptonberry Charmer]] ([[BLM]]). Then the lone [[Cryptonberry Abductor]] should be pulled and killed when it's close to the alliance. Afterwards, the alliance should move to the other side of the area when the [[Cryptonberry Designator]] moves away and kill the [[Cryptonberry Skulker]]. The last [[Tonberry]] pair can be slept while the alliance proceeds to the next floor. | * The easiest way to complete this floor is to run down the first ramp when the [[SMN]] + [[THF]] pair moves away and kill the [[Cryptonberry Charmer]] ([[BLM]]). Then the lone [[Cryptonberry Abductor]] should be pulled and killed when it's close to the alliance. Afterwards, the alliance should move to the other side of the area when the [[Cryptonberry Designator]] moves away and kill the [[Cryptonberry Skulker]]. The last [[Tonberry]] pair can be slept while the alliance proceeds to the next floor. | ||
*1-2 [[:Category:Artifact Armor +1|AF+1]] items: [[NIN]], [[MNK]], [[PLD]], [[WHM]], [[DRG]], [[WAR]], [[BLM]], [[RNG]]<span class="wotg">, [[SCH]]</span> | <!--*1-2 [[:Category:Artifact Armor +1|AF+1]] items: [[NIN]], [[MNK]], [[PLD]], [[WHM]], [[DRG]], [[WAR]], [[BLM]], [[RNG]]<span class="wotg">, [[SCH]]</span>--> | ||
<br clear=all> | <br clear=all> | ||
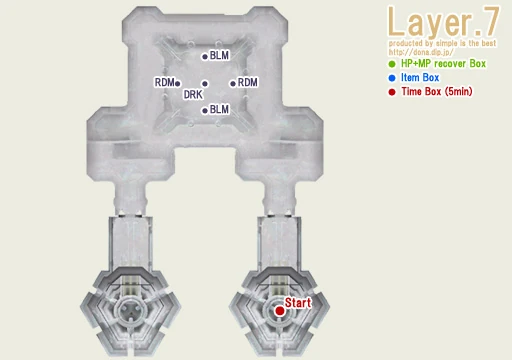
===Seventh Floor=== | ===Seventh Floor=== | ||
[[Image:Temenos-N7.webp|right]] | [[Image:Temenos-N7.webp|right]] | ||
Enemies: ([[:category:Goblins|Goblins]]) | *Enemies: ([[:category:Goblins|Goblins]]) | ||
*[[Goblin Theurgist]] x2 ([[BLM]]) | **[[Goblin Theurgist]] x2 ([[BLM]])<br/>[[Goblin Fencer]] x2 ([[RDM]])<br/>[[Goblin Warlord]] ([[DRK]]) | ||
* All drop 1-2 [[Ancient Beastcoin]]s | * All drop 1-2 [[Ancient Beastcoin]]s | ||
* Cannot pull from the side without linking all the others. | * Cannot pull from the side without linking all the others. | ||
| Line 335: | Line 366: | ||
** A way to avoid casting of an offensive spell on the pull is to run away after sending in your pet so that you are out of casting range when your pet is gone. This doesn't work as well with RDM, since RDM has more buff spells. | ** A way to avoid casting of an offensive spell on the pull is to run away after sending in your pet so that you are out of casting range when your pet is gone. This doesn't work as well with RDM, since RDM has more buff spells. | ||
* The final chest appears in the middle of the room when all the goblins are defeated. | * The final chest appears in the middle of the room when all the goblins are defeated. | ||
** It contains 6 [[Ancient Beastcoin]]s, an [[:Category:Artifact Armor +1|AF+1]] item, the [[Ivory Chip]], and a chance to drop a [[Metal Chip]]. | <!--** It contains 6 [[Ancient Beastcoin]]s, an [[:Category:Artifact Armor +1|AF+1]] item, the [[Ivory Chip]], and a chance to drop a [[Metal Chip]]. | ||
*[[:Category:Artifact Armor +1|AF+1]] item: [[DRG]], [[MNK]], [[THF]], [[WHM]], [[NIN]]<span class="toau">, [[COR]]</span><span class="wotg">, [[SCH]]</span> | *[[:Category:Artifact Armor +1|AF+1]] item: [[DRG]], [[MNK]], [[THF]], [[WHM]], [[NIN]]<span class="toau">, [[COR]]</span><span class="wotg">, [[SCH]]</span>--> | ||
[[Category:Limbus]] | [[Category:Limbus]] | ||
Latest revision as of 22:42, 12 September 2025
| Temenos - Northern Tower | |
|---|---|
| Zone | Temenos |
| Entry Items | |
| Entrance | Al'Taieu (H-4) (via Dimensional Portal at the Crag of Holla) |
| Level | 75 |
| Members | 18 |
| Time | 30-120 minutes |
| Completion Reward | Ivory Chip |
| Notes | |
|---|---|
| Chests |
|
| Portal |
|
| Others |
|
Walkthrough
First Floor
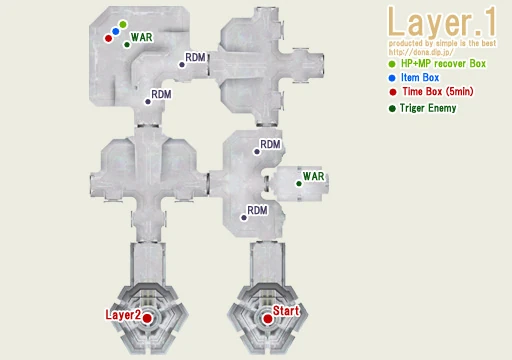
- Enemies: (Moblins)
- Moblin Dustman x4 (RDM) (moving)
- Gate Group: Kill one to open the portal.
- Goblin Slaughterman x2 (WAR) (stationary)
- Chest Group: Kill all to spawn the chests.
- About 3/6 drop an Ancient Beastcoin
- Moblin Dustman x4 (RDM) (moving)
- With good timing, it is possible to run past the patrolling RDMs undetected.
- The chests can spawn at either of the Goblin Slaughterman locations.
Second Floor
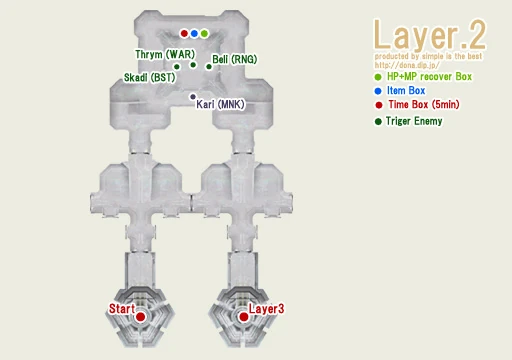
- Enemies: (all Gigas)
- The chests appear in the middle of the north room.
Third Floor
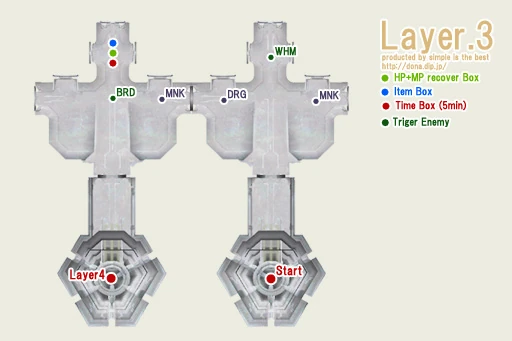
- Enemies: (all Sahagin)
- Telchines Monk x2 (wandering back and forth in the two rooms)
Telchines Dragoon (with Telchines's Wyvern, wandering east-west)- Gate Group: Kill one to open the portal.
- Telchines White Mage (NE)
Telchines Bard (NW)- Chest Group: Kill all to spawn the chests.
- About 2/5 drop an Ancient Beastcoin
- Telchines Monk x2 (wandering back and forth in the two rooms)
- The chest location on the map may not be accurate - the location of each chest is random.
Fourth Floor
- Enemies: (all Demons)
- Kindred Black Mage x4 (2 groups of 2 running along the north and south sides of the room)
- Gate Group: Kill one to open the portal.
- You can pull the BLMs without linking the DRK, WAR, and SMN.
- Kindred Black Mage x4 (2 groups of 2 running along the north and south sides of the room)
- Kindred Summoner (with Kindred's Elemental), Kindred Warrior, Kindred Dark Knight
- Chest Group: Kill all to spawn the chests.
- You can not pull from the back to prevent linking, so Sleepga all mobs and kill the SMN last.
- The Kindred Summoner can summon a 2nd avatar for Astral Flow.
- About 4/7 drop an Ancient Beastcoin
- The chests appear in the middle of the room.
Fifth Floor
- Enemies: (Antica)
- Praetorian Guard CCXX (WAR) (SE room)
Praetorian Guard LXXIII (BLM) (NE room)
Praetorian Guard CXLVIII (RNG) (NW room)
Praetorian Guard CCCXI (PLD) (SW room)- Gate Group and Chest Group: Killing one opens the portal, killing all spawns the chests.
- Bring Echo Drops for Jamming Wave (range 15).
- Praetorian Guard CCXX (WAR) (SE room)
- About 2/4 drop an Ancient Beastcoin
- The chests appear in the east-west door.
Sixth Floor
- Enemies: (Tonberries)
- Cryptonberry Designator x3 (SMN) (with Tonberry's Elemental (Light)) (wandering)
Cryptonberry Abductor x3 (THF) (wandering)- Gate Group: Kill one to open the portal.
- The avatar summoned by the Cryptonberry Designators for Astral Flow is random. Stoneskin is your best bet, or not fighting the Cryptonberry Designators at all.
- There are two sets of SMN and THF in linked pairs near the doorways. A single THF and a single SMN walk alone between rooms.
- Cryptonberry Designator x3 (SMN) (with Tonberry's Elemental (Light)) (wandering)
- Cryptonberry Charmer (BLM) (NW)
Cryptonberry Skulker (NIN) (NE)- Chest Group: Kill all to spawn the chests.
- The Cryptonberry Skulker uses Mijin Gakure (range 20').
- About 7/8 drop an Ancient Beastcoin
- The easiest way to complete this floor is to run down the first ramp when the SMN + THF pair moves away and kill the Cryptonberry Charmer (BLM). Then the lone Cryptonberry Abductor should be pulled and killed when it's close to the alliance. Afterwards, the alliance should move to the other side of the area when the Cryptonberry Designator moves away and kill the Cryptonberry Skulker. The last Tonberry pair can be slept while the alliance proceeds to the next floor.
Seventh Floor
- Enemies: (Goblins)
- Goblin Theurgist x2 (BLM)
Goblin Fencer x2 (RDM)
Goblin Warlord (DRK)
- Goblin Theurgist x2 (BLM)
- All drop 1-2 Ancient Beastcoins
- Cannot pull from the side without linking all the others.
- Can be pet pulled, though as always this can fail if the mob stops to cast before chasing you, giving the others time to link.
- One way to avoid all casting on pulls is to pull a mob right after it casts a buff spell.
- A way to avoid casting of an offensive spell on the pull is to run away after sending in your pet so that you are out of casting range when your pet is gone. This doesn't work as well with RDM, since RDM has more buff spells.
- The final chest appears in the middle of the room when all the goblins are defeated.
