Zilart Mission 5: Difference between revisions
From HorizonXI Wiki
Potatoking90 (talk | contribs) mNo edit summary |
Soldoutshovv (talk | contribs) m Verified Despawn DOES NOT work on Horizon for Lightning fragment. |
||
| (12 intermediate revisions by 5 users not shown) | |||
| Line 1: | Line 1: | ||
{{Mission Header|Expansion=Rise of the Zilart|Start= | {{Mission Header | ||
|Mission Name=Headstone Pilgrimage | |||
|Expansion=Rise of the Zilart | |||
|Start = Grav'iton | |||
|Start Location = {{Location|Sacrificial Chamber}} | |||
|Level=60+ | |||
|Title=Bearer of the Eight Prayers | |||
|Previous=The Temple of Uggalepih | |||
|Next=Through the Quicksand Caves | |||
|Rewards={{KeyItem}}[[Fire Fragment]]<br>{{KeyItem}}[[Earth Fragment]]<br>{{KeyItem}}[[Water Fragment]]<br>{{KeyItem}}[[Wind Fragment]]<br>{{KeyItem}}[[Ice Fragment]]<br>{{KeyItem}}[[Lightning Fragment]]<br>{{KeyItem}}[[Light Fragment]] | |||
|Description=Somewhere on the island of Zepwell lie the remains of an ancient temple. | |||
}} | |||
== Walkthrough == | == Walkthrough == | ||
| Line 5: | Line 16: | ||
* After defeating Zilart Mission 4, Grav'iton tells you that you need to collect eight different fragments from across Vana'diel. | * After defeating Zilart Mission 4, Grav'iton tells you that you need to collect eight different fragments from across Vana'diel. | ||
* To get a fragment, click on the headstone. Make sure to select yes and that '''you see the message''' that says you obtained the key item. | * To get a fragment, click on the headstone. Make sure to select yes and that '''you see the message''' that says you obtained the key item. | ||
* After getting the last fragment, you will see the message '''You now have all 8 fragments of light!'''. This message triggers the beginning of the next mission. | |||
== No Battles == | == No Battles == | ||
| Line 10: | Line 22: | ||
* '''{{KeyItem}}[[Dark Fragment]]:''' This fragment is given to you by Grav'iton when you complete ZM4. | * '''{{KeyItem}}[[Dark Fragment]]:''' This fragment is given to you by Grav'iton when you complete ZM4. | ||
<br> | <br> | ||
* '''{{KeyItem}}[[Ice Fragment]]:''' To get this fragment you need to go to [[Fei'Yin]]. Once you enter, go to ({{Location Tooltip|area=Fei'Yin|map=Map 1|pos=G-9}}) and head downstairs. Go to ({{Location Tooltip|area=Fei'Yin|map=Map 2|pos=I-5}}) to enter the [[Cloister of Frost]]. The headstone is against the wall past the crystal. If you have a level | * '''{{KeyItem}}[[Ice Fragment]]:''' To get this fragment you need to go to [[Fei'Yin]]. Once you enter, go to ({{Location Tooltip|area=Fei'Yin|map=Map 1|pos=G-9}}) and head downstairs. Go to ({{Location Tooltip|area=Fei'Yin|map=Map 2|pos=I-5}}) to enter the [[Cloister of Frost]]. The headstone is against the wall past the crystal. If you have a level 15+ Summoner and sufficient fame for a Mini Tuning Fork of Ice from Castilchat in Northern San d'Oria, you can warp directly to the Ice headstone. | ||
<br> | <br> | ||
* '''{{KeyItem}}[[Water Fragment]]:''' Go to [[La Theine Plateau]] and enter [[Ordelle's Caves]] through the canyon at ({{Location Tooltip|area=La Theine Plateau|pos=F-7}}). | * '''{{KeyItem}}[[Water Fragment]]:''' Go to [[La Theine Plateau]] and enter [[Ordelle's Caves]] through the canyon at ({{Location Tooltip|area=La Theine Plateau|pos=F-7}}). | ||
: Head east down to ({{Location Tooltip|area=Ordelle's Caves|map=Map 2|pos=I-6}}) where you'll switch to another map. Follow the tunnel south-west to ({{Location Tooltip|area=Ordelle's Caves|map=Map 1|pos=G-8}}). At ({{Location Tooltip|area=Ordelle's Caves|map=Map 1|pos=G-8}}) go east and take the south tunnel at ({{Location Tooltip|area=Ordelle's Caves|map=Map 1|pos=H-9}}). Follow the stairs upwards and continue south-ish until H- | : Head east down to ({{Location Tooltip|area=Ordelle's Caves|map=Map 2|pos=I-6}}) where you'll switch to another map. Follow the tunnel south-west to ({{Location Tooltip|area=Ordelle's Caves|map=Map 1|pos=G-8}}). At ({{Location Tooltip|area=Ordelle's Caves|map=Map 1|pos=G-8}}) go east and take the south tunnel at ({{Location Tooltip|area=Ordelle's Caves|map=Map 1|pos=H-9}}). Follow the stairs upwards and continue south-ish until ({{Location Tooltip|area=Ordelle's Caves|map=Map 2|pos=H-12}}). Drop down the hole here. | ||
: Head east to yet another tunnel ('''do not fall off any cliffs here!''') and follow it upwards. When you reach ({{Location Tooltip|area=Ordelle's Caves|map=Map 3|pos=I-6}}), head south. Keep going until ({{Location Tooltip|area=Ordelle's Caves|map=Map 3|pos=H-9}}) where you'll find a tunnel that breaks off to the west. Continue past the bombs to zone into [[La Theine Plateau]] again. | : Head east to yet another tunnel ('''do not fall off any cliffs here!''') and follow it upwards. When you reach ({{Location Tooltip|area=Ordelle's Caves|map=Map 3|pos=I-6}}), head south. Keep going until ({{Location Tooltip|area=Ordelle's Caves|map=Map 3|pos=H-9}}) where you'll find a tunnel that breaks off to the west. Continue past the bombs to zone here ({{Location Tooltip|area=Ordelle's Caves|map=Map 3|pos=G-11}}) into [[La Theine Plateau]] again. | ||
: Wander to the end of the canyon to find the headstone. | : Wander to the end of the canyon to find the headstone. | ||
<br> | <br> | ||
* '''{{KeyItem}}[[Earth Fragment]]:''' Go to ({{Location Tooltip|area=Western Altepa Desert|pos=J-9}}) in [[Western Altepa Desert]] and enter the [[Quicksand Caves]]. Go up to ({{Location Tooltip|area=Quicksand Caves|map=Map 3|pos=K-6}}) and drop down a sand pit (stand in the center and when it blows sand you'll fall). Follow the path until you exit back into [[Western Altepa Desert]]. Make your way to H-8/9 through the tunnels (basically south-west) to | * '''{{KeyItem}}[[Earth Fragment]]:''' Go to ({{Location Tooltip|area=Western Altepa Desert|pos=J-9}}) in [[Western Altepa Desert]] and enter the [[Quicksand Caves]]. Go up to ({{Location Tooltip|area=Quicksand Caves|map=Map 3|pos=K-6}}) and drop down a sand pit (stand in the center and when it blows sand you'll fall). Follow the path until you exit back into [[Western Altepa Desert]]. Make your way to H-8/9 through the tunnels (basically south-west) to the square shaped room at H/I-8. In this room take the path to the south, follow the tunnel South then South-West, and finally to the headstone at the North-East corner of ({{Location Tooltip|area=Western Altepa Desert|pos=H-9}}). | ||
== Battles == | == Battles == | ||
* '''{{KeyItem}}[[Lightning Fragment]]:''' Go to {{Location Tooltip|area=Behemoth's Dominion|pos=G-9}}) in [[Behemoth's Dominion]]. Kill the mobs in the area, and then touch the headstone. Two Weapons will appear: [[Legendary Weapon]] and [[Ancient Weapon]]. Defeat them and get the fragment. '''Note:''' If the person who touches the headstone has Sneak on them, you can pull just one Weapon at a time. If you're lucky, the other one will despawn while you're fighting and you will still be able to get the fragment. However, if it doesn't you need to fight it in order to get the fragment. | * '''{{KeyItem}}[[Lightning Fragment]]:''' Go to {{Location Tooltip|area=Behemoth's Dominion|pos=G-9}}) in [[Behemoth's Dominion]]. Kill the mobs in the area, and then touch the headstone. Two Weapons will appear: [[Legendary Weapon]] and [[Ancient Weapon]]. Defeat them and get the fragment. '''Note:''' If the person who touches the headstone has Sneak on them, you can pull just one Weapon at a time. If you're lucky, the other one will despawn while you're fighting and you will still be able to get the fragment. However, if it doesn't you need to fight it in order to get the fragment.{{Verification}} Possibly not working on Horizon. (Letting one despawn while killing other does not work, they just repop up examining Headstone) | ||
<br> | <br> | ||
* '''{{KeyItem}}[[Fire Fragment]]:''' This one is involved... | * '''{{KeyItem}}[[Fire Fragment]]:''' This one is involved... | ||
| Line 43: | Line 55: | ||
: '''Note:''' While you're at it, if you want a [[Flagellant's Rope]], trade a [[Rain Lily]] to this headstone. | : '''Note:''' While you're at it, if you want a [[Flagellant's Rope]], trade a [[Rain Lily]] to this headstone. | ||
<br> | |||
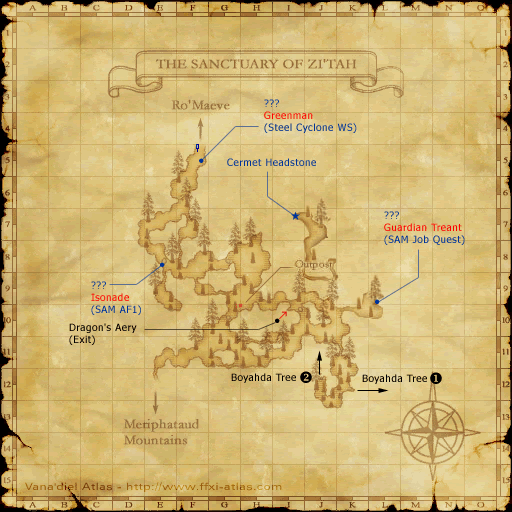
* '''{{KeyItem}}[[Light Fragment]]:''' Go the [[The Sanctuary of Zi'Tah]] and head to ({{Location Tooltip|area=The Sanctuary of Zi'Tah|pos=J-9}}). Follow a path north- | * '''{{KeyItem}}[[Light Fragment]]:''' Go the [[The Sanctuary of Zi'Tah]] and head to ({{Location Tooltip|area=The Sanctuary of Zi'Tah|pos=J-9}}). Follow a path north-ish to ({{Location Tooltip|area=The Sanctuary of Zi'Tah|pos=I-7}}) to find the headstone. When you touch the headstone a Doomed type mob will appear, called [[Doomed Pilgrims]]. He hits hard, so be careful. After he's defeated, get your fragment. **If you can click the headstone shortly after another group has killed, mobs wont spawn. | ||
:: | :: | ||
[[Category:Rise of the Zilart Missions]] | [[Category:Rise of the Zilart Missions]] | ||
[[Category:Missions]] | [[Category:Missions]] | ||
Latest revision as of 09:01, 20 May 2025
| Headstone Pilgrimage | |
|---|---|
| Series | Rise of the Zilart Missions |
| Starting NPC | Grav'iton, Sacrificial Chamber |
| Level Restriction: | Level 60+ |
| Title | Bearer of the Eight Prayers |
| Repeatable | No |
| Description | Somewhere on the island of Zepwell lie the remains of an ancient temple. |
| Rewards | |
| ← Previous Mission | Next Mission → |
|---|---|
| The Temple of Uggalepih | Through the Quicksand Caves |
Walkthrough
- After defeating Zilart Mission 4, Grav'iton tells you that you need to collect eight different fragments from across Vana'diel.
- To get a fragment, click on the headstone. Make sure to select yes and that you see the message that says you obtained the key item.
- After getting the last fragment, you will see the message You now have all 8 fragments of light!. This message triggers the beginning of the next mission.
No Battles
 Dark Fragment: This fragment is given to you by Grav'iton when you complete ZM4.
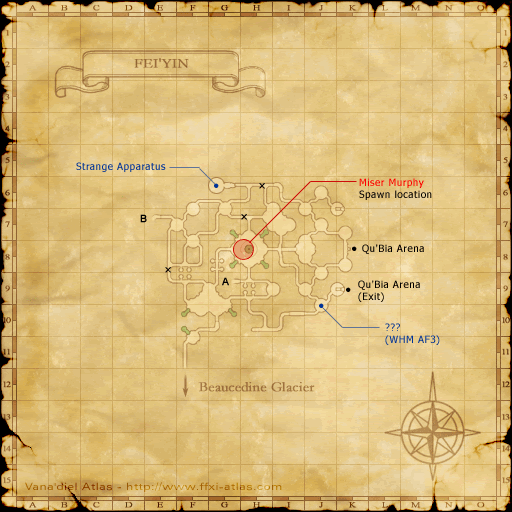
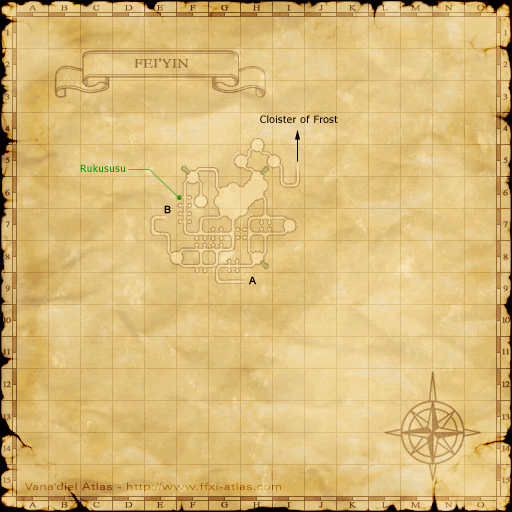
 Ice Fragment: To get this fragment you need to go to Fei'Yin. Once you enter, go to (G-9) and head downstairs. Go to (I-5) to enter the Cloister of Frost. The headstone is against the wall past the crystal. If you have a level 15+ Summoner and sufficient fame for a Mini Tuning Fork of Ice from Castilchat in Northern San d'Oria, you can warp directly to the Ice headstone.
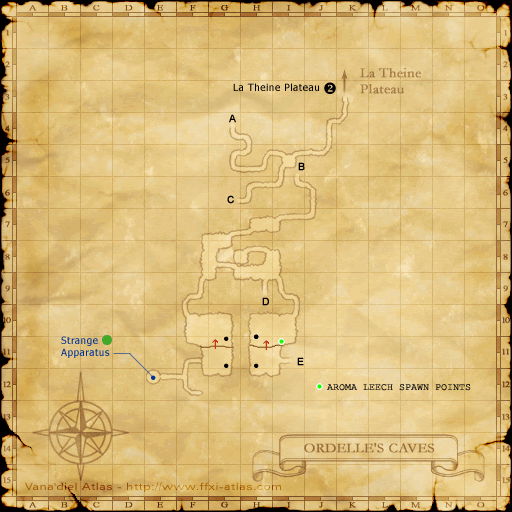
 Water Fragment: Go to La Theine Plateau and enter Ordelle's Caves through the canyon at (F-7).
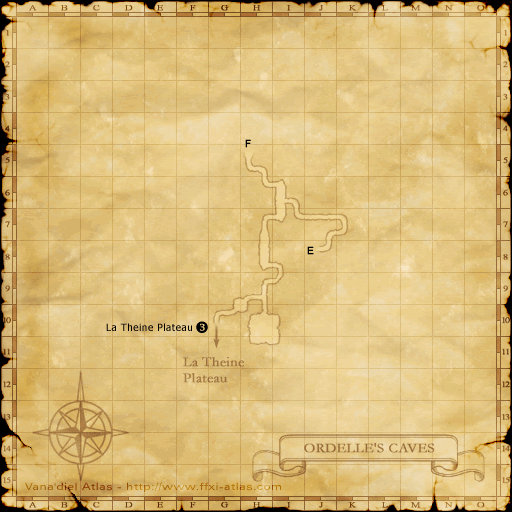
- Head east down to (I-6) where you'll switch to another map. Follow the tunnel south-west to (G-8). At (G-8) go east and take the south tunnel at (H-9). Follow the stairs upwards and continue south-ish until (H-12). Drop down the hole here.
- Head east to yet another tunnel (do not fall off any cliffs here!) and follow it upwards. When you reach (I-6), head south. Keep going until (H-9) where you'll find a tunnel that breaks off to the west. Continue past the bombs to zone here (G-11) into La Theine Plateau again.
- Wander to the end of the canyon to find the headstone.
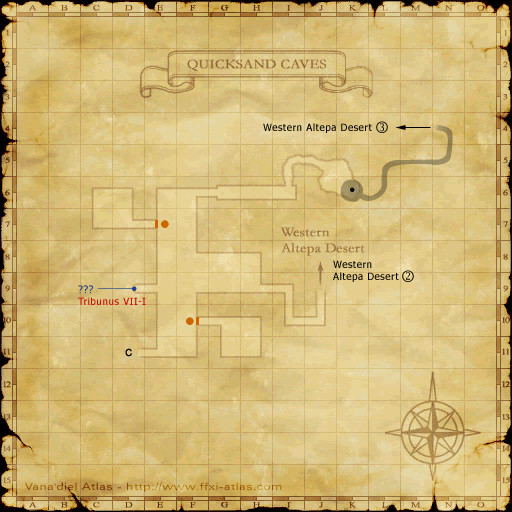
 Earth Fragment: Go to (J-9) in Western Altepa Desert and enter the Quicksand Caves. Go up to (K-6) and drop down a sand pit (stand in the center and when it blows sand you'll fall). Follow the path until you exit back into Western Altepa Desert. Make your way to H-8/9 through the tunnels (basically south-west) to the square shaped room at H/I-8. In this room take the path to the south, follow the tunnel South then South-West, and finally to the headstone at the North-East corner of (H-9).
Battles
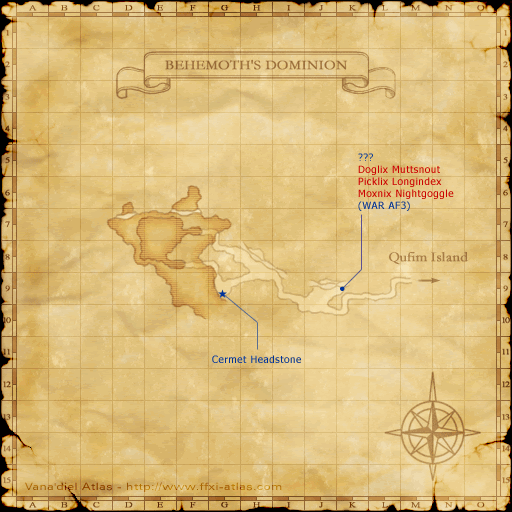
 Lightning Fragment: Go to G-9) in Behemoth's Dominion. Kill the mobs in the area, and then touch the headstone. Two Weapons will appear: Legendary Weapon and Ancient Weapon. Defeat them and get the fragment. Note: If the person who touches the headstone has Sneak on them, you can pull just one Weapon at a time. If you're lucky, the other one will despawn while you're fighting and you will still be able to get the fragment. However, if it doesn't you need to fight it in order to get the fragment.
 Possibly not working on Horizon. (Letting one despawn while killing other does not work, they just repop up examining Headstone)
 Fire Fragment: This one is involved...
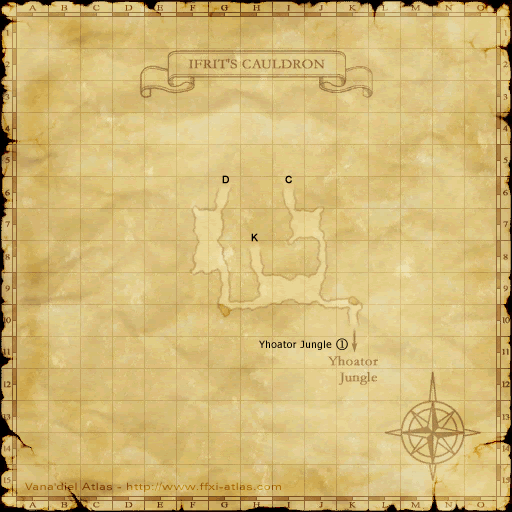
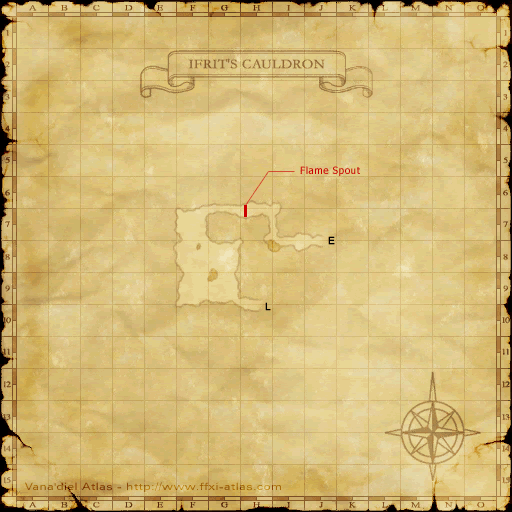
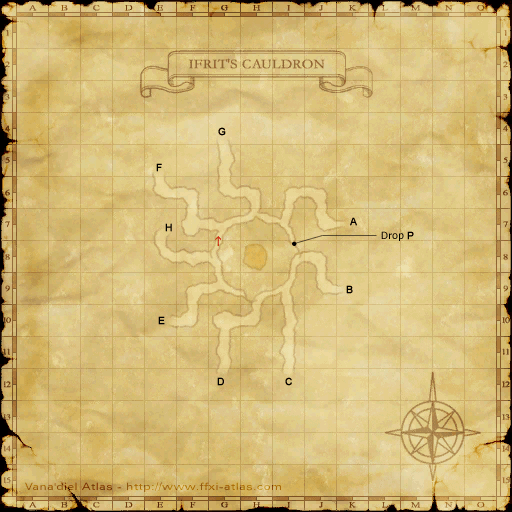
- Another tip: once you zone into Ifrit's Cauldron and have gone to H-8, just follow the left wall the entire rest of the way until you zone back out. Otherwise, you can follow the directions below.
- Enter Ifrit's Cauldron from Yhoator Jungle, at (G-6).
- On Map 4 - Venture to (H-8) to get to Map 7.
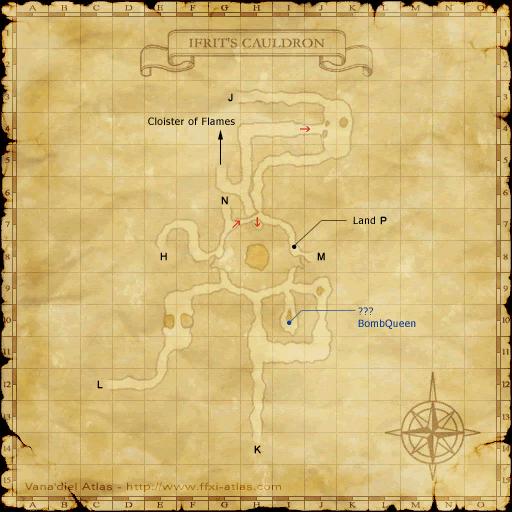
- On Map 7 - Go to (D-12) to get to Map 5.
- On Map 5 - Head to (J-8) to get to Map 2.
- There will be a Flame Spout in the way at (H-6)/(H-7). Trade an Ice Cluster to the spout, or wait for them to go down on their own approximately every 5 minutes (3 hours game time). They are only passable for ~30s, so keep an eye on it.
- On Map 2 - Go to (E-7) to get back to Map 7.
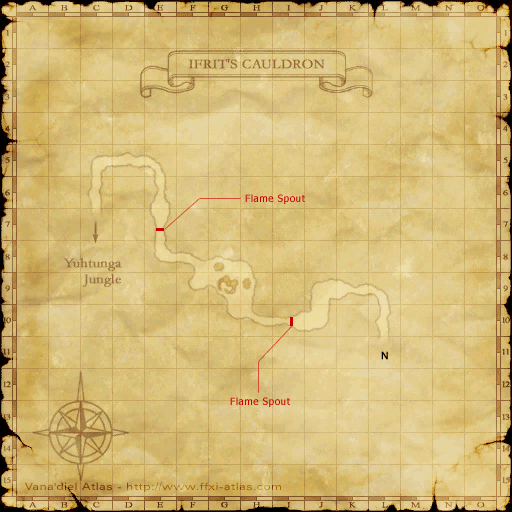
- On Map 7 - Go to (G-7) to get to Map 8.
- On Map 8 - Follow the tunnel all the way to (C-7), where you exit to that closed-off northeastern part of Yuhtunga Jungle.
- There are two Flame Spouts on the way. Trade an Ice Cluster to the spout, or wait for them to go down on their own approximately every 5 minutes (3 hours game time). They are only passable for ~30s, so keep an eye on it.
- Be alert of the Ash Dragon near the end (before the last Flame Spout). It has a wide sight and sound detection range and uses Draw In. Time it right and you can walk into the tunnel without a problem when it is far enough from the entrance.
- You're almost there! Now in Yuhtunga Jungle, exit the tunnel, turn left, and enter another tunnel keeping straight to find the Cermet Headstone located at (L-7). There are a few tunnels you can enter so if you can't find the one with the headstone, check the others until you do.
- Two Opo-Opo will spawn when you touch the headstone: Carthi and Tipha. They both aggro. Defeat them and get your fragment.
- Note: While you're at it, if you want an Opo-opo Necklace, trade a Garnet to this headstone.
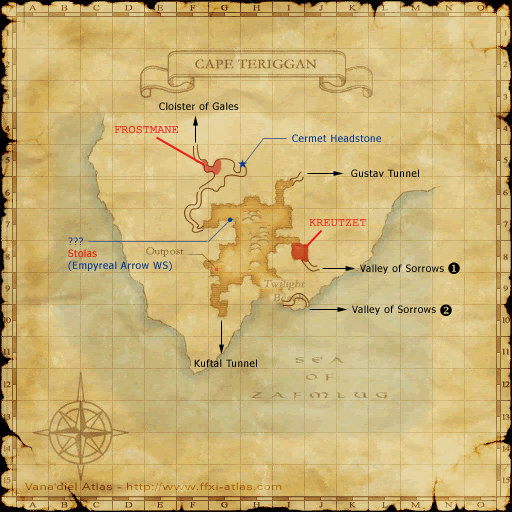
 Wind Fragment: Go to (F-7) in Cape Teriggan to find a secret tunnel. Follow this tunnel north out into the open again. Then go to another tunnel at (G-5). Follow it back to find the head stone at (H-5). A Shadow called Axesarion the Wanderer will spawn when you touch the headstone. Beware of Goblins that wander around here.
- Note: While you're at it, if you want a Flagellant's Rope, trade a Rain Lily to this headstone.
 Light Fragment: Go the The Sanctuary of Zi'Tah and head to (J-9). Follow a path north-ish to (I-7) to find the headstone. When you touch the headstone a Doomed type mob will appear, called Doomed Pilgrims. He hits hard, so be careful. After he's defeated, get your fragment. **If you can click the headstone shortly after another group has killed, mobs wont spawn.
