Temenos - Eastern Tower: Difference between revisions
From HorizonXI Wiki
put information into header and began horizon table styling (work in progress) |
af+1 materials drop chart now according to asb (page still work in progress, put construction tag on it until finished) |
||
| Line 1: | Line 1: | ||
__NOTOC__ | __NOTOC__ | ||
{{construction}} | |||
<div class="flex-container"> | <div class="flex-container"> | ||
<div class="flex-container-item-2"> | <div class="flex-container-item-2"> | ||
| Line 31: | Line 32: | ||
! class="subheader" valign=top width=20% | '''Chests''' | ! class="subheader" valign=top width=20% | '''Chests''' | ||
| | | | ||
*Each level has 4 [[:category:Elementals|Elementals]], each of which drops an [[Armoury Crate]] | *Each level has 4 [[:category:Elementals|Elementals]], each of which drops an [[Armoury Crate]]: one time chest (15 minutes), one restore chest, and 2 items chests per floor. | ||
*Opening a chest causes the remaining Elementals and any other chests on that floor to despawn, and also opens the portal to the next level. | *Opening a chest causes the remaining Elementals and any other chests on that floor to despawn, and also opens the portal to the next level. | ||
*One of the two | *One of the two items chests on any given floor is "fake", and contains a [[Mystic Avatar]] of the floor's element. Opening this chest will despawn the remaining Elementals, but not any chests that are already on the ground. The remaining chests will lock until the avatar is defeated, at which point you will be permitted to open one of the other chests to open the gate to the next level. If no other chests are present, the gate will automatically open upon the avatar's defeat. | ||
(''see [[Talk:Temenos - Eastern Tower#Chest Strategies|Chest Stratgies]])'' | (''see [[Talk:Temenos - Eastern Tower#Chest Strategies|Chest Stratgies]])'' | ||
| Line 60: | Line 60: | ||
</div> | </div> | ||
<div class="flex-container-item-2"> | <div class="flex-container-item-2"> | ||
{| class="horizon-table limbus-color center-col-2 center-col-3 center-col-4 center-col-5 center-col-6" | {| class="horizon-table limbus-color center-col-2 center-col-3 center-col-4 center-col-5 center-col-6 center-col-7 center-col-8" | ||
! colspan="8" | [[:Category:Apollyon Upgrade Items|Artifact Armor +1 Materials]] | ! colspan="8" | [[:Category:Apollyon Upgrade Items|Artifact Armor +1 Materials]] | ||
|- | |- | ||
! width=65% | Item (Job) | ! width=65% | Item (Job) | ||
! width=5% | Floor 1 | ! width=5% | [[{{PAGENAME}}#First Floor|Floor 1]] | ||
! width=5% | Floor 2 | ! width=5% | [[{{PAGENAME}}#Second Floor|Floor 2]] | ||
! width=5% | Floor 3 | ! width=5% | [[{{PAGENAME}}#Third Floor|Floor 3]] | ||
! width=5% | Floor 4 | ! width=5% | [[{{PAGENAME}}#Fourth Floor|Floor 4]] | ||
! width=5% | Floor 5 | ! width=5% | [[{{PAGENAME}}#Fifth Floor|Floor 5]] | ||
! width=5% | Floor 6 | ! width=5% | [[{{PAGENAME}}#Sixth Floor|Floor 6]] | ||
! width=5% | Floor 7 | ! width=5% | [[{{PAGENAME}}#Seventh Floor|Floor 7]] | ||
|- | |- | ||
! class="subheader" | [[Benedict Silk]] ([[White Mage|WHM]]) | ! class="subheader" | [[Benedict Silk]] ([[White Mage|WHM]]) | ||
|{{ | | {{X}} | ||
|{{ | | {{CheckY}} | ||
|{{ | | {{X}} | ||
|{{ | | {{X}} | ||
|{{ | | {{X}} | ||
|{{ | | {{Check}} | ||
|{{ | | {{X}} | ||
|- class="wotg" | |- class="wotg" | ||
! class="subheader" | [[Brilliantine]] ([[Scholar|SCH]]) | ! class="subheader" | [[Brilliantine]] ([[Scholar|SCH]]) | ||
|{{ | | {{CheckY}} | ||
|{{ | | {{X}} | ||
|{{ | | {{Check}} | ||
|{{ | | {{X}} | ||
|{{ | | {{X}} | ||
|{{ | | {{X}} | ||
|{{ | | {{X}} | ||
|- | |- | ||
! class="subheader" | [[Cobalt Mythril Sheet|Cbl. Myth. Sheet]] ([[Dragoon|DRG]]) | ! class="subheader" | [[Cobalt Mythril Sheet|Cbl. Myth. Sheet]] ([[Dragoon|DRG]]) | ||
|{{ | | {{X}} | ||
|{{ | | {{X}} | ||
|{{ | | {{X}} | ||
|{{ | | {{X}} | ||
|{{ | | {{Check}} | ||
|{{ | | {{X}} | ||
|{{ | | {{CheckY}} | ||
|- | |- | ||
! class="subheader" | [[Chameleon Yarn]] ([[Ranger|RNG]]) | ! class="subheader" | [[Chameleon Yarn]] ([[Ranger|RNG]]) | ||
|{{ | | {{X}} | ||
|{{ | | {{CheckY}} | ||
|{{ | | {{X}} | ||
|{{ | | {{X}} | ||
|{{ | | {{X}} | ||
|{{ | | {{X}} | ||
|{{ | | {{Check}} | ||
|- | |- | ||
! class="subheader" | [[Coiled Yarn]] ([[Bard|BRD]]) | ! class="subheader" | [[Coiled Yarn]] ([[Bard|BRD]]) | ||
|{{ | | {{X}} | ||
|{{ | | {{CheckY}} | ||
|{{ | | {{X}} | ||
|{{ | | {{X}} | ||
|{{ | | {{X}} | ||
|{{ | | {{Check}} | ||
|{{ | | {{X}} | ||
|- | |- | ||
! class="subheader" | [[Dark Orichalcum]] ([[Dark Knight|DRK]]) | ! class="subheader" | [[Dark Orichalcum]] ([[Dark Knight|DRK]]) | ||
|{{ | | {{X}} | ||
|{{ | | {{CheckY}} | ||
|{{ | | {{X}} | ||
|{{ | | {{X}} | ||
|{{ | | {{Check}} | ||
|{{ | | {{X}} | ||
|{{ | | {{X}} | ||
|- | |- | ||
! class="subheader" | [[Diabolic Silk]] ([[Black Mage|BLM]]) | ! class="subheader" | [[Diabolic Silk]] ([[Black Mage|BLM]]) | ||
|{{ | | {{X}} | ||
|{{ | | {{X}} | ||
|{{ | | {{X}} | ||
|{{ | | {{X}} | ||
|{{ | | {{Check}} | ||
|{{ | | {{CheckY}} | ||
|{{ | | {{X}} | ||
|- | |- | ||
! class="subheader" | [[Ecarlate Cloth]] ([[Warrior|WAR]]) | ! class="subheader" | [[Ecarlate Cloth]] ([[Warrior|WAR]]) | ||
|{{ | | {{X}} | ||
|{{ | | {{CheckY}} | ||
|{{ | | {{X}} | ||
|{{ | | {{X}} | ||
|{{ | | {{X}} | ||
|{{ | | {{X}} | ||
|{{ | | {{Check}} | ||
|- class="wotg" | |- class="wotg" | ||
! class="subheader" | [[Filet Lace]] ([[Dancer|DNC]]) | ! class="subheader" | [[Filet Lace]] ([[Dancer|DNC]]) | ||
|{{ | | {{X}} | ||
|{{ | | {{CheckY}} | ||
|{{ | | {{X}} | ||
|{{ | | {{X}} | ||
|{{ | | {{Check}} | ||
|{{ | | {{X}} | ||
|{{ | | {{X}} | ||
|- | |- | ||
! class="subheader" | [[Glittering Yarn]] ([[Summoner|SMN]]) | ! class="subheader" | [[Glittering Yarn]] ([[Summoner|SMN]]) | ||
|{{ | | {{X}} | ||
|{{ | | {{CheckY}} | ||
|{{ | | {{X}} | ||
|{{ | | {{Check}} | ||
|{{ | | {{X}} | ||
|{{ | | {{X}} | ||
|{{ | | {{X}} | ||
|- class="toau" | |- class="toau" | ||
! class="subheader" | [[Luminian Thread]] ([[Blue Mage|BLU]]) | ! class="subheader" | [[Luminian Thread]] ([[Blue Mage|BLU]]) | ||
|{{ | | {{X}} | ||
|{{ | | {{X}} | ||
|{{ | | {{X}} | ||
|{{ | | {{X}} | ||
|{{ | | {{X}} | ||
|{{ | | {{CheckY}} | ||
|{{ | | {{Check}} | ||
|- class="toau" | |- class="toau" | ||
! class="subheader" | [[Pantin Wire]] ([[Puppetmaster|PUP]]) | ! class="subheader" | [[Pantin Wire]] ([[Puppetmaster|PUP]]) | ||
|{{ | | {{X}} | ||
|{{ | | {{CheckY}} | ||
|{{ | | {{X}} | ||
|{{ | | {{X}} | ||
|{{ | | {{X}} | ||
|{{ | | {{Check}} | ||
|{{ | | {{X}} | ||
|- | |- | ||
! class="subheader" | [[Plaited Cord]] ([[Ninja|NIN]]) | ! class="subheader" | [[Plaited Cord]] ([[Ninja|NIN]]) | ||
|{{ | | {{CheckY}} | ||
|{{ | | {{X}} | ||
|{{ | | {{X}} | ||
|{{ | | {{Check}} | ||
|{{ | | {{X}} | ||
|{{ | | {{X}} | ||
|{{ | | {{X}} | ||
|- | |- | ||
! class="subheader" | [[Ruby Silk Thread]] ([[Red Mage|RDM]]) | ! class="subheader" | [[Ruby Silk Thread]] ([[Red Mage|RDM]]) | ||
|{{ | | {{CheckY}} | ||
|{{ | | {{X}} | ||
|{{ | | {{Check}} | ||
|{{ | | {{X}} | ||
|{{ | | {{X}} | ||
|{{ | | {{X}} | ||
|{{ | | {{X}} | ||
|- | |- | ||
! class="subheader" | [[Scarlet Odoshi]] ([[Samurai|SAM]]) | ! class="subheader" | [[Scarlet Odoshi]] ([[Samurai|SAM]]) | ||
|{{ | | {{X}} | ||
|{{ | | {{X}} | ||
|{{ | | {{X}} | ||
|{{ | | {{X}} | ||
|{{ | | {{X}} | ||
|{{ | | {{Check}} | ||
|{{ | | {{CheckY}} | ||
|- class="toau" | |- class="toau" | ||
! class="subheader" | [[Silkworm Thread]] ([[Corsair|COR]]) | ! class="subheader" | [[Silkworm Thread]] ([[Corsair|COR]]) | ||
|{{ | | {{X}} | ||
|{{ | | {{X}} | ||
|{{ | | {{X}} | ||
|{{ | | {{Check}} | ||
|{{ | | {{X}} | ||
|{{ | | {{X}} | ||
|{{ | | {{CheckY}} | ||
|- | |- | ||
! class="subheader" | [[Smalt Leather]] ([[Beastmaster|BST]]) | ! class="subheader" | [[Smalt Leather]] ([[Beastmaster|BST]]) | ||
|{{ | | {{X}} | ||
|{{ | | {{X}} | ||
|{{ | | {{Check}} | ||
|{{ | | {{X}} | ||
|{{ | | {{X}} | ||
|{{ | | {{CheckY}} | ||
|{{ | | {{X}} | ||
|- | |- | ||
! class="subheader" | [[Snowy Cermet]] ([[Paladin|PLD]]) | ! class="subheader" | [[Snowy Cermet]] ([[Paladin|PLD]]) | ||
|{{ | | {{X}} | ||
|{{ | | {{X}} | ||
|{{ | | {{X}} | ||
|{{ | | {{X}} | ||
|{{ | | {{X}} | ||
|{{ | | {{CheckY}} | ||
|{{ | | {{Check}} | ||
|- | |- | ||
! class="subheader" | [[Supple Skin]] ([[Thief|THF]]) | ! class="subheader" | [[Supple Skin]] ([[Thief|THF]]) | ||
|{{ | | {{X}} | ||
|{{ | | {{X}} | ||
|{{ | | {{Check}} | ||
|{{ | | {{X}} | ||
|{{ | | {{X}} | ||
|{{ | | {{X}} | ||
|{{ | | {{CheckY}} | ||
|- | |- | ||
! class="subheader" | [[Utopian Gold Thread|Ut. Gold Thread]] ([[Monk|MNK]]) | ! class="subheader" | [[Utopian Gold Thread|Ut. Gold Thread]] ([[Monk|MNK]]) | ||
|{{ | | {{CheckY}} | ||
|{{ | | {{X}} | ||
|{{ | | {{X}} | ||
|{{ | | {{Check}} | ||
|{{ | | {{X}} | ||
|{{ | | {{X}} | ||
|{{ | | {{X}} | ||
|} | |} | ||
{| | {| | ||
| {{check}} - high probability | | {{check}} - high probability | ||
| style="padding-left: 1em; padding-right: 1em;" | | | style="padding-left: 1em; padding-right: 1em;" | {{checkY}} - low probability | ||
| {{x}} - does not drop | | {{x}} - does not drop | ||
|} | |} | ||
</div></div> | </div></div> | ||
<!--*Temenos - Eastern Tower is a subsection of the [[Temenos]] zone in the [[Limbus]] region. | <!--*Temenos - Eastern Tower is a subsection of the [[Temenos]] zone in the [[Limbus]] region. | ||
*It is reached via the Teleport-Holla crag entrance to [[Al'Taieu]]. | *It is reached via the Teleport-Holla crag entrance to [[Al'Taieu]]. | ||
| Line 290: | Line 288: | ||
<br><br>--> | <br><br>--> | ||
==Walkthrough== | |||
=== | |||
===First Floor=== | ===First Floor=== | ||
[[Image:Temenos-E1.webp|right]] | [[Image:Temenos-E1.webp|right]] | ||
Revision as of 17:13, 29 August 2025
| NOTICE: | This article is currently undergoing construction by a single editor or group of editors. | |
| Temenos - Eastern Tower | |
|---|---|
| Zone | Temenos |
| Entry Items | |
| Entrance | Al'Taieu (H-4) (via Dimensional Portal at the Crag of Holla) |
| Level | 75 |
| Members | 18 |
| Time | 30-120 minutes |
| Completion Reward | Scarlet Chip |
| Notes | |
|---|---|
| Chests |
(see Chest Stratgies) |
| Portal |
|
| Others | Elementals
Avatars
|
Walkthrough
First Floor
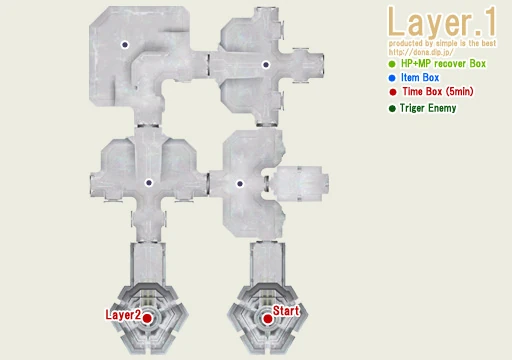
- Enemies: Fire Elemental x4
- Additional Effect: Plague
- Have approximately 8000 hp
- The Items chest has 5-7 Ancient Beastcoins and 1 AF+1 item (DRK, BLM, RNG, BST, PLD, PUP, DNC)
- A Mystic Avatar Ifrit may spawn when opening a chest. Avatar is capable of using Inferno as well as other Ifrit Blood Pacts.
Second Floor
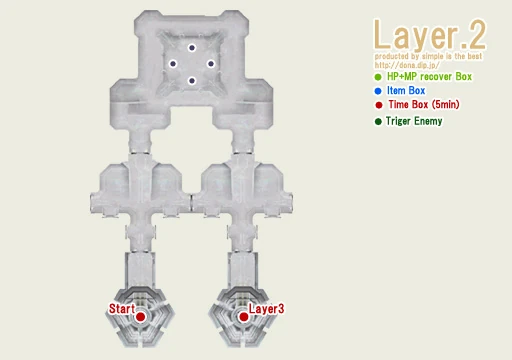
- Enemies: Ice Elemental x4
- Additional Effect: Paralyze
- Patrol back and forth between the center of the room and outside edges of the middle section of the room.
- Can be pulled without linking if pulled when its on the outside edge (as shown on map).
- The Items chest has 5-8 Ancient Beastcoins and 1-2 AF+1 item (BLM, SAM, RNG, PLD, SMN, DRG, RDM, DRK, BRD, BST, COR)
- A Mystic Avatar Shiva may spawn when opening a chest. Avatar is capable of using Diamond Dust as well as other Shiva Blood Pacts.
Third Floor
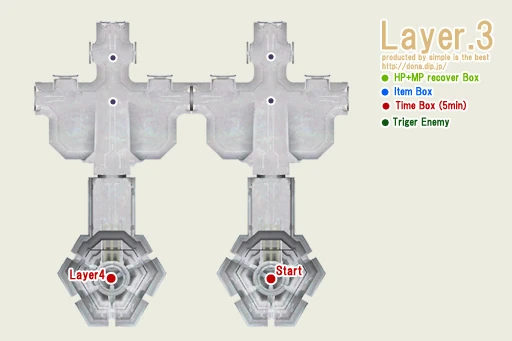
- Enemies: Air Elemental x4
- Additional Effect: Silence
- The Items chest has 5-8 Ancient Beastcoins and 1-2 AF+1 item (PLD, DRK, RNG, SAM, BST, THF, BLM, RDM, BRD, PUP)
- A Mystic Avatar Garuda may spawn when opening a chest. Avatar is capable of using Aerial Blast as well as other Garuda Blood Pacts.
Fourth Floor
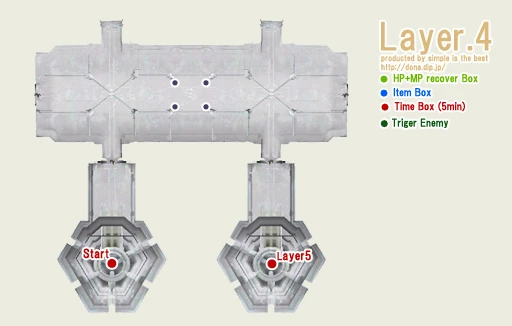
- Enemies: Earth Elemental x4
- Additional Effect: Petrification
- Immune to Stun
- Impossible to pull one without linking at least one other.
- The Items chest has 6-8 Ancient Beastcoins and 1-2 AF+1 items (RNG, DRG, DRK, THF, BST, BLM, SAM, PUP, COR)
- A Mystic Avatar Titan may spawn when opening a chest. Avatar is capable of using Earthen Fury as well as other Titan Blood Pacts.
Fifth Floor
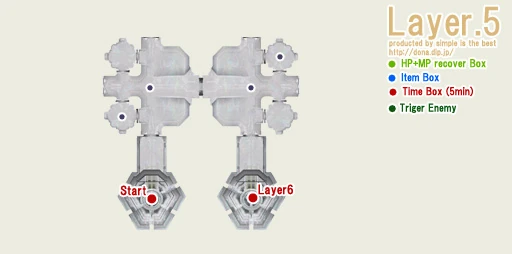
- Enemies: Thunder Elemental x4
- The Items chest has 6-7 Ancient Beastcoins and 1-2 AF+1 items (DRK, RDM, BST, THF, PLD, SAM, DRG, BLM, RNG, DNC)
- A Mystic Avatar Ramuh may spawn when opening a chest. Avatar is capable of using Judgment Bolt as well as other Ramuh Blood Pacts.
Sixth Floor
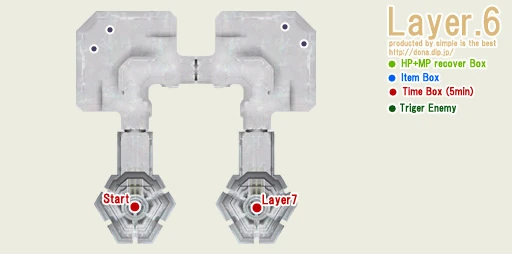
- Enemies: Water Elemental x4
- Additional Effect: Poison
- The Items chest has 6-7 Ancient Beastcoins and 1-2 AF+1 items (PLD, BRD, BLM, THF, DRG, RNG, BST, RDM, SAM, BST, COR, DNC)
- A Mystic Avatar Leviathan may spawn when opening a chest. Avatar is capable of using Tidal Wave as well as other Leviathan Blood Pacts.
Seventh Floor
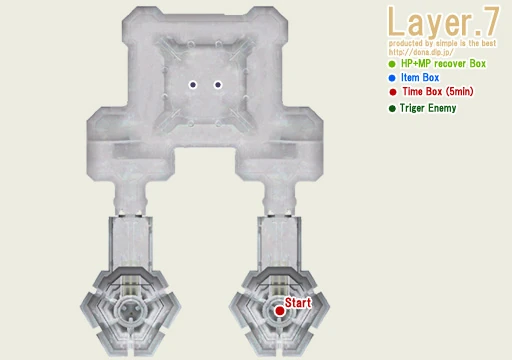
- Enemies: Dark Elemental x2
- Additional Effect: Curse
- Can be Carby-pulled
- Immune to dark based sleep (Both Yawn and Sheep Song Stuck)
- Once both have been defeated, 2 Item chests will then pop in the middle of the room. As on previous floors, one is the correct item chest and one is a "fake" that will spawn a Mystic Avatar Fenrir. Opening the correct chest will clear the area. If the "fake" is chosen, the Mystic Avatar must be defeated in order to open the remaining chest.
- Mystic Avatar is capable of using Howling Moon as well as other Fenrir Blood Pacts.
- The final chest has 7 Ancient Beastcoins, 1 AF+1 item (PLD, RNG, DRK, BLM, BST, PUP, DNC) and the Scarlet Chip, as well as a chance for a Metal Chip.
