Promathia Mission 4-3: Difference between revisions
From HorizonXI Wiki
Recommendations, prep, and nuances added throughout the document |
|||
| Line 14: | Line 14: | ||
}} | }} | ||
==Overview== | ==Overview== | ||
This mission takes place in [[Sacrarium]] (50 cap area). You have to get access to and interact with a door to view a cutscene and then proceed to fight the [[:Category:Ghosts|Ghost]] [[NM]] [[Old Professor Mariselle]] before returning to the door for a final cutscene. Access to said door requires farming a set of keys from monsters in [[Sacrarium]]. | This mission takes place in [[Sacrarium]] (50 cap area). You have to get access to and interact with a door to view a cutscene and then proceed to fight the [[:Category:Ghosts|Ghost]] [[NM]] [[Old Professor Mariselle]] before returning to the door for a final cutscene. Access to said door requires farming a set of keys from monsters in [[Sacrarium]]. | ||
This mission may take a very long time; be sure to plan accordingly! This zone is extremely dangerous, especially for new players. Don't be afraid to bring multiple parties, or form an alliance with parties you meet inside Sacrarium. The more players the merrier for this mission! | |||
==Walkthrough== | ==Walkthrough== | ||
===Preparation=== | ===Preparation=== | ||
*It is highly recommended to bring at least 1 SMN that know hows to Carby pull--multiple SMN are helpful. | |||
*It's a good idea for non-casters to bring multiple stacks of Silent Oil. Sneak is needed constantly, and for almost every enemy, with the exclusion of Taurus (true sight,) and NM's. | |||
*Fomor notes: in addition to hearing, these also '''blood aggro''' and may do so through walls; try to keep away from walls if possible. | |||
**Sleep does not land very reliably on Fomor but it may be worth trying if unexpected links occur. | |||
**SMN Carby Pull should be your go-to choice for initiating any fight with Fomor. Each pull will link with 2+ other Fomor, and fighting 2+ of them simultaneously can be very rough. Carby pull allows you to solo pull consistently. | |||
**Anyone with access to Silence should coordinate with your Carby Puller to Silence bomb any Fomor Black Mages; they can wipe parties very easily if left unchecked. | |||
**Fomor have a TP move that resets party members' TP to 0 in an AoE, so melee have it a bit rough in this zone. Summoners are great for performing skillchains here! | |||
*Highly recommended to bring one or multiple forms of Reraise, as chance of death is pretty high here. | |||
**Pay attention to the last 'safe' spot where you could heal or Reraise, and be ready to run there if death/wipe is imminent. | |||
*This mission requires passing through a locked door in [[Sacrarium]]. A considerable part of the mission is farming the required keys (2x [[Coral Crest Key]] and 1x [[Sealion Crest Key]]) to open the door. Alternatively, the door can be open by someone in possession of {{KeyItem}}[[Temple Knight Key]]. | *This mission requires passing through a locked door in [[Sacrarium]]. A considerable part of the mission is farming the required keys (2x [[Coral Crest Key]] and 1x [[Sealion Crest Key]]) to open the door. Alternatively, the door can be open by someone in possession of {{KeyItem}}[[Temple Knight Key]]. | ||
**The {{KeyItem}}[[Temple Knight Key]] can be obtained by trading 1x [[Coral Crest Key]] and 1x [[Sealion Crest Key]] to [[Quelveuiat]] in {{Location|Tavnazian Safehold|map=Map 1|I-10}} after the quest [[A Hard Day's Knight]] has been completed. | **The {{KeyItem}}[[Temple Knight Key]] can be obtained by trading 1x [[Coral Crest Key]] and 1x [[Sealion Crest Key]] to [[Quelveuiat]] in {{Location|Tavnazian Safehold|map=Map 1|I-10}} after the quest [[A Hard Day's Knight]] has been completed. | ||
| Line 57: | Line 68: | ||
*Next, kill [[Keremet]], a [[:category:Corses|Corse]] NM located in the large room at {{Position|Sacrarium|map=Map 2|K-8|pos 2=L-8}}, to obtain the [[Sealion Crest Key]]. | *Next, kill [[Keremet]], a [[:category:Corses|Corse]] NM located in the large room at {{Position|Sacrarium|map=Map 2|K-8|pos 2=L-8}}, to obtain the [[Sealion Crest Key]]. | ||
**The two hallways leading into the large room are lined with 6 [[:category:Skeletons|Skeletons]] each. The [[:category:Skeletons|Skeletons]] don't aggro and are weak, but if anyone attacks [[Keremet]] they will rush to aid him. Defeat all 12 [[:category:Skeletons|Skeletons]] first before you pass through one of the doors into the large room at {{Position|Sacrarium|map=Map 2|K-8|pos 2=L-8}}. | **The two hallways leading into the large room are lined with 6 [[:category:Skeletons|Skeletons]] each. The [[:category:Skeletons|Skeletons]] don't aggro and are weak, but if anyone attacks [[Keremet]] they will rush to aid him. Defeat all 12 [[:category:Skeletons|Skeletons]] first before you pass through one of the doors into the large room at {{Position|Sacrarium|map=Map 2|K-8|pos 2=L-8}}. | ||
**'''Carby pulling does not work on [[Keremet]]'''--the 12 Skeletons will aggro the SMN and start sewing chaos on anyone that generated enmity after that. | |||
**[[Keremet]] is at the far side of the room at {{Position|Sacrarium|map=Map 2|L-8}}. Wait for the [[:Category:Tauri|Tauri]] to wander to one side and then pull [[Keremet]] back through one of the doors into one of the hallways where the [[:category:Skeletons|Skeletons]] were. Only one person should pull [[Keremet]] while the others wait in the hallway. | **[[Keremet]] is at the far side of the room at {{Position|Sacrarium|map=Map 2|L-8}}. Wait for the [[:Category:Tauri|Tauri]] to wander to one side and then pull [[Keremet]] back through one of the doors into one of the hallways where the [[:category:Skeletons|Skeletons]] were. Only one person should pull [[Keremet]] while the others wait in the hallway. | ||
**You have 30 minutes to kill him before the [[:category:Skeletons|Skeletons]] begin to repop and aggro you. | **You have 30 minutes to kill him before the [[:category:Skeletons|Skeletons]] begin to repop and aggro you. | ||
| Line 73: | Line 85: | ||
*Head back out the locked door. | *Head back out the locked door. | ||
**If you do not have another [[Coral Crest Key]], you can leave a member behind to open the door with the switch but they cannot participate in the [[NM]] fight. | **If you do not have another [[Coral Crest Key]], you can leave a member behind to open the door with the switch but they cannot participate in the [[NM]] fight. | ||
*You are looking to spawn and defeat the [[NM]] [[Old Professor Mariselle]]. They are located in | *You are looking to spawn and defeat the [[NM]] [[Old Professor Mariselle]]. They are located in one of the six classrooms: three on the north side at {{Position|Sacrarium|map=Map 2|F-5|pos 2=G-5|pos 3=H-5}} and three on the south side at {{Position|Sacrarium|map=Map 2|F-11|pos 2=G-11|pos 3=H-11}}. Each classroom has a [[???]] in it. Check each [[???]] until you spawn the [[Ghost]] [[NM]] [[Old Professor Mariselle]] and his two [[Mariselle's Pupil]]s. | ||
**Sneak pulling is ineffective; the NM spawns aggressive. | |||
**The correct [[???]] is randomly selected each time the NM is spawned. Unsure whether it can select the same [[???]] twice in a row. Additionally, it seems to remain spawned for multiple minutes, even if all party/alliance members are KO'd. | |||
**[[Old Professor Mariselle]] teleports, casts [[Sleepga II]] and [[Silence]], and uses [[:category:Ghosts|Ghost]] abilities. It seems to have a fair bit of regen, so continuing to keep damage on after it teleports is important. | **[[Old Professor Mariselle]] teleports, casts [[Sleepga II]] and [[Silence]], and uses [[:category:Ghosts|Ghost]] abilities. It seems to have a fair bit of regen, so continuing to keep damage on after it teleports is important. | ||
**Don’t use [[AoE]] abilities or you risk aggroing the [[:category:Fomors|Fomor]]. | **Don’t use [[AoE]] abilities or you risk aggroing the [[:category:Fomors|Fomor]]. | ||
Revision as of 05:51, 23 December 2025
| The Secrets of Worship | |
|---|---|
| Series | Chains of Promathia Missions |
| Start | After The Savage |
| Level Restriction: | Level 50 Cap |
| Items Needed | Coral Crest Key Sealion Crest Key or and |
| Title | The Lost One |
| Repeatable | No |
| Description | Now that you have learned the Wyrmking's plan, you must travel to the fourth mothercrystal. Nag'molada has informed you where the stone lies. However, you will need the amulet you lent to Prishe before you are to make your way there. |
| Rewards | |
| Access to Sacrarium (Given at the start of the quest after interacting with the Walnut Door) | |
| ← Previous Mission | Next Mission → |
|---|---|
| The Savage | Slanderous Utterings |
Overview
This mission takes place in Sacrarium (50 cap area). You have to get access to and interact with a door to view a cutscene and then proceed to fight the Ghost NM Old Professor Mariselle before returning to the door for a final cutscene. Access to said door requires farming a set of keys from monsters in Sacrarium.
This mission may take a very long time; be sure to plan accordingly! This zone is extremely dangerous, especially for new players. Don't be afraid to bring multiple parties, or form an alliance with parties you meet inside Sacrarium. The more players the merrier for this mission!
Walkthrough
Preparation
- It is highly recommended to bring at least 1 SMN that know hows to Carby pull--multiple SMN are helpful.
- It's a good idea for non-casters to bring multiple stacks of Silent Oil. Sneak is needed constantly, and for almost every enemy, with the exclusion of Taurus (true sight,) and NM's.
- Fomor notes: in addition to hearing, these also blood aggro and may do so through walls; try to keep away from walls if possible.
- Sleep does not land very reliably on Fomor but it may be worth trying if unexpected links occur.
- SMN Carby Pull should be your go-to choice for initiating any fight with Fomor. Each pull will link with 2+ other Fomor, and fighting 2+ of them simultaneously can be very rough. Carby pull allows you to solo pull consistently.
- Anyone with access to Silence should coordinate with your Carby Puller to Silence bomb any Fomor Black Mages; they can wipe parties very easily if left unchecked.
- Fomor have a TP move that resets party members' TP to 0 in an AoE, so melee have it a bit rough in this zone. Summoners are great for performing skillchains here!
- Highly recommended to bring one or multiple forms of Reraise, as chance of death is pretty high here.
- Pay attention to the last 'safe' spot where you could heal or Reraise, and be ready to run there if death/wipe is imminent.
- This mission requires passing through a locked door in Sacrarium. A considerable part of the mission is farming the required keys (2x Coral Crest Key and 1x Sealion Crest Key) to open the door. Alternatively, the door can be open by someone in possession of
 Temple Knight Key.
- The
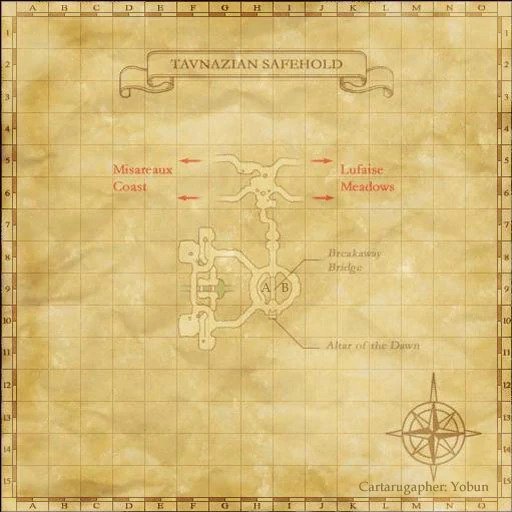
 Temple Knight Key can be obtained by trading 1x Coral Crest Key and 1x Sealion Crest Key to Quelveuiat in Tavnazian Safehold, Map 1 (I-10) after the quest A Hard Day's Knight has been completed.
- The
Before starting the mission, consider your options:
- Farming 2x Coral Crest Key and 1x Sealion Crest Key.
- Farming 1x Coral Crest Key and 1x Sealion Crest Key and have someone who completed A Hard Day's Knight run back to Tavnazian Safehold to obtain the
 Temple Knight Key.
 - Bring someone who already has a
 Temple Knight Key.
- The final NM of this mission spawns in a room full of Fomor. Consider clearing your Fomor Hate by killing Orcs and Gigas in Misareaux Coast. Note that if you have to farm Coral Crest Keys, you will have to kill Fomor to get them, increasing your Fomor Hate.
Mission Start
- Speak with Justinius at Tavnazian Safehold, Top Floor (J-6).
- On the same floor, click the Walnut Door at (K-7), next to Parelbriaux, for a cutscene.
- Head to the Iron Gate in the northernmost part of Misareaux Coast (G-4) for a cutscene.
- This is the entrance to the Sacrarium. This area is capped at level 50.
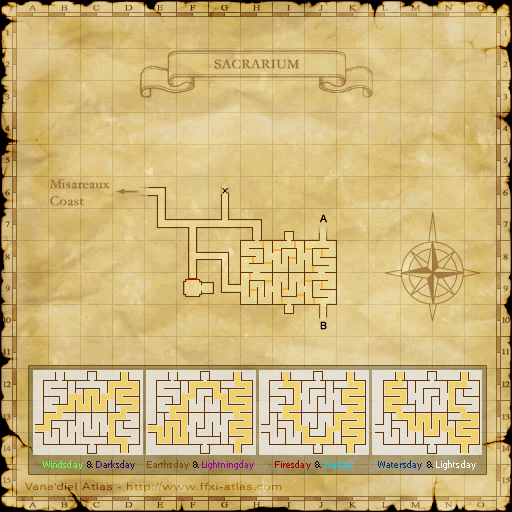
- Upon entering Sacrarium, proceed to (J-10) (Connection 'B').
- Note that the maze walls will shift with each Vana'diel day (see 'Sacrarium Map 1' below).
- Entering Map 2 through Connection 'B', you arrive at (E-9).
Farming the Keys
Note: This part of the mission can be skipped if someone has a ![]() Temple Knight Key in their possession.
Temple Knight Key in their possession.
- Kill Fomors until you get two Coral Crest Keys.
- You can do this mission with only one Coral Crest Key, but since they break on use, it will be necessary to have an extra person to stay behind to operate the door. They cannot participate in the final NM fight.
- Optional, but recommended - Head back to Misareaux Coast and kill Orcs and Gigas to lower your Fomor Hate. Check with Resauchamet at (Tavnazian Safehold/Maps#Upper Floor). Lower your Fomor Hate to level 1, where Resauchamet will tell you that you have a “good head start.”
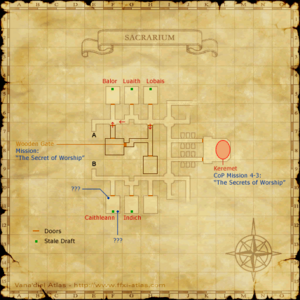
- Next, kill Keremet, a Corse NM located in the large room at (K-8 / L-8), to obtain the Sealion Crest Key.
- The two hallways leading into the large room are lined with 6 Skeletons each. The Skeletons don't aggro and are weak, but if anyone attacks Keremet they will rush to aid him. Defeat all 12 Skeletons first before you pass through one of the doors into the large room at (K-8 / L-8).
- Carby pulling does not work on Keremet--the 12 Skeletons will aggro the SMN and start sewing chaos on anyone that generated enmity after that.
- Keremet is at the far side of the room at (L-8). Wait for the Tauri to wander to one side and then pull Keremet back through one of the doors into one of the hallways where the Skeletons were. Only one person should pull Keremet while the others wait in the hallway.
- You have 30 minutes to kill him before the Skeletons begin to repop and aggro you.
- Keremet can be Silenced. He is highly resistant to Stun, Sleep, and Ice-based spells.
- Like all Corse, Keremet can Charm members of your party with the Danse Macabre TP attack. Charmed party members MUST be slept. This fight is pretty tough as he has a nasty AoE Paralyze move and can Charm multiple targets.
- A Beastmaster makes this fight much easier: a Blubber Eyes under Familiar does a lot of damage and pets are immune to Keremet's Charm. Two Blubber Eyes can duo Keremet.
- From Keremet you obtain the Sealion Crest Key.
- If you did the quest A Hard Day's Knight, you can return to Tavnazian Safehold and go trade Quelveuiat the a Coral Crest Key along with the Sealion Crest Key to obtain the permanent
 Temple Knight Key to be able to open the door solo.
 - If you do not intend to get the
 Temple Knight Key but use the Coral Crest Keys and the Sealion Crest Key to directly open the door, let someone take the Sealion Crest Key who doesn’t have either of the Coral Crest Keys since one person cannot open the door by trading both keys.
- If you did the quest A Hard Day's Knight, you can return to Tavnazian Safehold and go trade Quelveuiat the a Coral Crest Key along with the Sealion Crest Key to obtain the permanent
Mission Continues
- With either a
 Temple Knight Key OR the Coral Crest Keys and a Sealion Crest Key head to Sacrarium, Map 2 (H-7) in the Sacrarium and look for a door with two keyholes: one LARGE and one SMALL.
 - Opening the door: The first party member will trade the Coral Crest Key to the SMALL HOLE; you will hear a click.
The other party member will trade the Sealion Crest Key to the large hole; the door will then open. **You have a limited amount of time to trade the Sealion Crest Key after the Coral Crest Key has been traded, so make sure the key holders are both ready. (Both locks cannot be opened by a single person!)- You will keep your Sealion Crest Key, but your Coral Crest Key will break. If the Sealion Crest Key isn't traded quickly enough, you will have lost your opportunity to get the door open, and will have to get another Coral Crest Key.
- Find and click on the Wooden Gate at (G-8) for a cutscene (This is necessary to be able to proceed with the mission).
- Head back out the locked door.
- If you do not have another Coral Crest Key, you can leave a member behind to open the door with the switch but they cannot participate in the NM fight.
- You are looking to spawn and defeat the NM Old Professor Mariselle. They are located in one of the six classrooms: three on the north side at (F-5 / G-5 / H-5) and three on the south side at (F-11 / G-11 / H-11). Each classroom has a ??? in it. Check each ??? until you spawn the Ghost NM Old Professor Mariselle and his two Mariselle's Pupils.
- Sneak pulling is ineffective; the NM spawns aggressive.
- The correct ??? is randomly selected each time the NM is spawned. Unsure whether it can select the same ??? twice in a row. Additionally, it seems to remain spawned for multiple minutes, even if all party/alliance members are KO'd.
- Old Professor Mariselle teleports, casts Sleepga II and Silence, and uses Ghost abilities. It seems to have a fair bit of regen, so continuing to keep damage on after it teleports is important.
- Don’t use AoE abilities or you risk aggroing the Fomor.
- Don’t use Tractor during the fight with Old Professor Mariselle, as it will cause the player to zone and the NM will have to be repopped before they can get their
 Reliquiarium Key!
- Don’t use Tractor during the fight with Old Professor Mariselle, as it will cause the player to zone and the NM will have to be repopped before they can get their
- The Mariselle's Pupils are weak, but if you kill them Old Professor Mariselle will summon more. They CANNOT be slept.
- Highly recommend clearing the Fomor out of each room before clicking the ???, as the Fomor will Blood aggro, chain link, and probably wipe your group. Additionally, Mariselle warps, so melee players will only have a couple safe places in the room to stand if Fomor are still alive. This strat may take quite a bit of time to check all 6 rooms, but wiping will also take ages.
- Kill Old Professor Mariselle and check the ??? again for the Reliquiarium Key. Any ??? in any of the rooms will allow you to obtain the
 Reliquiarium Key.
 - Proceed back to the locked door and open it with your second Coral Crest Key and the Sealion Crest Key, using the same method as before. Alternatively, have someone operate the switch on the other side.
- Behind the locked door, head to the Wooden Gate again for a final cutscene and to end the mission.
