''<small>NOTE: This mission cannot be skipped.</small>''
''<small>NOTE: This mission cannot be skipped.</small>''
*Under level 35s will need some kind of sneak/invisible.
=== Windurst ===
=== Windurst ===
Line 40:
Line 39:
**[[Teleport-Mea]] (if you have the [[Mea Gate Crystal]]).
**[[Teleport-Mea]] (if you have the [[Mea Gate Crystal]]).
** [[Kolshushu]] outpost warp, if you've completed the supplied quest.
** [[Kolshushu]] outpost warp, if you've completed the supplied quest.
#*If under level 35, you should have [[Invisible]] / [[Sneak]] available for the next part, such as [[Prism Powder]] / [[Silent Oil]].
* Adventurers below level 40 can expect [[aggro]] during this section of the mission so some form of [[Sneak]] & [[Invisible]] is advisable.
#**It is possible to get by without invisible, but you definitely need sneak.
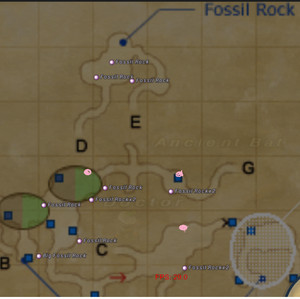
* Head to ({{Location Tooltip|area=Maze of Shakhrami|map=Map 1|pos=G-6}}) on the upper map and take the right tunnel labeled "D".
#Go to ({{Location Tooltip|area=Maze of Shakhrami|map=Map 1|pos=G-6}}) on the upper map and take the right tunnel.
#*Tip: follow the North/left wall until you reach a fork. This is at (G-6), where you take the right.
#*Tip: follow the North/left wall until you reach a fork. This is at (G-6), where you take the right.
#*There are several aggressive mobs on the way,
#*There are several aggressive mobs on the way,
Line 90:
Line 85:
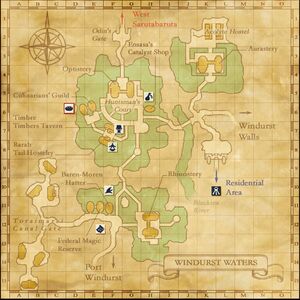
:#[[File:Map Windurst-Waters-Full.jpg|thumb|(N&S Win.Waters) Optistery is at very top in the north.]]([[Windurst Waters]] North) Return to {{Location|Windurst Waters|map=North|G-8}} [[Tosuka-Porika]] at the Optistery <!--(near [[Home Point]] #1) to finish.-->
:#[[File:Map Windurst-Waters-Full.jpg|thumb|(N&S Win.Waters) Optistery is at very top in the north.]]([[Windurst Waters]] North) Return to {{Location|Windurst Waters|map=North|G-8}} [[Tosuka-Porika]] at the Optistery <!--(near [[Home Point]] #1) to finish.-->
:#*As usual, the NPCs around the [[Windurst Gate Guard]]s have additional dialogue.
:#*As usual, the NPCs around the [[Windurst Gate Guard]]s have additional dialogue.
== Notes ==
* Adventurers can expect to find aggressive mobs as high as level 28 when completing this mission. As such, any player lower than level 40 can expect [[aggro]] and should plan accordingly.
There are reports that the Cat Burglar has her paws on a "Book of the Gods," a restricted book that was lost twenty years ago. Assist the Optistery in investigating the reports, and attempt to retrieve the priceless, but dangerous, tome.
(Win.Waters) Optistery is in the very north, below the exit gate.(E.Saruta)Tahrongi entrance is at the top-right.(Tahrongi) Shakhrami entrance is at the top right.Maze of Shakhrami UpperMaze of Shakhrami Lower
Trading 3 crystals to a conquest overseer unlocks this mission. Trading 12 will max out your rank points for Rank 2.
Note: It is recommended that you do Making Headlines in conjunction with this mission.
Go to (G-9), the lower-left corner of the big room shaped like a rectangular ring.
Enter the room with an Ancient Magical Gizmo. Click and go through the Cracked Wall there to enter a new map in Beetle's Burrow at (K-9).
There is no need for Sneak nor Invisible, as the beetles and bats here are level 5-11. Goblins and Skeletons won't attack players that are level 20 or above.
Head to (G-8) (the tunnel extension there is not marked on your in-game map; see the Inner Horutoto Ruins map).
Go west from (K-9), take the path north and follow the western wall.
At (I-9), take the west tunnel at the 3-way intersection.
Follow the tunnel NW at the next intersection.
Follow the western wall and you'll make it to the Mahogany Door.
Click on the Mahogany Door at (G-8) for a cutscene.
Adventurers can expect to find aggressive mobs as high as level 28 when completing this mission. As such, any player lower than level 40 can expect aggro and should plan accordingly.
Game Description
Mission Orders
There are reports that the Cat Burglar has her paws on a "Book of the Gods," a restricted book that was lost twenty years ago. Assist the Opistery in investigating the reports, and attempt to retrieve the priceless, but dangerous, tome.


 will max out your rank points for Rank 2.


 Lapis Monocle.