User:Chiimi000/Sandbox: Difference between revisions
From HorizonXI Wiki
m (→Level 40-50) |
m (→Level 40-50) |
||
| Line 1: | Line 1: | ||
== Level 40-50== | == Level 40-50== | ||
<div class="flex-container"> | <div class="flex-container"> | ||
{| class="droppedby horizon-table mw-collapsible mw-collapsed sortable center-col-1 " | {| class="droppedby horizon-table mw-collapsible mw-collapsed sortable center-col-1" | ||
|+ | |+ | ||
|- | |||
! Level | ! Level | ||
! Zone | ! Zone | ||
| Line 21: | Line 22: | ||
|'''[[Yhoator Jungle]]''' | |'''[[Yhoator Jungle]]''' | ||
| | | | ||
''Yhoat Telepoint at {{Location Tooltip|area=Yhoator Jungle|pos=F-9}}'' | |||
| | | | ||
* [[Master Coeurl]] (48-50) | * [[Master Coeurl]] (48-50) | ||
| Line 29: | Line 30: | ||
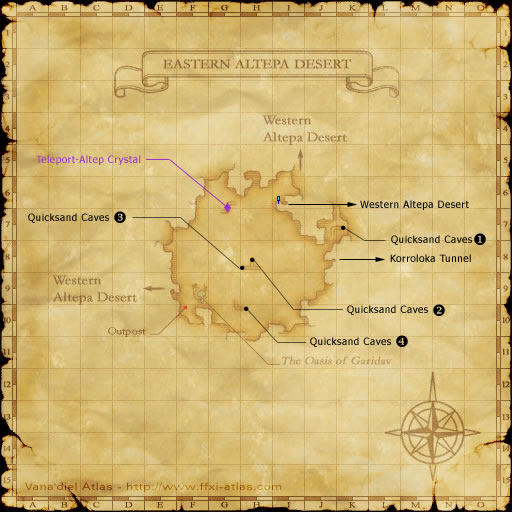
|'''[[Eastern Altepa Desert]]''' | |'''[[Eastern Altepa Desert]]''' | ||
| | | | ||
''{{Location Tooltip|area=Eastern Altepa Desert|pos=F-9|pos 2=F-10}}'' | |||
| | | | ||
* [[Goblin Poacher]] (45-52) | * [[Goblin Poacher]] (45-52) | ||
| Line 40: | Line 41: | ||
|'''[[Beaucedine Glacier]]''' | |'''[[Beaucedine Glacier]]''' | ||
| | | | ||
''{{Location Tooltip|area=Beaucedine Glacier|pos=J-8|pos 2=J-9}} Lower level, by the coast.'' | |||
| | | | ||
* {{changes|Horizon Drop Rate change}} [[Stone Golem]] (47-49) | * {{changes|Horizon Drop Rate change}} [[Stone Golem]] (47-49) | ||
| Line 50: | Line 51: | ||
|'''[[Yhoator Jungle]]''' | |'''[[Yhoator Jungle]]''' | ||
| | | | ||
''{{Location Tooltip|area=Yhoator Jungle|pos=K-10}}'' | |||
| | | | ||
*{{Changes|Horizon custom mob}} [[Opotrap]] (47-51) | *{{Changes|Horizon custom mob}} [[Opotrap]] (47-51) | ||
| Line 59: | Line 60: | ||
|'''[[Western Altepa Desert]]''' | |'''[[Western Altepa Desert]]''' | ||
| | | | ||
''{{Location Tooltip|area=Western Altepa Desert|pos=G-6|pos 2=H-6|pos 3=G-7|pos 4=H-7}}'' | |||
| | | | ||
* [[Desert Beetle]] (47-51) | * [[Desert Beetle]] (47-51) | ||
| Line 67: | Line 68: | ||
|'''[[Xarcabard]]''' | |'''[[Xarcabard]]''' | ||
| | | | ||
''Baileys Zone, {{Location Tooltip|area=Xarcabard|pos=E-8}}'' | |||
| | | | ||
* [[Demon Knight]] (48-52) | * [[Demon Knight]] (48-52) | ||
| Line 77: | Line 78: | ||
|'''[[Yhoator Jungle]]''' | |'''[[Yhoator Jungle]]''' | ||
| | | | ||
''Ifrit Cauldron zone {{Location Tooltip|area=Yhoator Jungle|pos=H-6}}'' | |||
| | | | ||
* [[Goblin Bouncer]] (52-54) | * [[Goblin Bouncer]] (52-54) | ||
| Line 86: | Line 87: | ||
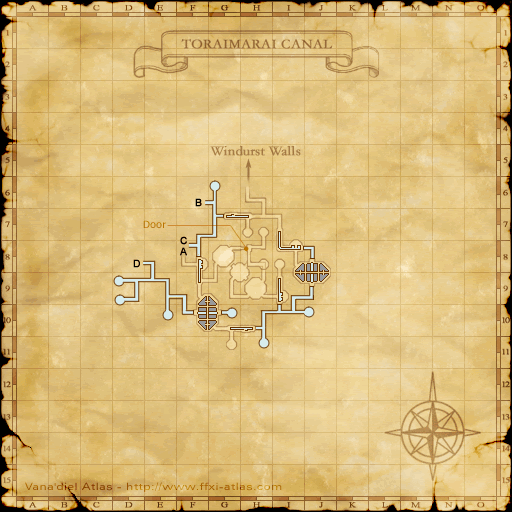
|'''[[Toraimarai Canal]]''' | |'''[[Toraimarai Canal]]''' | ||
| | | | ||
''{{Location Tooltip|area=Toraimarai Canal|map=Map 2|pos=F-9}} 1st map, by Full Moon Fountain'' | |||
| | | | ||
* [[Bigclaw]] (49-52) | * [[Bigclaw]] (49-52) | ||
| Line 105: | Line 106: | ||
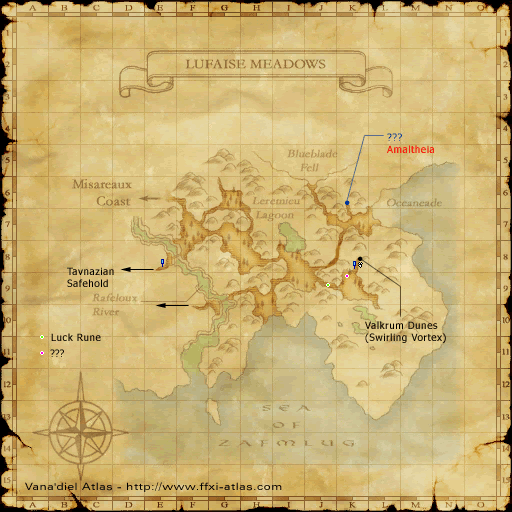
|'''[[Lufaise Meadows]]''' | |'''[[Lufaise Meadows]]''' | ||
| | | | ||
''{{Location Tooltip|area=Lufaise Meadows|pos=G-6}}'' | |||
| | | | ||
* [[Leshachikha]] (49-51) | * [[Leshachikha]] (49-51) | ||
| Line 115: | Line 116: | ||
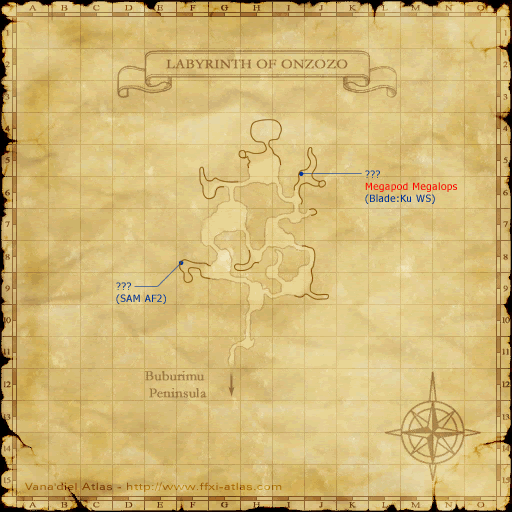
|'''[[Labyrinth of Onzozo]]''' | |'''[[Labyrinth of Onzozo]]''' | ||
| | | | ||
''{{Location Tooltip|area=Labyrinth of Onzozo|pos=I-9}}, in the two tunnels'' | |||
| | | | ||
* [[Cockatrice]] (50-53) | * [[Cockatrice]] (50-53) | ||
| Line 127: | Line 128: | ||
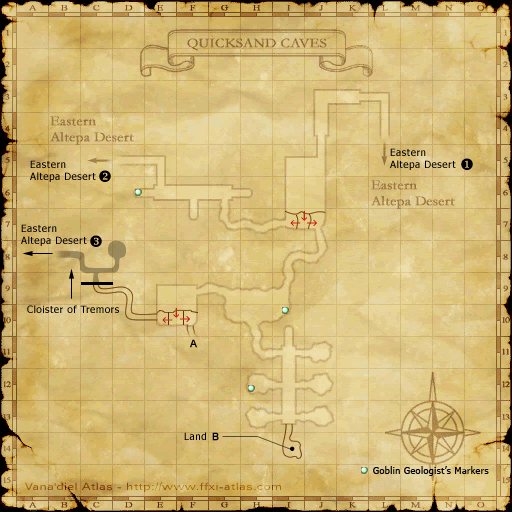
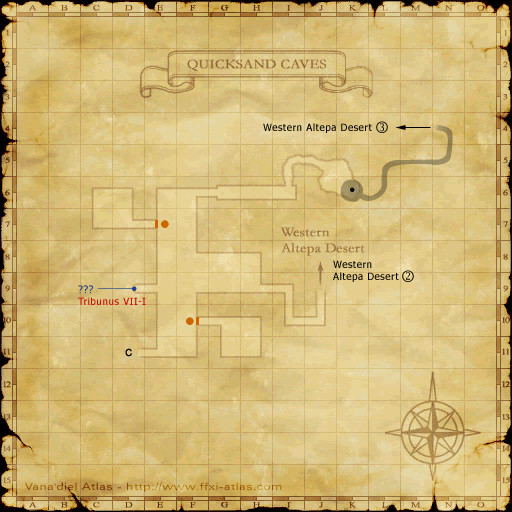
|'''[[Quicksand Caves]]''' | |'''[[Quicksand Caves]]''' | ||
| | | | ||
''Map 1 {{Location Tooltip|area=Quicksand Caves|map=Map 1|pos=J-5|pos 2=E-5}} '' | |||
| | | | ||
* [[Helm Beetle]] (51-54) | * [[Helm Beetle]] (51-54) | ||
| Line 138: | Line 139: | ||
|'''[[Beaucedine Glacier]]''' | |'''[[Beaucedine Glacier]]''' | ||
| | | | ||
''{{Location Tooltip|area=Beaucedine Glacier|pos=J-5}} at [[Fei'Yin]] entrance''' | |||
| | | | ||
* {{Changes|Horizon custom mob}} [[Rime Lynx]] (51-53) | * {{Changes|Horizon custom mob}} [[Rime Lynx]] (51-53) | ||
| Line 147: | Line 148: | ||
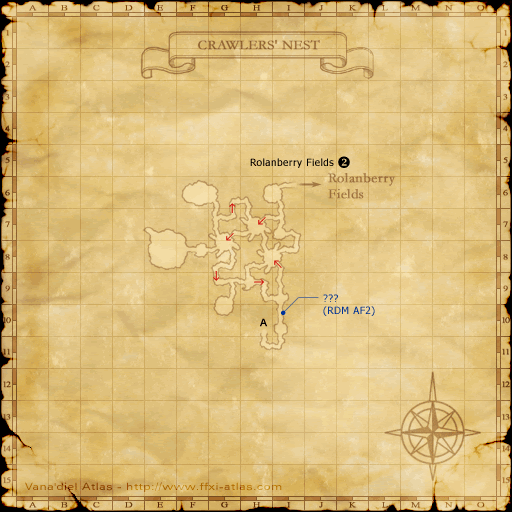
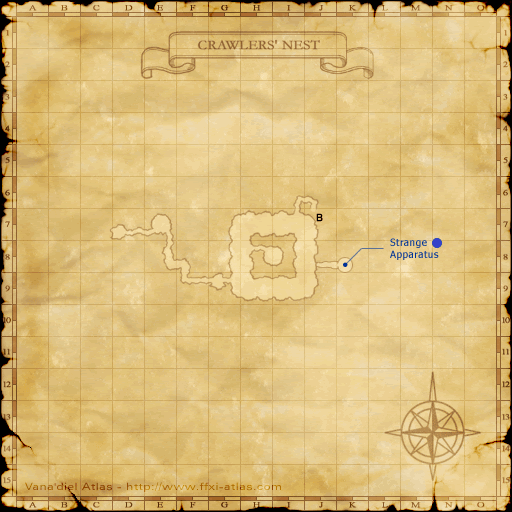
|'''[[Crawlers' Nest]]''' | |'''[[Crawlers' Nest]]''' | ||
| | | | ||
''Map 3 {{Location Tooltip|area=Crawlers' Nest|map=Map 3|pos=J-8|pos 2=H-9}}'' | |||
| | | | ||
* [[Hornfly]] (50-53) | * [[Hornfly]] (50-53) | ||
| Line 158: | Line 159: | ||
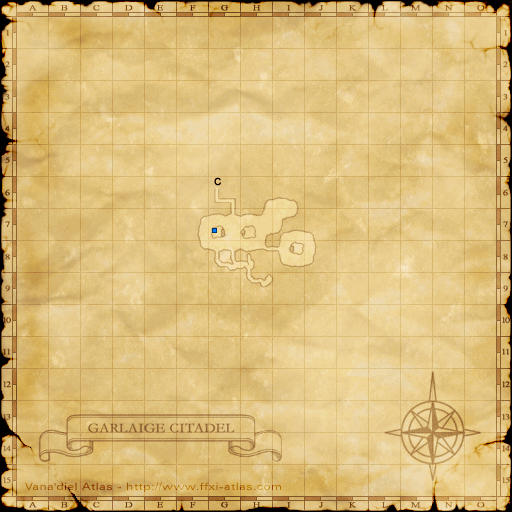
|'''[[Garlaige Citadel]]''' | |'''[[Garlaige Citadel]]''' | ||
| | | | ||
'' Basement Map {{Location Tooltip|area=Garlaige Citadel|map=Map 4|pos=G-6|pos 2=J-8}}'' | |||
| | | | ||
* [[Funnel Bats]] (52-54) | * [[Funnel Bats]] (52-54) | ||
| Line 167: | Line 168: | ||
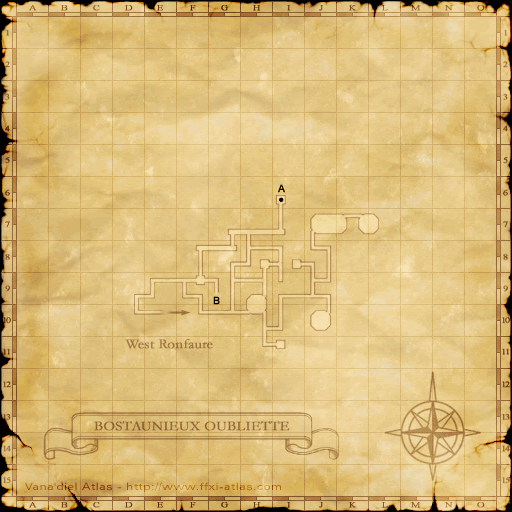
|'''[[Bostaunieux Oubliette]]''' | |'''[[Bostaunieux Oubliette]]''' | ||
| | | | ||
''South of Sewer Hatch Landing, {{Location Tooltip|area=Bostaunieux Oubliette|map=Map 2|pos=G-8}}'' | |||
| | | | ||
* [[Funnel Bats]] (52-55) | * [[Funnel Bats]] (52-55) | ||
| Line 176: | Line 177: | ||
|'''[[Crawlers' Nest]]''' | |'''[[Crawlers' Nest]]''' | ||
| | | | ||
''Map 2 {{Location Tooltip|area=Crawlers' Nest|map=Map 2|pos=G-7}}'' | |||
''Map 3 {{Location Tooltip|area=Crawlers' Nest|map=Map 3|pos=G-9}}'' | |||
| | | | ||
* [[Rumble Crawler]] (53-55) | * [[Rumble Crawler]] (53-55) | ||
| Line 185: | Line 186: | ||
|'''[[Quicksand Caves]]''' | |'''[[Quicksand Caves]]''' | ||
| | | | ||
''Map 3 {{Location Tooltip|area=Quicksand Caves|map=Map 3|pos=H-9}}'' | |||
| | | | ||
* [[Helm Beetle]] (51-58) | * [[Helm Beetle]] (51-58) | ||
| Line 195: | Line 196: | ||
|'''[[Misareaux Coast]]''' | |'''[[Misareaux Coast]]''' | ||
| | | | ||
''{{Location Tooltip|area=Misareaux Coast|pos=G-5|pos 2=G-7}}'' | |||
| | | | ||
* {{Changes|Horizon custom mob}} [[Migrant Dobsonfly]] (55-57) | * {{Changes|Horizon custom mob}} [[Migrant Dobsonfly]] (55-57) | ||
| Line 204: | Line 205: | ||
|'''[[Crawlers' Nest]]''' | |'''[[Crawlers' Nest]]''' | ||
| | | | ||
''Map 2 {{Location Tooltip|area=Crawlers' Nest|map=Map 2|pos=G-6|pos 2=F-6}}'' | |||
| | | | ||
* [[Dragonfly]] (55-58) | * [[Dragonfly]] (55-58) | ||
| Line 214: | Line 215: | ||
|'''[[Western Altepa Desert]]''' | |'''[[Western Altepa Desert]]''' | ||
| | | | ||
''{{Location Tooltip|area=Western Altepa Desert|pos=F-6|pos 2= G-6}} | |||
| | | | ||
* [[Antica Lanista]] (54-58) | * [[Antica Lanista]] (54-58) | ||
| Line 223: | Line 224: | ||
|'''[[Garlaige Citadel]]''' | |'''[[Garlaige Citadel]]''' | ||
| | | | ||
'' Basement Map {{Location Tooltip|area=Garlaige Citadel|map=Map 4|pos=G-6}} or {{Location Tooltip|area=Garlaige Citadel|map=Map 4|pos=J-8}}'' | |||
| | | | ||
* [[Chamber Beetle]] (56-58) | * [[Chamber Beetle]] (56-58) | ||
Revision as of 18:18, 2 February 2025
Level 40-50
| Level | Zone | Camp | Mob(s) | Notes |
|---|---|---|---|---|
| 40-42 | Crawlers' Nest |
|
At least 2 camps. Dispel and/or BLM recommended for cocoon. Camp at rocks/boulders on map 3. | |
| 40-42 | Yhoator Jungle |
Yhoat Telepoint at F-9 |
|
Popular BST camp |
| 40-43 | Eastern Altepa Desert |
|
Goblins Bomb Toss can be an issue, stuns recommended. Lower level parties should beware of the diggers as they are higher in level. Supports 2 parties. | |
| 40-43 | Beaucedine Glacier |
J-8 / J-9 Lower level, by the coast. |
|
Supports 1 party. Dispel recommended. |
| 41-44 | Yhoator Jungle | Mobs do not raise defense (Confirmed by Charsi) | ||
| 41-44 | Western Altepa Desert |
|
Beetles all around Revelation Rock, supports many parties, Beetles link. | |
| 42-45 | Xarcabard |
Baileys Zone, E-8 |
|
1 party |
| 43-45 | Yhoator Jungle |
Ifrit Cauldron zone H-6 |
|
2 parties. RNG and WAR Goblins. 6 Spawns at west entrance. 8 at east entrance. Barfira for bombs. |
| 43-45 | Toraimarai Canal |
F-9 1st map, by Full Moon Fountain |
Supports 1 party. Dispel and BLM recommended. Need either (~15 minute walk from Sarutabarta OP going through 3 mage gate). | |
| 43-45 | Crawlers' Nest |
|
|
Supports 1 party. Lizards aggro sound and link!
About a 7.5 minute walk from Derfland OP. |
| 43-46 | Lufaise Meadows |
|
Beware of Thunder Elemental that spawns by Leshys. Uses damaging area-of-effect moves as well as Slumber Powder.
Requires completion of CoP 1-3 | |
| 43-45 | Labyrinth of Onzozo |
I-9, in the two tunnels |
|
Supports 2 parties. Know when Cockatrice in tunnels will repop. WHM required for Stona. Cockatrice do not link but are aggressive via sound. Echo Drops strongly recommended. Avoid Goblins Miners if possible (THF Goblins) |
| 44-47 | Quicksand Caves |
Map 1 J-5 / E-5 |
|
Beetles and spiders no aggro but link. Bring WHM for Erase if you fight spiders. Antia have AoE silence. Supports 2 parties. Drops coffer keys.
Titan entrance from Eastern Altepa Desert K-7 |
| 44-46 | Beaucedine Glacier |
|
Does NOT raise defenses. Bring silena and paralnya. Supports 1 party. 2 parties doubtful.
~8.5 minute walk from Fauregandi OP | |
| 44-47 | Crawlers' Nest |
Map 3 J-8 / H-9 |
|
Can also mix in Exorays(51-54) or other mobs in the area. Typically enough spawns for 2 parties, can camp at other entrances to room as well. |
| 45-51 | Garlaige Citadel |
Basement Map G-6 / J-8 |
|
Funnel Bats initially, moving up to Chamber Beetles around level ~48. Supports 2 parties. |
| 46-48 | Bostaunieux Oubliette |
South of Sewer Hatch Landing, G-8 |
|
Sneak up before dropping down, slimes below. Watch out for pops. Lots of link potential. Bring a Bard and/or Carby pull. Don't go past the hounds. Supports at least 2 parties.
(Must progress through certain rank missions to enter Chateau, have rank 3 Bastok and Windurst to enter) |
| 46-48 | Crawlers' Nest |
|
Dispel/Finale recommended. | |
| 48-50 | Quicksand Caves |
Map 3 H-9 |
|
High level range of mobs. Bring echo drops and/or mages /whm for silena.
Entry at Western Altepa Desert (J-9) |
| 48-50 | Misareaux Coast |
|
1 camp by the Qufim warp. Other camp is by waterfall near Sacrarium.
Requires completion of CoP 1-3 | |
| 48-50 | Crawlers' Nest |
Map 2 G-6 / F-6 |
|
Will need sneak/oils to reach camp. Take the NW tunnel at the sack room (H-8) to the 2nd map. Supports 1 party. Flies link.
About a 10.5 minute walk from Derfland OP |
| 48-51 | Western Altepa Desert |
|
Pull Antica from below. They do not link. Bring RDM/Silencer- Lanista are BLM. Silena/echo drops recommended. Could also fight manticore and beetles in the area. | |
| 49-51 | Garlaige Citadel |
|
Supports 2 parties in the basement. Another 2 behind banishing gate 2. BLM Recommended. |

