Central Temenos - 1st Floor: Difference between revisions
From HorizonXI Wiki
No edit summary |
layout rework, updated drops from lsb |
||
| Line 1: | Line 1: | ||
__NOTOC__ | __NOTOC__ | ||
<div class="flex-container"> | |||
<div class="flex-container-item-2"> | |||
{| class="horizon-table battlefield-table-border limbus-color" | |||
! colspan="2" | [[Central Temenos - 1st Floor]] | |||
|- | |||
*There is only one | ! class="subheader" valign=top width=20% | '''Zone''' | ||
*The chest | | [[Temenos]] | ||
|- | |||
! class="subheader" valign=top | '''Entry Items''' | |||
* | | {{KeyItem}}[[White Card]]<br/>{{KeyItem}}[[Cosmo-Cleanse]]<br>[[Emerald Chip]] | ||
|- | |||
! class="subheader" valign=top | '''Entrance''' | |||
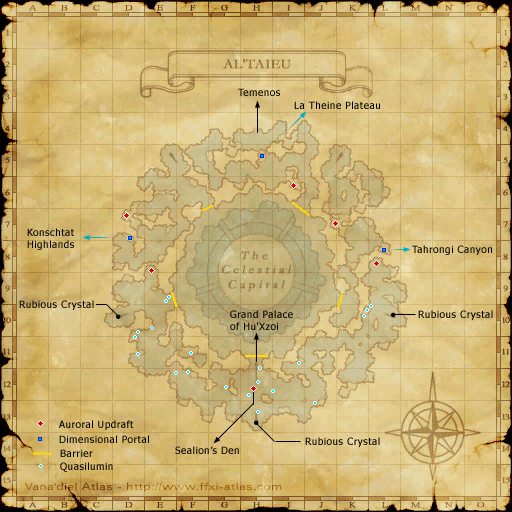
| {{Location|Al'Taieu|H-4}}<br/>(via [[Dimensional Portal]] at the [[Crag of Holla]]) | |||
< | |- | ||
! class="subheader" valign=top | '''Level''' | |||
{| class=" | | 75 | ||
|- | |||
! class="subheader" valign=top | '''Members''' | |||
| 18 | |||
|- | |||
! class="subheader" valign=top | '''Time''' | |||
| 45 minutes | |||
|- | |||
! class="subheader" valign=top | '''Completion Reward''' | |||
| [[Orchid Chip]] | |||
|} | |||
{| class="horizon-table battlefield-table-border limbus-color" | |||
! colspan="2" | Notes | |||
|- | |||
! class="subheader" valign=top width=20% | '''Chests''' | |||
| | |||
*There is only one chest, an item chest, which spawns after killing all mobs. | |||
*The item chest (brown with gold trim) yields 6 [[Ancient Beastcoin]]s and 2-3 [[:Category:Temenos Upgrade Items|Artifact Armor +1 Materials]], an [[Orchid Chip]] and a chance of a [[Metal Chip]]. | |||
|- | |||
! class="subheader" valign=top | '''Portal''' | |||
| | |||
*There is only one floor | |||
|- | |||
! class="subheader" valign=top | '''Others''' | |||
| | |||
*Enter by trading an [[Emerald Chip]] to the [[Matter Diffusion Module]] in [[Temenos]]. | |||
*The mobs in this area are connected in pairs; Killing one will empower the other. | |||
|} | |||
</div> | |||
<div class="flex-container-item-2"> | |||
{| class="horizon-table limbus-color center-col-2 center-col-3 center-col-4 center-col-5 center-col-6 center-col-7 center-col-8" | |||
! colspan="8" | [[:Category:Temenos Upgrade Items|Artifact Armor +1 Materials]] | |||
|- | |- | ||
! width=95% | Item (Job) | |||
! width=5% | [[{{PAGENAME}}#First Floor|Floor 1]] | |||
|- | |- | ||
! class="subheader" | [[Benedict Silk]] ([[White Mage|WHM]]) | |||
|{{ | | {{check}} | ||
|- class="wotg" | |- class="wotg" | ||
! class="subheader" | [[Brilliantine]] ([[Scholar|SCH]]) | |||
|{{ | | {{check}} | ||
|- | |- | ||
! class="subheader" | [[Cobalt Mythril Sheet|Cbl. Myth. Sheet]] ([[Dragoon|DRG]]) | |||
|{{ | | {{X}} | ||
|- | |- | ||
! class="subheader" | [[Chameleon Yarn]] ([[Ranger|RNG]]) | |||
|{{ | | {{Check}} | ||
|- | |- | ||
! class="subheader" | [[Coiled Yarn]] ([[Bard|BRD]]) | |||
|{{ | | {{X}} | ||
|- | |- | ||
! class="subheader" | [[Dark Orichalcum]] ([[Dark Knight|DRK]]) | |||
|{{ | | {{X}} | ||
|- | |- | ||
! class="subheader" | [[Diabolic Silk]] ([[Black Mage|BLM]]) | |||
|{{ | | {{Check}} | ||
|- | |- | ||
! class="subheader" | [[Ecarlate Cloth]] ([[Warrior|WAR]]) | |||
|{{ | | {{checkY}} | ||
|- class="wotg" | |- class="wotg" | ||
! class="subheader" | [[Filet Lace]] ([[Dancer|DNC]]) | |||
|{{ | | {{checkY}} | ||
|- | |- | ||
! class="subheader" | [[Glittering Yarn]] ([[Summoner|SMN]]) | |||
|{{ | | {{check}} | ||
|- class="toau" | |||
! class="subheader" | [[Luminian Thread]] ([[Blue Mage|BLU]]) | |||
| {{X}} | |||
|- class="toau" | |- class="toau" | ||
! class="subheader" | [[Pantin Wire]] ([[Puppetmaster|PUP]]) | |||
|{{ | | {{Check}} | ||
|- | |- | ||
! class="subheader" | [[Plaited Cord]] ([[Ninja|NIN]]) | |||
|{{ | | {{X}} | ||
|- | |- | ||
! class="subheader" | [[Ruby Silk Thread]] ([[Red Mage|RDM]]) | |||
|{{ | | {{check}} | ||
|- | |- | ||
! class="subheader" | [[Scarlet Odoshi]] ([[Samurai|SAM]]) | |||
|{{ | | {{X}} | ||
|- class="toau" | |- class="toau" | ||
! class="subheader" | [[Silkworm Thread]] ([[Corsair|COR]]) | |||
|{{ | | {{X}} | ||
|- | |- | ||
! class="subheader" | [[Smalt Leather]] ([[Beastmaster|BST]]) | |||
|{{ | | {{checkY}} | ||
|- | |- | ||
! class="subheader" | [[Snowy Cermet]] ([[Paladin|PLD]]) | |||
|{{ | | {{checkY}} | ||
|- | |- | ||
! class="subheader" | [[Supple Skin]] ([[Thief|THF]]) | |||
|{{ | | {{check}} | ||
|- | |- | ||
! class="subheader" | [[Utopian Gold Thread|Ut. Gold Thread]] ([[Monk|MNK]]) | |||
|{{ | | {{X}} | ||
|} | |||
{| | |||
| {{check}} - high probability | |||
| style="padding-left: 1em; padding-right: 1em;" | {{checkY}} - low probability | |||
| {{x}} - does not drop | |||
|} | |} | ||
< | </div></div> | ||
===Enemies=== | ===Enemies=== | ||
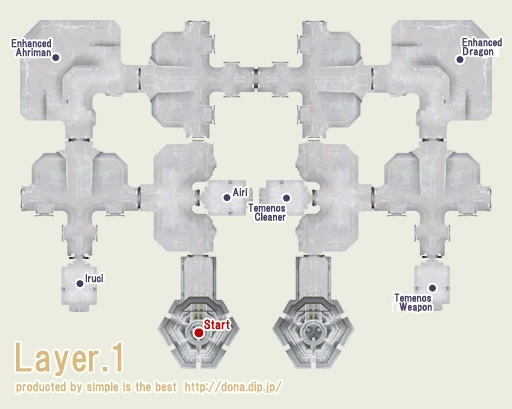
[[Image:Temenos-C1.webp|right]] | [[Image:Temenos-C1.webp|right]] | ||
The enemies are paired: | |||
*[[Airi]] and [[Temenos Cleaner]] | |||
*[[Iruci]] and [[Temenos Weapon]] | |||
*[[Enhanced Ahriman]] and [[Enhanced Dragon]]. | |||
Defeating one of the pair strengthens the other. The strengthened monsters have much higher [[evasion]], [[accuracy]], [[attack]] and [[defense]]. They also gain [[Regen]], [[Refresh]], and [[Regain]]. | |||
Pair 1: | |||
* [[Airi]] ([[:category:Ghosts|Ghost]]) | * [[Airi]] ([[:category:Ghosts|Ghost]]) | ||
** The [[Airi]] has the highest [[regen]], while the [[Temenos Cleaner]] appears to have the lowest. | |||
* [[Temenos Cleaner]] ([[:category:Magic Pots|Magic Pot]]) | |||
** Mysterious Light is strong ([[Distance|10']] range). | |||
Pair 2: | |||
* [[Iruci]] ([[:category:Skeletons|Skeleton]] [[BLM]]) | * [[Iruci]] ([[:category:Skeletons|Skeleton]] [[BLM]]) | ||
* [[Temenos Weapon]] ([[:category:Evil Weapons|Evil Weapon]] [[RDM]]) | |||
Pair 3: | |||
* [[Enhanced Ahriman]] ([[:category:Ahriman|Ahriman]]) | * [[Enhanced Ahriman]] ([[:category:Ahriman|Ahriman]]) | ||
** Beware of Level 5 Petrify ([[Distance|15']] range). | ** Beware of Level 5 Petrify ([[Distance|15']] range). | ||
| Line 93: | Line 144: | ||
** Uses all normal dragon abilities | ** Uses all normal dragon abilities | ||
** [[Body Slam]] damage is blocked by a difference in height, so pull it to the bottom of the long ramp to the middle of the map. Mages stay at the very top of the ramp while the melees go down to fight the Dragon. | ** [[Body Slam]] damage is blocked by a difference in height, so pull it to the bottom of the long ramp to the middle of the map. Mages stay at the very top of the ramp while the melees go down to fight the Dragon. | ||
** Voidsong [[Dispel]]s all buffs (except [[Reraise]]), including food. | ** Voidsong [[Dispel]]s all buffs (except [[Reraise]]), including food. | ||
* | ** The [[Enhanced Dragon]] is much more dangerous than the [[Enhanced Ahriman]], so it is recommended to kill the [[Enhanced Ahriman]] first. | ||
* [[ | |||
* All monsters can be slept, but build up resistance with repeated sleeps. | *All monsters can be slept, but build up resistance with repeated sleeps. | ||
*To speed things up you can knock the first of each pair down to low HP, put it to sleep while you kill the other one, then finish off the first one. The monsters have a fairly strong [[regen]] effect, so the slept one will regain some of its HP while you're killing the other one. | |||
[[Category:Limbus]] | [[Category:Limbus]] | ||
Latest revision as of 22:25, 16 December 2025
| Central Temenos - 1st Floor | |
|---|---|
| Zone | Temenos |
| Entry Items | Emerald Chip |
| Entrance | Al'Taieu (H-4) (via Dimensional Portal at the Crag of Holla) |
| Level | 75 |
| Members | 18 |
| Time | 45 minutes |
| Completion Reward | Orchid Chip |
| Notes | |
|---|---|
| Chests |
|
| Portal |
|
| Others |
|
| Artifact Armor +1 Materials | |||||||
|---|---|---|---|---|---|---|---|
| Item (Job) | Floor 1 | ||||||
| Benedict Silk (WHM) | |||||||
| Brilliantine (SCH) | |||||||
| Cbl. Myth. Sheet (DRG) | |||||||
| Chameleon Yarn (RNG) | |||||||
| Coiled Yarn (BRD) | |||||||
| Dark Orichalcum (DRK) | |||||||
| Diabolic Silk (BLM) | |||||||
| Ecarlate Cloth (WAR) | |||||||
| Filet Lace (DNC) | |||||||
| Glittering Yarn (SMN) | |||||||
| Luminian Thread (BLU) | |||||||
| Pantin Wire (PUP) | |||||||
| Plaited Cord (NIN) | |||||||
| Ruby Silk Thread (RDM) | |||||||
| Scarlet Odoshi (SAM) | |||||||
| Silkworm Thread (COR) | |||||||
| Smalt Leather (BST) | |||||||
| Snowy Cermet (PLD) | |||||||
| Supple Skin (THF) | |||||||
| Ut. Gold Thread (MNK) | |||||||
Enemies

The enemies are paired:
- Airi and Temenos Cleaner
- Iruci and Temenos Weapon
- Enhanced Ahriman and Enhanced Dragon.
Defeating one of the pair strengthens the other. The strengthened monsters have much higher evasion, accuracy, attack and defense. They also gain Regen, Refresh, and Regain.
Pair 1:
- Airi (Ghost)
- The Airi has the highest regen, while the Temenos Cleaner appears to have the lowest.
- Temenos Cleaner (Magic Pot)
- Mysterious Light is strong (10' range).
Pair 2:
Pair 3:
- Enhanced Ahriman (Ahriman)
- Enhanced Dragon (Dragon)
- The strongest enemy in the level
- Uses all normal dragon abilities
- Body Slam damage is blocked by a difference in height, so pull it to the bottom of the long ramp to the middle of the map. Mages stay at the very top of the ramp while the melees go down to fight the Dragon.
- Voidsong Dispels all buffs (except Reraise), including food.
- The Enhanced Dragon is much more dangerous than the Enhanced Ahriman, so it is recommended to kill the Enhanced Ahriman first.
- All monsters can be slept, but build up resistance with repeated sleeps.
- To speed things up you can knock the first of each pair down to low HP, put it to sleep while you kill the other one, then finish off the first one. The monsters have a fairly strong regen effect, so the slept one will regain some of its HP while you're killing the other one.

