Update 1.2.2 is here! Tier 2 HENMs, Horizon Adventuring Assistance Program and much more!
Windurst Mission 2-1: Difference between revisions
From HorizonXI Wiki
(→Horutoto Ruins: Removed refranced 75+ mobs not existing on server.) |
|||
| (13 intermediate revisions by 6 users not shown) | |||
| Line 1: | Line 1: | ||
{{Mission Header | {{Mission Header | ||
|Mission Name=Lost for Words | |Mission Name=Lost for Words | ||
|Expansion= | |Expansion=windurst | ||
|Start=Any Windurst Gate Guard | |Start=Any [[Windurst Gate Guard]] | ||
|Description=There are reports that the Cat Burglar has her paws on a "Book of the Gods," a restricted book that was lost twenty years ago. Assist the [[Optistery]] in investigating the reports, and attempt to retrieve the priceless, but dangerous, tome. | |Description=There are reports that the Cat Burglar has her paws on a "Book of the Gods," a restricted book that was lost twenty years ago. Assist the [[Optistery]] in investigating the reports, and attempt to retrieve the priceless, but dangerous, tome. | ||
|Level= | |Level= | ||
| Line 9: | Line 9: | ||
|Next=Windurst Mission 2-2{{!}}A Testing Time | |Next=Windurst Mission 2-2{{!}}A Testing Time | ||
|Title= | |Title= | ||
| | |Rewards=[[Rank Points]] | ||
|Image= | |Image= | ||
}} | }} | ||
= Walkthrough == | == Walkthrough == | ||
[[Image:MazeofShakhrami1.png|thumb|Maze of Shakhrami Upper]] | |||
[[File:Fossil Rock Map.png|thumb|Fossil Rock Location are in Pink {{verification}}]] | |||
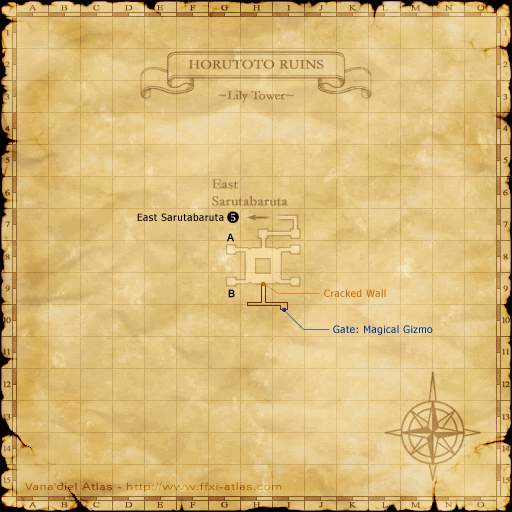
[[Image:InnerHorutotoRuins1.png|thumb|Lily Tower]] | |||
[[Image:InnerHorutotoRuins2.png|thumb|Beetle's Burrow]] | |||
''<small>NOTE: This mission cannot be skipped.</small>'' | |||
=== Windurst === | === Windurst === | ||
* Trading 3 crystals to a [[conquest overseer]] unlocks this mission. Trading 12 {{verification}} will max out your rank points for Rank 2. | |||
*Talk to any [[Windurst Gate Guard]] and accept the misson. | |||
** [[Mokyokyo]], [[Windurst Waters]] ({{Location Tooltip| area = Windurst Waters|map = North| pos = F-5}}) | |||
** [[Janshura-Rashura]], [[Port Windurst]] ({{Location Tooltip| area = Port Windurst| pos = B-5}}) | |||
** [[Rakoh Buuma]], [[Windurst Woods]] ({{Location Tooltip| area = Windurst Woods| pos = K-10}}) | |||
** [[Zokima-Rokima]], [[Windurst Walls]] ({{Location Tooltip| area = Windurst Walls| pos = H-7}}) | |||
* Talk to [[Tosuka-Porika]] in the east wing of the [[Optistery]], {{Location|Windurst Waters|map=North|G-8}}. | |||
** You may have to talk to [[Tosuka-Porika]] twice if you've started [[Past Reflections]]. No need to zone, just talk to him again. | |||
* Talk to [[Nanaa Mihgo]] at the very north of {{Location|Windurst Woods|J-3}} and obtain the '''Key Item''': {{KeyItem}}[[Lapis Monocle]]. | |||
=== Maze of Shakrami === | |||
* Travel to [[Maze of Shakhrami]], which can be found in [[Tahrongi Canyon]], ({{Location Tooltip| area = Tahrongi Canyon| pos = K-5}}). | |||
** The quickest two ways to get here are: [[Teleport-Mea]] (if you have the [[Mea Gate Crystal]]) or via the [[Kolshushu]] outpost warp, if you've completed the supplied quest. | |||
** Adventurers below level 40 can expect [[aggro]] during this section of the mission so bringing some form of [[Sneak]] & [[Invisible]] is advisable. | |||
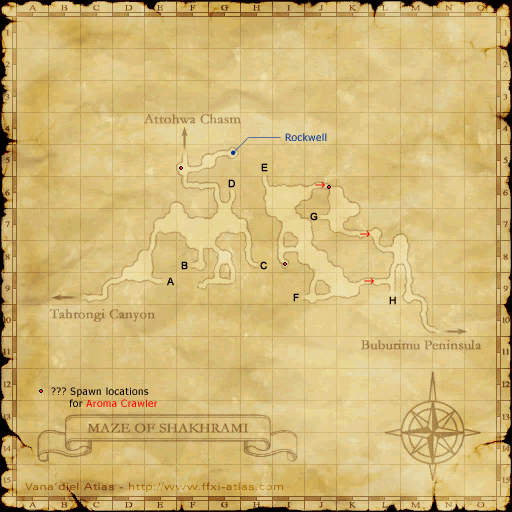
* Head to ({{Location Tooltip|area=Maze of Shakhrami|map=Map 1|pos=G-6}}) on the upper map and take the right tunnel labeled "D". | |||
** Follow the North/left wall until you reach a fork. This is at (G-6), where you take the right. Along the way you can expect to find [[goblin]]s, [[:Category:Scorpions|scorpions]] and [[ghoul]]s, all of which will [[aggro]] lower level players. | |||
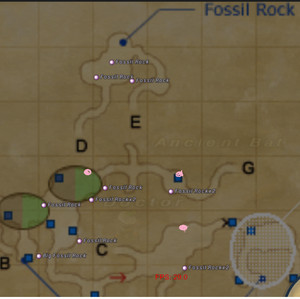
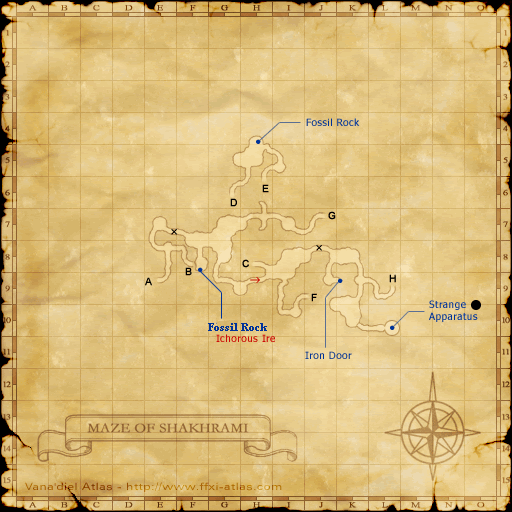
* Continuing on that path will bring you to the room ({{Location Tooltip|area=Maze of Shakhrami|map=Map 2|pos=H-5}}) on the lower map. Examine a '''Fossil Rock''' until you get {{KeyItem}}[[Lapis Coral]]. | |||
** The mobs here all detect by sound only, so it's safe to cancel your [[Invisible]] in order to examine the '''Fossil Rock'''. | |||
* There are four Fossil Rocks in this room: Left side(1), top(1), middle(2). | |||
* The same map at ({{Location Tooltip|area=Maze of Shakhrami|map=Map 2|pos=I-8}}) has (2) more. To reach here, you will need to backtrack and take the path labeled {{Location Tooltip|area=Maze of Shakhrami|map=Map 1|pos=H-8|text="C" on the first map}}. | |||
=== Windurst === | === Windurst === | ||
* Once you have a {{KeyItem}}[[Lapis Coral]], return to {{Location|Windurst Woods|J-3}} and [[Nanaa Mihgo]] to receive the {{KeyItem}}[[Hideout Key]]. | |||
* Now head to {{Location|East Sarutabaruta|J-7}} and enter the [[:Image:InnerHorutotoRuins1.png|Lily Tower]] entrance of [[Inner Horutoto Ruins]]. | |||
=== Inner Horutoto Ruins === | |||
<small>''NOTE:'' It is recommended that you do [[Making Headlines]] in conjunction with this mission.</small> | |||
* Go to ({{Location Tooltip|area=Inner Horutoto Ruins|map=Lily Tower|pos=G-9}}), the lower-left corner of the big room shaped like a rectangular ring. | |||
* Enter the room with an '''Ancient Magical Gizmo'''. Click and go through the '''Cracked Wall''' to the left to enter a new map in [[:Image:InnerHorutotoRuins2.png|Beetle's Burrow]] at ({{Location Tooltip|area=Inner Horutoto Ruins|map=Beetle's Burrow|pos=K-9}}). | |||
** There is no need for [[Sneak]] nor [[Invisible]], as the beetles and bats here are level 5-11. Goblins and Skeletons won't attack players that are level 20 or above. | |||
* Head to ({{Location Tooltip|area=Inner Horutoto Ruins|map=Beetle's Burrow|pos=G-8}}) and continue along the tunnel extension that is not marked on your in-game map. See the [[:File:InnerHorutotoRuins4.png|Inner Horutoto Ruins map]]. | |||
=== Horutoto Ruins === | * You will find a '''Mahogany Door''', which you need to click on for a cutscene. | ||
: | |||
=== Windurst === | === Windurst === | ||
* Return to Windurst and head to the very north of {{Location|Windurst Walls|G-3}} to reach the [[House of the Hero]]. | |||
* Click on the front door for a cutscene | |||
* Return to {{Location|Windurst Waters|map=North|G-8}} [[Tosuka-Porika]] at the Optistery to complete the mission. | |||
** As usual, the NPCs around the [[Windurst Gate Guard]]s have additional dialogue. | |||
== Notes == | |||
* Adventurers can expect to find aggressive mobs as high as level 28 when completing this mission. As such, any player lower than level 40 can expect [[aggro]] and should plan accordingly. | |||
{{Mission/Description | {{Mission/Description | ||
Latest revision as of 20:36, 6 April 2024
| Lost for Words | |
|---|---|
| Series | Windurst Missions |
| Starting NPC | Any Windurst Gate Guard |
| Title | None |
| Repeatable | No |
| Description | There are reports that the Cat Burglar has her paws on a "Book of the Gods," a restricted book that was lost twenty years ago. Assist the Optistery in investigating the reports, and attempt to retrieve the priceless, but dangerous, tome. |
| Rewards | |
| Rank Points | |
| ← Previous Mission | Next Mission → |
|---|---|
| The Price of Peace | A Testing Time |
Walkthrough
NOTE: This mission cannot be skipped.
Windurst
- Trading 3 crystals to a conquest overseer unlocks this mission. Trading 12
 will max out your rank points for Rank 2.
 - Talk to any Windurst Gate Guard and accept the misson.
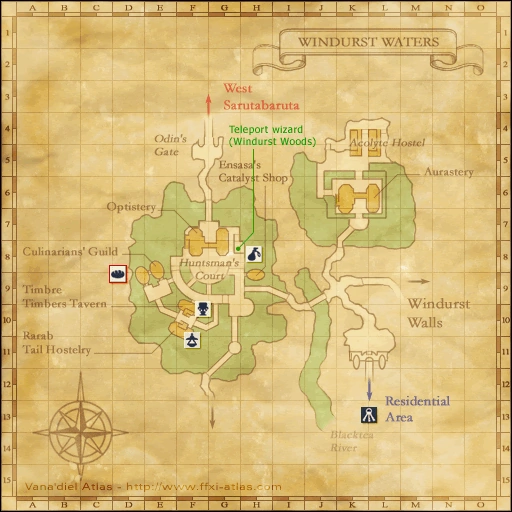
- Talk to Tosuka-Porika in the east wing of the Optistery, Windurst Waters, North (G-8).
- You may have to talk to Tosuka-Porika twice if you've started Past Reflections. No need to zone, just talk to him again.
- Talk to Nanaa Mihgo at the very north of Windurst Woods (J-3) and obtain the Key Item:
 Lapis Monocle.
Maze of Shakrami
- Travel to Maze of Shakhrami, which can be found in Tahrongi Canyon, (K-5).
- The quickest two ways to get here are: Teleport-Mea (if you have the Mea Gate Crystal) or via the Kolshushu outpost warp, if you've completed the supplied quest.
- Adventurers below level 40 can expect aggro during this section of the mission so bringing some form of Sneak & Invisible is advisable.
- Head to (G-6) on the upper map and take the right tunnel labeled "D".
- Continuing on that path will bring you to the room (H-5) on the lower map. Examine a Fossil Rock until you get
 Lapis Coral.
- The mobs here all detect by sound only, so it's safe to cancel your Invisible in order to examine the Fossil Rock.
- There are four Fossil Rocks in this room: Left side(1), top(1), middle(2).
- The same map at (I-8) has (2) more. To reach here, you will need to backtrack and take the path labeled "C" on the first map.
Windurst
- Once you have a
 Lapis Coral, return to Windurst Woods (J-3) and Nanaa Mihgo to receive the
  Hideout Key.
 - Now head to East Sarutabaruta (J-7) and enter the Lily Tower entrance of Inner Horutoto Ruins.
Inner Horutoto Ruins
NOTE: It is recommended that you do Making Headlines in conjunction with this mission.
- Go to (G-9), the lower-left corner of the big room shaped like a rectangular ring.
- Enter the room with an Ancient Magical Gizmo. Click and go through the Cracked Wall to the left to enter a new map in Beetle's Burrow at (K-9).
- Head to (G-8) and continue along the tunnel extension that is not marked on your in-game map. See the Inner Horutoto Ruins map.
- You will find a Mahogany Door, which you need to click on for a cutscene.
Windurst
- Return to Windurst and head to the very north of Windurst Walls (G-3) to reach the House of the Hero.
- Click on the front door for a cutscene
- Return to Windurst Waters, North (G-8) Tosuka-Porika at the Optistery to complete the mission.
- As usual, the NPCs around the Windurst Gate Guards have additional dialogue.
Notes
- Adventurers can expect to find aggressive mobs as high as level 28 when completing this mission. As such, any player lower than level 40 can expect aggro and should plan accordingly.
Game Description
- Mission Orders
- There are reports that the Cat Burglar has her paws on a "Book of the Gods," a restricted book that was lost twenty years ago. Assist the Opistery in investigating the reports, and attempt to retrieve the priceless, but dangerous, tome.


