Update 1.2.2 is here! Tier 2 HENMs, Horizon Adventuring Assistance Program and much more!
Template:Zone/Infobox: Difference between revisions
From HorizonXI Wiki
(testing improvements on zone infobox) |
m (pagename as fallback if zone not given for weather icons) |
||
| (9 intermediate revisions by the same user not shown) | |||
| Line 1: | Line 1: | ||
<noinclude>[[Category:Templates|{{PAGENAMEE}}]]</noinclude><includeonly><onlyinclude> | <noinclude>[[Category:Templates|{{PAGENAMEE}}]]</noinclude><includeonly><onlyinclude> | ||
<!-- outer flex container for the entire Zone Infobox --> | <!-- outer flex container for the entire Zone Infobox --> | ||
<div style="display: flex; flex-wrap: wrap; | <div style="display: flex; flex-wrap: wrap; align-items: stretch; gap: 8px;"> | ||
<!-- Left part with description, TOC, map and connections--> | <!-- Left part with description, TOC, map and connections--> | ||
<div style="flex-grow: | <div style="flex-grow: 9; flex-basis: 300px; background-color: #eddce7; padding: 8px;"> | ||
<!-- inner flex container for the left side to arrange description, TOC, map and connections --> | <!-- inner flex container for the left side to arrange description, TOC, map and connections --> | ||
<div style="display: flex; flex-wrap: wrap; | <div style="display: flex; flex-wrap: wrap; align-items: stretch; gap: 8px;"> | ||
<!-- first row: description: full width --> | <!-- first row: description: full width --> | ||
<div style="flex-grow: | <div style="flex-grow: 1; flex-basis: 100%;"> | ||
<div | <div class="zone-section-header zone-infobox-header">Description</div> | ||
<div | <div class="zone-section-body zone-infobox-body">{{{Description}}}</div> | ||
</div> | </div> | ||
<!-- close first row: description--> | <!-- close first row: description--> | ||
<!-- second row col 1: TOC and connections: half width--> | <!-- second row col 1: TOC and connections: half width--> | ||
<div style="flex-grow: | <div style="flex-grow: 99; flex-basis: 200px; style="background-color: #eddce7"> | ||
<div | <div class="zone-section-header zone-infobox-header">Table of Contents</div> | ||
<div | <div class="zone-section-body zone-infobox-body horizontal-list"> | ||
{{{ToC}}}</div> | |||
<div | <div class="zone-section-header zone-infobox-header">Connections</div> | ||
<div | <div class="zone-section-body zone-infobox-body suppress-p-margin plain-list"> | ||
{{{Connections}}}</div> | |||
</div> | </div> | ||
<!-- close second row col 1: TOC and connections --> | <!-- close second row col 1: TOC and connections --> | ||
<!-- second row col 2: Map--> | <!-- second row col 2: Map--> | ||
<div style="flex-grow: 1; | <div style="flex-grow: 1; flex-basis: 330px; background-color: #eddce7"> | ||
<div | <div class="zone-section-header zone-infobox-header">Interactive Map</div> | ||
<div | <div class="zone-section-body zone-infobox-body"><center> | ||
{{{interactive map}}} | {{{interactive map}}} | ||
</center></div> | </center></div> | ||
| Line 36: | Line 38: | ||
<!-- close inner flex container and left part: description, TOC, map, connections--> | <!-- close inner flex container and left part: description, TOC, map, connections--> | ||
<!-- Start of right part: zone information --> | <!-- Start of right part: zone information --> | ||
<div style="flex-grow: 1; flex-basis: 300px | <div style="flex-grow: 1; flex-basis: 300px; background-color: #eddce7; padding: 8px;"> | ||
{| style=" | {| style="width: 100%; font-size: 0.9rem; text-align: left; border: 1px solid #eddce7;" cellpadding="7" class="zone-infobox-table" | ||
! colspan=2 style="font-size: 1.2rem; | Zone Information | |||
|- | |- | ||
! style=" | ! style="width: 150px;" | Area Name | ||
| {{{Zone|{{PAGENAME}}}}} | | {{{Zone|{{PAGENAME}}}}} | ||
|- | |- | ||
! | ! Type | ||
| {{{Type}}} | | {{{Type}}} | ||
|- | |- | ||
! | ! Maps | ||
| valign="top" | {{{Maps|{{:{{PAGENAME}}}/Maps}}}}} | | valign="top" | {{{Maps|{{:{{{Zone|{{PAGENAME}}}}}}/Maps}}}}} | ||
|- | |- | ||
! | ! Map Acquisition | ||
| {{{Map Acquisition}}} | | {{{Map Acquisition}}} | ||
|- | |- | ||
! | ! Miscellaneous | ||
| {{{Stats}}} | | {{{Stats}}} | ||
|- | |- | ||
! | ! Hobbies | ||
| | | <div style="width: min-content;" class="suppress-p-margin">{{{HELM|{{:{{{Zone|{{PAGENAME}}}}}/HELM}}}}}</div> | ||
|- | |- | ||
! | ! Weather <!-- preferrably from section transclusion from the /Weather page. retail often has /Weather Icons which should be changed --> | ||
| | | {{{Weather|{{#section:{{{Zone|{{PAGENAME}}}}}/Weather|weather}}}}}<!--<div style="width: min-content;" class="suppress-p-margin">{{{Weather|{{:{{{Zone|{{PAGENAME}}}}}/Weather Icons}}}}}</div>--> | ||
{| | |||
|- | |- | ||
! | ! Region | ||
| [[{{{Region}}}]] | | [[{{{Region}}}]] | ||
|- | |- | ||
! | ! Expansion | ||
| {{{Expansion}}} | | {{{Expansion}}} | ||
|- | |- | ||
! | ! Requirements | ||
| {{{Requirements}}} | | {{{Requirements}}} | ||
|- | |- | ||
! | ! Restrictions | ||
| {{{Restrictions}}} | | {{{Restrictions}}} | ||
|- | |- | ||
! | ! Background music | ||
| {{{BGM|}}} | | {{{BGM|}}} | ||
|- | |- | ||
! | ! Notes | ||
| {{{Notes|None}}} | | {{{Notes|None}}} | ||
|} | |} | ||
| Line 90: | Line 86: | ||
</div> | </div> | ||
<!-- close outer flex container --> | <!-- close outer flex container --> | ||
__NOTOC__[[Category:Areas]][[Category:{{{Region}}}]] | __NOTOC__{{categorize|{{{1|}}}|<!-- | ||
-->[[Category:Areas]][[Category:{{{Region}}}]]}} | |||
</onlyinclude></includeonly> | </onlyinclude></includeonly> | ||
==Usage== | ==Usage== | ||
===Example=== | ===Example 1: Valkurm Dunes=== | ||
{{Zone/Infobox | {{Zone/Infobox|nc | ||
| Zone = Valkurm Dunes | | Zone = Valkurm Dunes | ||
| ToC = | | ToC = | ||
[[#Involved in Quests/Missions|Quests/Missions]] | *[[#Involved in Quests/Missions|Quests/Missions]] | ||
*[[#digging|Chocobo Digging]] | |||
*[[#fishing|Fishing]]<!-- | |||
--><li class="treasurecasket">[[#Treasure Casket|Treasure Casket]]<li> | |||
*[[#weather|Weather]] | |||
*[[#NPCs Found Here|NPCs]] | |||
*[[#Notorious Monsters Found Here|Notorious Monsters]] | |||
*[[#Regular Monsters Found Here|Regular Monsters]] | |||
*[[#Event Monsters Found Here|Event Monsters]] | |||
| Description = This enormous expanse of dunes can be found along the Bhefhel Gulf. While a majority of the surrounding coastline is too shallow for larger sea vessels, one natural harbor does exist. Near this harbor lies the independent port town of [[Selbina]]. | | Description = This enormous expanse of dunes can be found along the Bhefhel Gulf. While a majority of the surrounding coastline is too shallow for larger sea vessels, one natural harbor does exist. Near this harbor lies the independent port town of [[Selbina]]. | ||
[[File:Valkurm-dunes-pic.jpg|300px|center]] | [[File:Valkurm-dunes-pic.jpg|300px|center]] | ||
| Connections = | | Connections = | ||
[[Konschtat Highlands]]: ({{Location Tooltip|area=Valkurm Dunes|pos=M-11}}) | *[[Konschtat Highlands]]: ({{Location Tooltip|area=Valkurm Dunes|pos=M-11}}) | ||
*[[Gustav Tunnel]]: ({{Location Tooltip|area=Valkurm Dunes|pos=B-8}}) | |||
*[[Lufaise Meadows]]: ({{Location Tooltip|area=Valkurm Dunes|pos=I-9}}) | |||
*[[Selbina]]: ({{Location Tooltip|area=Valkurm Dunes|pos=G-9}}) | |||
*[[La Theine Plateau]]: ({{Location Tooltip|area=Valkurm Dunes|pos=L-5}}) | |||
*[[Dynamis - Valkurm]]: [[Hieroglyphics]] at ({{Location Tooltip|area=Valkurm Dunes|pos=H-7}}) | |||
<span class="abyssea"><br>[[Abyssea - Misareaux]] via [[Cavernous Maw]] at ({{Location Tooltip|area=Valkurm Dunes|pos=I-9}})</span> | <span class="abyssea"><br>[[Abyssea - Misareaux]] via [[Cavernous Maw]] at ({{Location Tooltip|area=Valkurm Dunes|pos=I-9}})</span> | ||
| Monstrosity = {{Medium}} | | Monstrosity = {{Medium}} | ||
| Line 120: | Line 123: | ||
| Requirements = None | | Requirements = None | ||
| Expansion = Original | | Expansion = Original | ||
}} | |||
===Example 2: Bastok Markets=== | |||
{{Zone/Infobox|nc | |||
| Zone = Bastok Markets | |||
| interactive map = <FFXIMap mapID=1 width=100% height=300px/> | |||
| ToC = [[#Involved in Quests/Missions|Quests/Missions]] • [[#fishing|Fishing]] • [[#NPCs Found Here|NPCs]] • [[#Area Layout|Area Layout]] | |||
| Description = The main thoroughfare of [[Bastok|The Republic of Bastok]], the markets is home to a wide number of [[:category:architecture|shops]], including the [[:category:goldsmithing|goldsmithing guild]] and the west [[Auction House]] (accessible just off of [[Firewater Circle]]). This is the center of town, and provides access to all of the other sections of Bastok. | |||
[[File:Bastok-markets-pic.jpg|left|320px]] | |||
| Connections = | |||
[[Metalworks]]: {{Tooltip-Connection-Map|map=Bastok-markets.png|size=300|blip=RedBlip|text=H-6|x=60.93|y=36.32}}, {{Tooltip-Connection-Map|map=Bastok-markets.png|blip=RedBlip|text=H-7|x=61.13|y=45.89}} | |||
<br>[[Port Bastok]]: {{Tooltip-Connection-Map|map=Bastok-markets.png|size=300|blip=RedBlip|text=G-3|x=46.48|y=20.50}} | |||
<br>[[Bastok Mines]]: {{Tooltip-Connection-Map|map=Bastok-markets.png|size=300|blip=RedBlip|text=H-13|x=51.36|y=80.07}} | |||
<br>[[South Gustaberg]]: {{Tooltip-Connection-Map|map=Bastok-markets.png|size=300|blip=RedBlip|text=D-11|x=25.78|y=69.72}} | |||
<!-- | |||
<br>[[Home Point]] #1: (F-9) | |||
<br>[[Home Point]] #2: (E-7) | |||
<br>[[Home Point]] #3: (I-6) | |||
<br>[[Home Point]] #4: (H-8) | |||
--> | |||
| Stats = None | |||
| Region = Bastok | |||
| Type = City | |||
| HELM = {{Zone Icon|fishing}} | |||
| Weather = None | |||
| Maps = {{Zone Tooltip Map|Map 1|zone=Bastok Markets}} | |||
| Map Acquisition = [[Map of the Bastok Area|Purchase]] | |||
| Restrictions = None | |||
| Requirements = None | |||
| Expansion = Final Fantasy XI | |||
| BGM = "The Republic of Bastok" | |||
}} | }} | ||
Latest revision as of 23:09, 8 April 2024
Usage
Example 1: Valkurm Dunes
Description
This enormous expanse of dunes can be found along the Bhefhel Gulf. While a majority of the surrounding coastline is too shallow for larger sea vessels, one natural harbor does exist. Near this harbor lies the independent port town of Selbina.
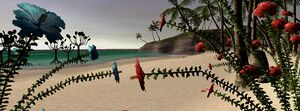

Table of Contents
Connections
- Konschtat Highlands: (M-11)
- Gustav Tunnel: (B-8)
- Lufaise Meadows: (I-9)
- Selbina: (G-9)
- La Theine Plateau: (L-5)
- Dynamis - Valkurm: Hieroglyphics at (H-7)

Abyssea - Misareaux via Cavernous Maw at (I-9)
Interactive Map
{{{interactive map}}}
Example 2: Bastok Markets
Description
The main thoroughfare of The Republic of Bastok, the markets is home to a wide number of shops, including the goldsmithing guild and the west Auction House (accessible just off of Firewater Circle). This is the center of town, and provides access to all of the other sections of Bastok.


Table of Contents
Connections

Interactive Map